Wednesday, January 27, 2010

The start of the Bargello Art quilt

Yesterday evening I had some time to work on my quilt. After having the color strips laying out for several days I narrowed it down to the color pallets that I wanted to use and an approximate size that I wanted.

My inspiration for this quilt is the beautiful colors of a summer sunset. Maybe I was just thinking it would be so nice to have a beautiful late evening summer sunset versus the normal Chicago winter evening of a fade from gray to black.

The process involved me whittling down the number of color strips to 16 (I started with 40) I played with this over a period of several days until I came up with something that I really liked. I also used a red filter to help determine color value in the fabrics.

The process up until now has been fabric and color selection as the first step. Then would be the cutting of the strips (I was able to skip this step since the fabric pack was already cut into strips).

Step 2: I played with about 20 strips, playing with color placement and final selection, this process took a couple of days. I viewed it in daylight and under artificial light and just gave it a day to sit without looking and then coming back to it.

Step 3: iron the strips and apply some spray starch to help increase the hand of the fabric.

Step 4: sew the strips together using perfect 1/4 inch seams in straight lines. I sewed them together in groups of 4, then 2 groups of 8 and then one final group. This allowed for no one piece of fabric to be overly handled.

Step 5: then to the ironing board and ironed all the seams in one direction, flipped it over and ironed from the top making sure there was no hidden pleating from the ironing.


18 colors that I played with


I took some time to play with placement of the fabrics until I found

one that I really liked.


The view through the red filter, this allows me to see the color values so I can make sure I have what I want. In this case I wanted to have a variety from light to darks.


The final 16 choices sewn together and pressed.


The next steps include checking over the seams to make sure that everything looks even and straight. The I will sew the 2 ends pieces together turning into a tube. Then I get to cut it all apart and sew it together again!
I am off to New Orleans for the next 4 days do no sewing room time for me until next week :)


Monday, January 25, 2010

Ponderings of an Art Quilt

I have been itching to make an Art Quilt and in fact that is something on my list of things to explore in 2010. I have made some in the past, just a couple, and have really enjoyed the process. I have also created several crib and lap top size quilts over the past 20 or so years. I like creating them.
I have tried a bit of traditional bed quilting and have found the process to be too 'big'. I don't have enough space to feel that I can really do it justice and I really don't feel a big calling towards it.
I come from a family of artists (traditional artists, graphic artists, stained glass artists, woodworkers, sculptresses, painters, drawers) and have always thought of myself as not being an artist. I cannot draw, I cannot paint and power tools are not my friend. However over the years I have found myself to be very creative and somewhat of an artist in my sewing room. I thought about what makes an Art Quilt and for that mater what makes something Art. I found this great example on the web:
What is a Contemporary Art
Quilt
There is a lot of discussion in the
art quilt world about what exactly an "art quilt" is and what we should call
them. The simple term "quilt" is deemed unacceptable by a large portion of the
general art quilting population because of the connotations of traditional quilt
that it carries with it. So most people prefer to add some type of disclaimer to
qualify the type of quilt they make.One of the more common terms is "art quilt".
I prefer "contemporary quilt". Some people say "fiber art" or "studio quilt" or
"textile art" or "soft painting". But the question remains - exactly WHAT is a
contemporary art quilt? Generally it refers to a quilt that was intended to be
art and hang on the wall vs. placed on a bed. Although some art quilts might
also be bed quilts.
What is Art?
As contemporary art quilts are "art"
it's good to think about what art is when trying to define them. Of course
defining art is difficult but the definition I prefer I read on Alyson
Stanfield's Art Biz Blog"What is art? . . . art is the deliberate creation of
aesthetic sensations. Art is a work of a human being, not of nature. It is not
accidental. It produces something that is perceived through the senses and
results in a personal emotional experience. . . .". . . it is the conscious,
deliberate production of an event or object of beauty (or emotional import) by a
human being, employing not only the skill of the craftsman, but in addition, an
element of creativity--original, inventive, instinctive, genius. An art object
is an aesthetic artifact, deliberately created.Art actually lies in the act of
creation, not in its result."--G. Ellis Burcaw, Introduction to Museum Work,
page 66
Maybe this yearning to wear the title of 'artist' has drawn me to the art quilt... there are no rules to follow and there are a million different jumping off points. Just look at the book section in any quilt shop or fabric store.
For example: Years ago I saw this quilt exhibition while vacationing, I think my mom was with me. It was all of these beautiful 'Bargello style' quilts. This is originally a style of needlepoint/tapestry design (I used to love needlework!) and for some reason I was drawn to it. Upon exiting the exhibition there was a book for sale on creating Bargello quilts, I bought it. I have pulled this book out many, many, many times over the years. The pages are marked and the spine lovingly creased, yet I have never created a Bargello Quilt of my own. It is a great book that talks about construction and fabric selection and gives wonderful pictures of others works. It gives you no reason to not try making one. It even has an entire section on what to do if you screw it up!
Maybe I can transform it into the ultimate quilt of the '10s
(now that just looks weird!)
Add this yearning, my intimate affair with this book that I have owned for maybe 15 years now and a Christmas gift of this great little pack of fabric strips from my hubby and I am off to explore the great wide world of Art Quilting to see what I can come up with. :)


A great selection of colors from Hoffman fabrics Batiks!
AT least I have a great palate to start with.
On a side note... like any other creative person, once I started thinking of 'Art Quilts' my brain started whirring and the more I thought about it the more ideas have started spinning around and around. Now I have more ideas than I will ever have time to try and make!
I wrote down several of the more creative ideas I had and tacked it on my cork board for future inspiration.
Now my mom has come up with a great idea that we will have to try out sometime. She is a stained glass artist and she was thinking wouldn't it be cool to have 2 pieces from the same pattern hanging. 1 made up in stained glass and the other made up as an art quilt??? The possibilities are great! We could make it into a 'challenge' of sorts.
So many ideas, so little time!

Sunday, January 24, 2010

Another birthday gift

I finished Melissa's birthday robe today. It came out very, very cute and I think it is perfect for a young lady turning 22!

The pattern I used was McCall's M5989 from the Easy/endless options line. It is for a misses robe, belt, top, nightgown, shorts and pants.

I used 'Ultra Cuddle fleece' that I picked up at JoAnn's when they where having one of the year end sales. I still have enough of this fleece left to make a matching pajama set of pants and a top. However, I am not sure that I want to!! While this fabric is a dream to cuddle with, rub your cheek against and just generally fondle... it is awful to work with. It sheds like crazy along cut edges and makes a HUGE mess everywhere. Thank goodness I have a serger, otherwise it would have taken me forever to finish every seam.

I included the picture from the pattern front of the robe. As you can see the arm and lower ruffles on the model are quite a bit more ruffled than in my version. I honestly think the super ruffle on the arm looked a bit much. So instead of doing a traditional gathering technique of running 2 lines of stitches and then gathering it up I just used the differential feed on my serger to do a slight gather and I did a rolled hem on the gathers to keep it from being too bulky.

I really like this robe, it is fun and up to date and not a 'granny' robe!

Top: my version
Below: McCall's version


The fabric and the mess!!
It was everywhere... it even followed me through the house,
I had to vacuum quite a bit to get it all up!


Close up of the front


Back View

I think she is going to love it! (or at least I hope so!) Now I just hope that she doesn't decide to take a look at mom's blog to see what I have been up to. I really doubt that will happen since she is so darn busy with school right now.
But... just in case... Mel if you do happen to check this out do me a favor and act surprised anyway!! LOL!
While I was sitting at my machine I kept hearing this crinkling noise and finally I heard a tearing noise. I got up and there was Baby Blue with one paw through the sleeve pattern and the lower corner of it happily in her mouth! She heard me get up and walk around the table and she just froze, maybe she was thinking that if she did not move I would not see her eating the pattern piece??? Silly dog!

The chewed up pattern piece

My sewing room helpers :)

Wednesday, January 20, 2010

Not much getting done in the sewing room!

I have not gotten too much done in my sewing room since last post...

I spent several nights in Boston for work, then spent several days on the couch, not wanting to do much because of a nasty head cold/sinus thing which I believe started from an allergy attack in Boston...

Not really a good idea for me to sew while I am in that fog of head cold/ allergy medicine/ decongestant/ can't breath state. It was bad enough trying to ride my horse, that took it all out of me.

And now I am back on the road for work until tomorrow evening. No where too exciting... Indianapolis, IN and Dayton, OH.

What I did accomplish was cutting out a new pattern and fabric for a new project. I am making a cute robe for my DD for her birthday. Apparently she left hers at her BF's apartment... We will be in New Orleans over her birthday and are taking her on the trip as her birthday gift but... I like giving a gift that needs to be unwrapped. Presents are fun to give to the ones I love!

I have also been doing a bit of catching up on some reading, I got a couple of new sewing books to read. 2 of them I got as gifts over the holidays, David Coffin's Making Trousers and an Art quilt book about creating art quilts from photos. As well as David Coffin's shirt book that I have out from the library.

Hopefully I will be feeling fully recovered and find some time to spend in the sewing room this weekend :)

Tuesday, January 12, 2010

A quick project: Sneeze Catchers

This was a super quick, fun and easy project. and one that I was not intending on doing last night!
My goal was to straighten up my sewing room, get ready for my next project and to organize my shelf of cotton quilting fabrics. I am not a huge quilter... but I like to dabble, especially in art quilts. I have some idea drawings for several art quilts hanging on my sewing room wall and I wanted to organize my quilting fabrics by color schemes so I would be able to better locate and use my stash. Almost all of these fabrics are in 1 yard or less cuts. some 1/2 yard and even some fat quarters. Most are a yard and this is because if I like a fabric I should buy at least a yard!!
And this is the reason why I always have so much scrap fabric left over from quilting projects... I buy an entire yard for a 5 inch square piece... hmmm, I know I am not the only person that does this!
So as I was straightening up I came across the directions for a 'sneeze catcher' on a 5x7 piece of paper. It was a free handout from QuiltTricks that I picked up when I attended the Chicago sewing and quilt expo in November.
I placed on my sewing desk next to one of the machines to hang on one of my bulletin boards. And it made me think of the 2 full cases of pocket tissue packs that I have in the laundry room that I got for free last winter. I thought 'hmmmmm.... sneeze catchers and I have about 100 packs of pocket tissues downstairs...
So then I was organizing my quilt fabrics and came across these 2 remnant pieces that I must have used in a dozen projects over the years and went 'ohhhhhhhhhh, I could finally get these fabrics used up and out of here!!! I am frankly a little tired of looking at them!'
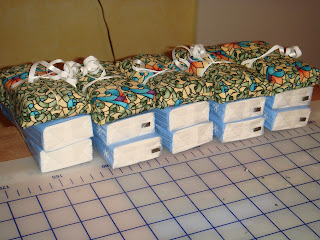
So, in the space of 30 minutes I whipped up 6 'sneeze catchers'. One for me and the other 5 for girlfriends that I will be seeing this Saturday evening.
Thanks for the handout QuiltTricks! It was a nice, easy, quick and useful project that will make my GF's smile.

Outer fabric is a stained glass look, the lining fabric is a pretty yellow print.


The ends, serged and cornered.

All stuffed!


Tied in pretty packages with extra tissues.

Now I am in Boston on a work trip for a couple days... Hope everyone has a great week!


Monday, January 11, 2010

Dad's shirt is done and shipped off!

It is still quite cold here in Chicago land. This weekend was in another deep freeze... other than trips out to the barn, I was perfectly content with staying indoors and playing in my sewing room!
My Dad's birthday shirt is done! It came out great and I can't wait until he gets it. I really want to see a picture of him in it.

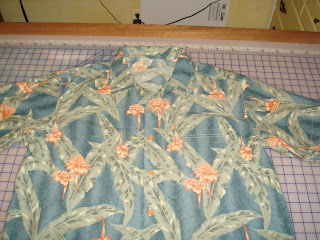
I mock flat-felled all the seams so the inside has a very clean finish. Top stitched all the details on the outside and went with the orange buttons. I did change both the direction of the buttonholes as well as the button spacing from what the pattern called for. I double and triple checked all my husbands 'Hawaiian' Shirts and they all had vertical buttonholes (change #1) and the spacing of the buttons was at either 3 3/4 inches to 4 inches apart with a minimum of 5 buttons on the shirt. That was change 2, the pattern directions called for only 4 buttons spaced 4 1/2 inches apart.

The shirt front on hanger

Flat on the cutting table


Collar detail

side vent detail
The funniest part of the entire thing was shipping it. I originally had asked my DD to wrap it up in an extra Kohl's shirt box so we could take it to the Post Office, stick it in one of those free cardboard priority mail boxes and ship it to NJ. The problem was that the shirt box was too long for any of the free priority mail boxes... so, I was just going to purchase a bigger box and then pay the shipping on top of it. Oh NO! My DD is a very frugal college senior living on her own and she saw no reason to pay all that extra money!

Make a long story short she unwrapped the shirt, carefully folded it into the smallest possible bundle, wrapped it in birthday tissue paper and a plastic grocery bag for protection and then stuck it and 2 cards into the smallest box they had! and in the process saved me $7.02.
When I started to complain about wrinkles her comeback was ironing is free and Grandma is really good with her iron!!! Too funny!

Small Flat Rate Box
Domestic Rate: $4.85
Size: 8 5/8" x 5 3/8" x 1 5/8"
Good for: Brochures , Small Electronics, Jewelry

Now to ponder my next project!! Always so many ideas to choose from :)


Wednesday, January 6, 2010

A birthday gift for my Dad

The frost on my den window
I am working on a new project. It is a birthday gift for my Dad :) I don't think that I have ever sewn him an item of clothing before. Maybe always thinking that I was not quite good enough or doubting my abilities. However, lately I seem to have majorly thrown all of those issues over my shoulder and am just enjoying myself and my creative time.

It is a short sleeve Hawaiian style shirt with vents at the side so it can be left out or tucked in. The fabric was one from my stash that I bought several years ago because I just liked it. I had just enough fabric for the shirt. Not enough to fussy cut and match all the seams but I was able to match the breast pocket quite nicely.

The pocket is on, the collar is made but not attached and the front and backs are together at the shoulders. I did not have my Dad's measurements but I know he wears a size large in RTW. After a search on patternreview.com I found that most people felt this ran true to size of RTW. So I am keeping my fingers crossed that it will fit well. It should since it is a pretty basic shirt and not a fitted shape.

Pattern: McCalls 2149

The fabric with my 2 choices of buttons...
ivory or orange???


The pocket, matched pretty nicely!


Sewing helper #1: Chloe
she is the good one, stays on the other side of the cutting table and out of the way.


Sewing helper #2: Baby Blue
Always having to lay down right under me!
75 lbs of hound dog always in my way :)

MOM... don't show Dad!!!

Saturday, January 2, 2010

Another finished project and some goals for 2010

The temperature is frightfully cold outside which left me huddling indoors to stay warm. To cold to takes the girls for a walk and waaaaaay to cold to ride Fawkes... but a perfect day to play in my sewing room :)
I just finished up another top. This is made from the same pattern as my birthday top, Simplicity 2960. I did make several changes to it. I cut a size smaller, I re-drew and cut the neckline an inch lower and used a bias binding on the neckline instead of facings, I cut the length shorter by 3 inches and made it in a short sleeve version and applied the elastic at the waist line differently. This fabric is not quite as delicate as the one I used for my birthday shirt so it was quite a bit easier and faster to work with.
It was fun to work on a spring/summer shirt while it was below zero outside... helped to keep my mind on some fun in the sun!

Front

Back

Sleeve detail
The pattern did call for a second row of ruffles sewn over the seam of the lower ruffle on the sleeve but I did not add it on, it made it look a little to 'little girly' for my tastes!

Now onto some thoughts on what I want to accomplish in my sewing room during 2010.
1. enjoy the process and what I am making/creating
2. make some handbags
3. try some 'art' quilts
4. pants, pants, and more pants
5. sew for others (as in birthday and holiday gifts)
6. a Channel style jacket
7. to not purchase any clothes (except socks and under clothes) make them all myself
8. to experiment more and try new things, new colors and new techniques.
I think those are some good goals for 2010! we shall see what I can get done.

Friday, January 1, 2010

Happy New Years to all!! And my first project of the year

Happy New Years Day to all!! May your 2010 be imaginative, fun, full of love and happiness and lots if great sewing projects :)

My 2009 ended on a good note (I am staying in the positive here and completely trying to forget that on the last day of 2009 I had a 823$ car repair bill...) Oh well, at least it is fixed for the new year!


My birthday was wonderful, spent with some of my best friends and family at an uber nice restaurant in a private room... oh la la! The food was fabulous, the company was superb and my hubby was just the star in my heart for making it happen.
New Years Eve was spent with some friends playing games, having some drinks :) and of course more wonderful food!
Melissa and I
(and yes... I could not help and put in what I call my 'fake' boobies,
it was my birthday and I was having fun!!)

My Hubby and I
I was quite tired today, even after sleeping late, and the weather here in Chicagoland has been quite frigid. Only a high of maybe 15 today. I made a couple of no sew blankets for the girls to add to their beds. I got the fabric on super sale and it only cost me 4.80$ to make the blankets. As soon as I got Blue's done she was curled up in it!! (She gets chilly with only having short hair)


Baby Blue enjoying her new fleece blanket


Chloe giving her blanket the sniff test.

It was a perfect project to do when feeling a bit hungover from 2 evenings out in a row! All I had to do was cut and tie, easy peasy and it made my girls super happy!