Friday, September 8, 2017

Sewing for Happiness- Self drafted Skirt and Top!

Sewing for happiness!

I hosted a party the first weekend of August,  a housewarming party for myself. My divorce is final and I am all moved into my own apartment in the city. Radio silence is over and I am coming to terms with my new life!
All smiles in my new outfit and in my new home!

Prior to this I had done a little bit of sewing here and there but nothing very inspired, it felt like something that I was doing because it felt safe and comforting and I needed that. I ended up spending a lot of time setting up my sewing space and feeling out my new space. You know what it's like! A new place and everything just has to find its right home. I never imagined how sweet it would feel to have my own place and to decorate how I wanted and not have to think about anyone else! It may sound a bit bit selfish... I needed some selfish time, I needed to find me and it felt liberating, freeing and just down right good!


Anyhow... as the the craziness, of any major life change causes, started to wind down I wanted to host a party and invite my friends to come and share in my happiness and to be a part of my new beginning. As I started to plan my party, I was suddenly very inspired to sew myself a new outfit. This outfit is one from my 2nd half of 2017 sewing plans! Woohoo!! I am so very good at putting together sewing plans but not always the best at following through with those plans!
This was a sketch that was included in the 'In the Sketchbook' series.
The original intent was to use the green as the under skirt.
 However, as I was constructing the skirt I changed my mind.
I am much happier with the light pink fabric as the second fabric.

Pink is a happy color for me and I really wanted to make a pink outfit that picks up the pink accents in my new place AND i wanted to just share my happiness through my clothes!

This is the same skirt pattern that I used for the yellow and black print skirt in 2016.
A great master pattern that I developed with guidance from Sarah Veblen.
The skirt is my own self drafted flippy A-line skirt. This is my third iteration of this skirt and I really like how this fits. This time I made it as a double layer skirt with the over layer being 2 inches shorter than the under layer. The light pink shirting under layer is a shirting remnant from Fabrics and Fabrics in NYC. The dark pink overlay is a beautiful linen remnant from my fabric collection. I used a lapped zipper application from Janet Pray method and it came out beautifully. I made one big oops on this skirt... I have 2 copies of the pattern, one for stretch wovens and one for non-stretch wovens and I accidentally used the wrong one which resulted in it being too small! UGH... I had to pick out the seams on both skirts and re sew them with a smaller seam allowance. I'm worried that this may have affected the integrity if the linen and am concerned I may have weakened the fabric at the seams. I guess only time will tel!  
Top left, right and bottom right: Lapped zipper application
Bottom left hand stitched hems on both layers. 


The top is a self drafted top with a back invisible zipper. The fabric was a remnant left from my Corner dress that I made last year. I like it that I was able to get an entire new outfit from remnants!
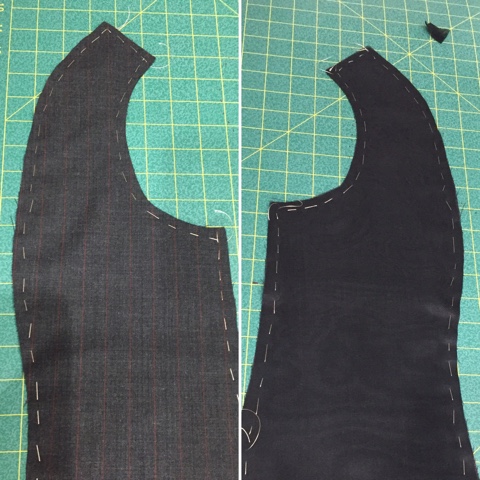
I drafted this from my master princess line button up bodice. I went with a wide U neckline and a partial collar. Some books call this a portrait neckline, although that may be a full collar and I have a split collar.  For the bodice hem I made a shaped hem, longer in the back, higher on the sides and then back down in the front. Back is lower than the front.

The sleeves have a detail that I have had on my mind for quite a while. I wanted to use a turn back wing detail with a facing in the dark pink linen. To get this detail to show as I wanted I used a trick from Sarah Veblen and first played with this in paper! I realized that when I kept the seam straight and just folded back the corners the fold back part, or the wing, was too small. I wanted something slightly more pronounced. I started by drawing on the pattern the size of the wing that I wanted. I then taped some paper onto the edge of the pattern and folded this back over the drawing and then traced it, unfolded the paper and cut along those lines. Once I got the wing size and shape to where I wanted it I then added seam allowances. With the facing made and the wing turned back I then went to my button collection and found light pink fabric buttons, in the perfect shade!, to sew to the seam line between the wings. This carried over the 2 shades of pink to the sleeve detail.


Left: Sleeve detail, top Right: double collar
Bottom Right: serge finished seam allowances.

Once the bodice and sleeves were done I put the garment on my Dottie and went to work drafting a collar.  The collar was drafted from muslin and basted onto the bodice to determine the size and shape. I first drafted the bottom collar. Once I had that I went on to the top collar. I actually cut a single layer for each out of scraps of the fashion fabric to get a good look. I left this overnight, made some final tweaks, developed patterns for both sets of collars and voila!!

Everything went together like a dream except for the back collar at the top of the invisible zipper. Just too many layers! 6 layers of fabric, 3 layers of interfacing and the zipper. Long story short... I ended up flattening it with a hammer 😳. Still a bit bulky but of course always more noticeable to the maker than anyone else!
I really like the hem shape of the top! it is very pleasing to my eye!

I think the final outfit was quite close to the original design except for the change of the under layer of the skirt fabric. 

Happy Sewing!!
So very happy to have the support of my girls!!

Monday, September 4, 2017

Some days you just need to sew!

With my blogging hiatus and my back up of posts things may be a little all over the place! kind of like life can be...

I moved back in May and have a place of my own and a wonderful new place to sew... Yes, I will do a proper introduction of my sewing space soon! Once, I was all settled in, I just felt like I just needed to sew. You know that feeling, the act of preparing fabric, planning the details, cutting it out and construction. By the time construction starts the process is almost completed! It just feels good to have your hands on something and before you know it... a new dress or two!


I went to a good old standby for this project, I didn't want to really think about too much. I pulled out a couple of knits and decided I could use a couple more wrap dresses. They are so dang versatile! They are great to wear while traveling, they take up such a small amount of space in the suitcase and you still look put together and smartly dressed.

2 new Appletons and one new topper, Marcy Tilton Vogue 8975. I almost never just sew up a pattern from the envelope. I almost always go back to my master pattern and re-draft for the design therefore insuring a great fit for my body. This was a total exception! It is such a weird pattern and there was not an easy way to look at it and ascertain how the puzzle of pattern pieces fit together. So I took my measurements and went for the corresponding pattern size and hoped for the best! One of these crazy toppers are enough for my wardrobe.


See what I mean...
that line drawing doesn't make any sense and the construction order is crazy.
Part of the side panels is attached to the sleeve and things just are weird...
Somehow it all works out!
One Appleton was done for summer, with short sleeves and a slimmer silhouette. The knit is also a lighter weight so feels great to wear in the heat. The accompanying topper makes it equally as comfortable in the summer indoor air conditioning. The Fabric for both the dress and the topper came from Fabrications in western Michigan. A lovely shop run by an even lovelier couple!
Bad hotel room selfies in the mirror!
This one shows the colors much better!

The second Appleton is the first of my fall sewing and has several modifications to it
1- I added a center back seam and took out a closed wedge. I did this because this is a beefier knit and I did not want the fabric to blouse out or bunch up. I wanted a smooth line from nape of my neck to the base of my spine.
2- I added width to the skirt to make it more full. This gives it a bit of a fit and flare look.
3- Addition of in-seam pockets. I love having pockets and miss them when I don't. So, I finally got my butt in order and added a set of pockets.
4- I added a ruffle or more accurately 'easy pleated trim' This was inspired from a Mary Ray day long seminar I took back in January. The technique she used was on a woven and I think cut on the bias. For mine I just cut 1 1/4 inch wide strips on the grain. I did a practice run to make sure I liked the technique and to see if I could easily do it. Heck yeah! It's the easiest thing to do. I just laid the dress down and sewed while I used my fingers to tuck the fabric at fairly even intervals under the presser foot. I did this all around the front edge. I started on the underlap side just about an inch below where it wraps over (to keep from having to much fabric bunched up under the overlap) and I sewed around the band and down the center front to the hem. Pleated and attached all in one go!

This fabric was a gift to me from a special sewing friend! I'm so glad she likes what I made!!
Applied 'easy pleated trim' It really just makes the garment pop!
Added in-seam pockets.
No pictures of me in this one yet.
 I love that the print is random enough that you can't tell there is a center back seam unless you really stare at it!

Sewing up those 2 garments really got my sewjo back into high gear!!

 Happy Sewing!!
Princess V and Me!


Friday, September 1, 2017

My fancy, fancy dress!!

Now that life has settled down into it's new normal, I realize that I have a backlog of blog posts! This one dates back to the beginning of May when the Haute Couture Club of Chicago had it's annual fashion show.

Wendy and I at a charity gala in Chicago.

I had several entries for the show but this one is by far one of my favorite and one of my biggest projects successfully completed. In my last In the Sketchbook post you saw the evolution of the sketches that led up to this final design. 
The design is all mine and the pattern was totally self drafted. I started out with my bodice master pattern and my skirt master pattern and figured out how to merge them into one with a little guidance from Sarah Veblen... hah!! who am I kidding!! It was a lot of guidance and it sure was good! I learned sooooooo much from this project. 

Muslin number 1.
Very first try from merging the bodice and skirt master patterns together.
Muslin number 3, I think... There were about a total of 6 muslins. 

Close to the end of the muslin stage.
This shows the final neckline I decided to go with.
I had multiple fashion fabrics, underlinings and linings and overlays... Lots and lots of handbasting and then a lot of handsewing. Almost as much if not more than the amount in my french jacket!

The main fabric of the dress was a superfine dark grey wool with a red pinstripe with the Savile Row  of London woven in the selvedge. Each panel of the princess lined dress was underlined with black silk organza to give it an extra bit of body. The 'V' insert was done with red silk georgette and the entire dress was lined entirely in red china silk except for the godets.

Fashion fabric from Savile Row via A Fabric Place in Baltimore and
the black organza hand basted to each piece. 

The godets along the hem of the dress were designed with the sizes graduating from the skinniest in the side fronts to the widest and longest in the center back. This gave a feeling of movement and the look of a slight train. Each godet was cut out of a layer of red silk organza with laser cut black scuba hand sewn to it. each of these were basted into the godet, sewn, trimmed and then the lining was hand stitched to the edge of each godet. 

Godets. I used the actual mislin pieces for my pattern pieces. Each piece of laser cut scuba was hand stitched to the organza in 1" spaced zig-zag rows so you could not see the stitching.

The jacket was self drafted from my master jacket pattern.. I was very careful with the front neckline so that you had a peek of the red silk georgette. The front bodice and the back yoke used a red and black circular jacquard with the laser cut scuba overlaid and hand stitched on and faced with the jacquard. the sleeves and the back were cut from red silk organza and again covered with the laser cut scuba and lined in red silk organza.
Sooooo much hand stitching!!
This was such an enjoyable garment to design and create!

I wore this at the HCCC fashion show 2017, Never in My Wildest Dreams.

Kind of a weird angle shot from the student photographer at the HCCC show. 
On the runway!


I wore this outfit to a charity gala in Chicago in June. I also plan on wearing it to the Opera. So exciting to have beautiful clothes to wear!


More Catch-up blog posts on their way!
Happy Sewing!
Princess Victoria taking time to smell the flowers!