Friday, July 31, 2020

Issey Miyake Coat Vogue 1227 construction update

I have been slowly, very slowly working on my Issey Miyake Coat project, Vogue 1227.

As a reminder this is an American Sewing Guild – Chicago Chapter- Sew Chicago Neighborhood Group fashion show challenge project. Every year the Chicago Chapter does a Fashion Show in October and the chapter encourages each neighborhood group to participate in a group challenge.


In Sew Chicago we do our best to come up with a challenge idea at the beginning of the year and try to build a little bit of excitement around it for the year. This year we challenge ourselves to making a coat or jacket.  Due to the Covid19 pandemic the annual fashion show is going to be virtual and the deadline for the submissions is September 1st, a bummer for sure as we all like to get together and show off our me-made garments! It is all for the best though and I am glad that we are still moving forward with a virtual show!

September is rapidly approaching so I am going to try to finish up the coat within the next week.

The Lining is completed with the Thinsulate interlining quilted to the silk and has been hanging on the back of my sewing room door for a couple of months waiting for the rest of the coat to be constructed.


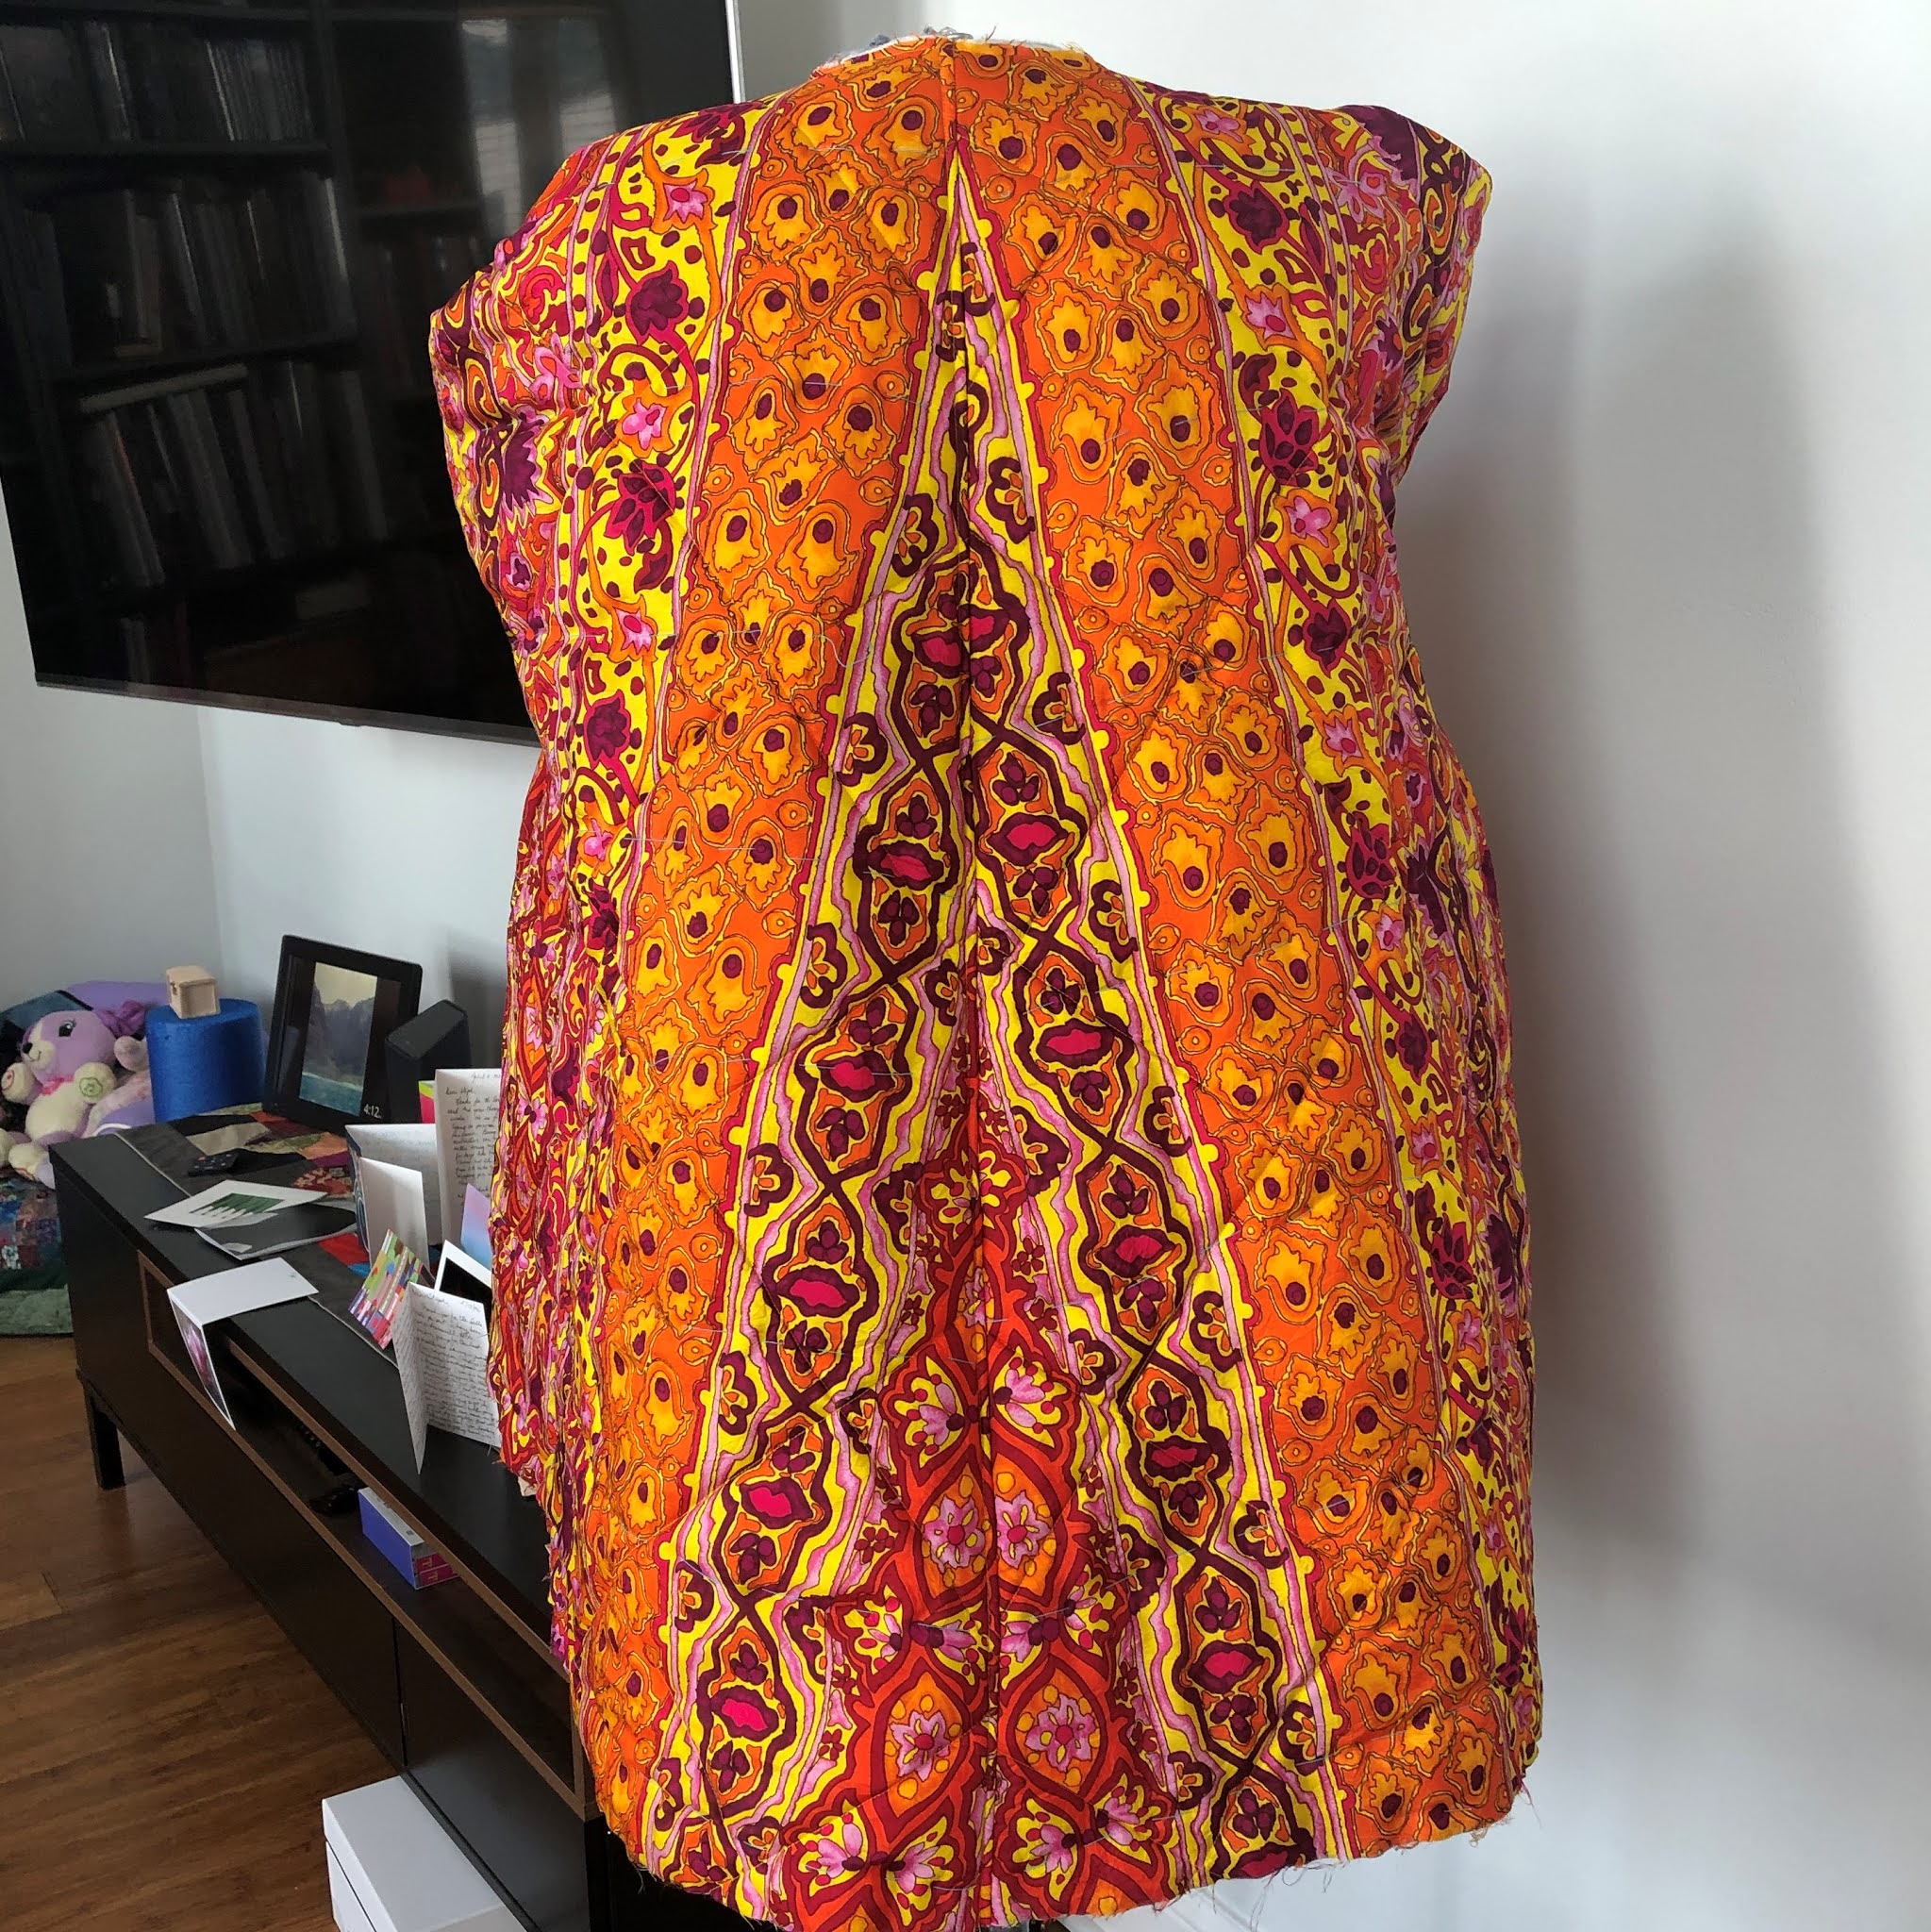
This was quite a process but fun to do! Because there are ‘stripes’ in the lining print I decided to do diamond quilting following the Thinsulate manufactures guideline for spacing of quilted lines versus just following the pre-quilted lines on the Thinsulate. I cut the silk and Thinsulate larger than the pattern pieces, with the stripes of the silk following the grainline markings and then hand basted them together with basting thread.


After the machine quilting was done, I cut the quilted pieces to the pattern size and then constructed them and trimmed back the Thinsulate from all the seams using my duck bill scissors.

I also took advantage of the color blocking on the front facing to insert a zipper and a large internal pocket. I love me some good pockets!!

Some people may be wondering why I did the lining first. Well, I like to have the lining constructed first so that once the outer garment construction is complete I can move right into the finishing work. It’s a psychological thing on my part! I also like to get as many of the small parts together before the major construction as well. In the case of this coat the pockets, flaps, collar parts, etc. It streamlines the construction for me.


I made a full test version of the welt pocket with pocket flap and full pocket bags. Partly because since this was a new process for me and I wanted to test it out with the thickness of the fabric and make sure I had the process down pat before I started. I have decided to put the pockets in before I join the color blocked sections of the front of the coat together.

After I put the sleeves and back of the coat together in sections I felt slightly underwhelmed. I really like the color blocking but I felt like it just needed a little more something. So, I decided to make a test with multiple row of top stitching for the horizontal seams to kid of highlight the color blocking.


I am super happy with it so far! To make the lines parallel and even I used the laser function on my sewing machine. The fabric was too think to use the edge-stitching foot/stitch in the ditch foot, the guiding blade kept getting caught up on the thick wool and causing the stitches to be uneven. Using the laser with the digital feed foot worked perfectly. I have only used the laser when sewing in darts so it is nice to have another use for it.


The back stay has been inserted and all hem areas has been interfaced with fusible bias cut weft with the edges cut with pinking shears. The fronts have been fully interfaced with weft fusible as well as the collar and collar stand pieces both upper and under pieces.


Once the pockets, welts and flaps are in the rest of the outer shell should be easy. I have practiced the diamond gusset in the underarm with the muslin and it will just take some time to do all the topstitching.

Then the only other part that I have not yet quite figured out is how I am going to add in the rib knit internal cuff to keep the wind from blowing up the sleeves. In Chicago winters that is really needed! I have researched some ideas and I have added some length to the lining sleeves to have the room to make it work if needed, they can always be trimmed backed if I don’t need the extra length.

There have been some other things on my sewing table that I finished this week… But will have to wait a little bit before I can blog them since one is a gift!  have also been working my way through this bunch of masks, about another 60 or so. Some are for family and friends, some for me and some are for donation.This pandemic clearly is not slowing down anytime soon and I am glad that I can help some people in a small way. I think everyone has the right to feel safe and to do their part in keeping everyone else safe as well.

Happy sewing and stay safe!!  #sewcialdistancing

This week I had the pleasure of spending an afternoon and evening with the princess and her trusty little dog!


Friday, July 24, 2020

The TLC Caftan for #caftansandcocktails2020

The Instagram Caftans and Cocktails challenge is what spurred me on to make my caftan! If you are on IG go search tags for #caftansandcocktails  and #caftansandcocktails2020  It has been so much fun to see all of the caftans, definitely something that many of us in the northern hemisphere are more willing to put on in the hot summer during a pandemic while many of us are spending lots of time at home. Why not be cool and comfortable and swan around in gorgeous delicious fabric!

Now I don’t partake in the cocktails part but I will drink a fizzy water or a nice smoothie J

Pattern:  Decades of Style – Decades Everyday – No 107 The TLC Caftan – View B

Pic 2 Pic 2a


Fit Changes: none! I decided to be a rebel and not make a muslin. I used the size chart to determine my size and just jumped in. I did think about what would happen if this ended up being a wadder, I figured that the pieces were sufficiently large that I could reuse most of them. There are no regular side seams just a side panel with front and back side panel seams. This meant that there are lots of large pieces of fabric.

Pic 3

Design Changes: None- kept the design as is. Not my normal outfit choice so I decided to keep it as is and just see how it worked out.


Fabric: Main fabric is a rayon challis that I believe I purchased from Style Maker Fabrics. It is super soft and flowy and simply delightful to wear. The coordinating fabric is the very last bit of the washed coral linen from Blackbird Fabrics that I used in my Tunic Dress. I originally wanted to make the longer version but this baby is a fabric hog!! The full length version takes 5-6 yards of 60” wide fabric I only had 3 so view B it was.

Interfacing: Fusible tricot for just the facing side of the front and back waist pieces in linen. I also used lightweight Japanese Fusi-Web from The Sewing Workshop. I used this on both the armhole facings and waist facings to fuse them done to hold them in place before topstitching. Works like a charm and you don’t have to worry about anything slipping. I particularly like this when I had to place the waist facing on the inside and then want to stitch from the front. It was either hand baste, painstakingly pin, use a glue stick (tried once but makes my needle sticky) or use fusi web.

Notions/Buttons/Zippers: For the inside ties, I used 2 pieces of elastic, the kind you use with kids clothes that has the button holes in it, sometimes called adjustable elastic. Plus 2 buttons from the button collection. The pattern calls for the use of twill tape or 4 pieces of elastic. I liked the idea of having this adjustable.

PIC 8

Seam construction and seam finishes: Seams were all sewn on my sewing machine with the seams being finished on the serger with a 3 thread overlock stitch. I did do a French seam on the shoulder seam since the pattern directions said that this seam may possibly be seen. As a note in view B you do not see this seam.  For the inside fitting/ties I used the button elastic and have the elastic attached to the back waist facing and a button on the front inside. I have been leaving one side buttoned and when I put it on or take it off I button the other side to where I want it. It is nice having it adjustable! Just know that this requires you to hold the skirt portion up to make the adjustment or take it on or off, not something that you can do while in public.

Hem Finishes: The neckline is finished with a bias binding; next time it may be interesting to do this in the coordinating color for a contrast look at the neckline. The arm slits are done with a facing that is sewn and pressed to outside and topstitched/edge stitched into place. The skirt hem is a simple turn and stitch. Or in my case I always do a stitch, turn on stitching, press, turn again and press, and stitch into place. That first line of stitching is a guide. So if you know you have a total of 1-inch hem allowance, I stitch at ½ inch. Use this as a pressing guide. Way easier and faster than trying to press and measure with ruler or a pressing template for an entire hem.

Final Thoughts: I really like this caftan dress. The length feels good and it doesn’t feel too overwhelming in the volume of fabric. The neckline actually fits great and I have no gaping at all and no other malfunctions when sitting! I have worn this dress several times out and about and it feels a bit decadent to swan around in this breezy, soft and light fabric!


Of course… a matching mask! For this mask I basted the rayon to an extra layer of muslin prior to regular construction to make it stable and make sure that I had enough of a mask to be purposeful in its use and not just decorative.


I’m currently working on some more masks. Some for a friend who has a long beard and asked for a beard pocket mask, some outdoor only exercise masks (playing with fabrics that may be a little more breathable but still want to be protective of other people while exercising outdoors, and some more basic ones to donate to those in need.

Also on the sewing table is a birthday gift, a Suki robe for me and slowly working on my coat for the ASG Chicago virtual fashion show. Needs to be done by September! Lots to do and that is really good since I really need the distraction for some time each day from the external world.


**For best picture quality please go to the blog and read**

Happy Sewing!! Stay safe!!

PS- here is the Princess and I from a visit together this past weekend!

Friday, July 17, 2020

Camp Shirt # 3 - Sleevless version!

I couldn’t stop at 2!! This time I used up some more of my lovely Liberty tana lawn and made a sleeveless version. I am always a glass half full person, so my 'silver lining' to the pandemic is that I have more time to sew. And not just to sew but to slow down and think about sewing and exploring ideas more fully. I am very lucky to still be working full time and have been fairly busy with work. However, not getting on an airplane every week has given much more leisure time. Especially since I am still being very careful with socializing. Enough on that and more on this great new shirt!!


I made no fit changes from shirt number 2

Change back pleat to gathers.

Sleeveless!!

Design changes

-     Left off the sleeves

-     Changed the back pleat to gathers

-     Color blocked the back panel

-     I added a front chest pocket. A pocket that I won’t really use but wanted to play with the option.


Single chest pocket


Fabric

-     Yellow and Pink Liberty lawn purchased front the Liberty of London store when I visited there December of 2018.

-     The bias armhole facings were made from 1 ½ inch wide bias cut strips from a white cotton batiste.


Interfacing

-     The Sewing Workshop Japanese Ultra sheer fusible.

-     I interfaced the front facings and BOTH upper and under collar pieces.

-     I did NOT use the stitch flip and fuse method. I wanted to do it the ‘regular’ way and see if the finishing on the long edge bothered me.

-     It did not… I used a 3 thread narrow overlock hem stitch and while this finish is slightly more noticeable it is still quite fine and does not show through to the front. Just another option!!


Nice shot of the inside showing the front facing going up into the clean finished shoulder and the bias armhole facing.

Buttons

-     Free buttons from an ASG Chicago event. They caught my eye with the pink outer and white inner and it echoes some of the prints in the fabric.


Construction:

-     Used narrow bias facings to finish the armholes.

-     Sewn on with a ½ SA. I start sewing near underarm seam leaving a tail sew all the way around and stop a couple inches away.

-     Remove from machine and sew the bias strip together to finish and trim.

-     Complete sewing of last few inches.

-     Press seam, turn bias under and press.

-     Edgestitch along edge of bias facing to attach. Alternatively, can attach with hand stitches.


Seams, seam finishes and hems all the same as the previous 2 shirts except for the bias facing on the armholes. See these 2 blog posts- Camp Shirt 1 and Camp Shirt 2


This shirt has the You Are Loved label in it. We can all use that reminder these days!


I am super happy with this shirt! I wore it with these RTW shorts on a 3 plus mile walk and it was so cool and comfortable!


Once again I made a matching mask :)

The rising pandemic numbers across the US are quite alarming. So I am making masks again. I recently made a batch of 62 for donation to a Black Lives Matter Food and Goods drive. Many Chicago neighborhoods are in need and I’m glad it was something I could do.

A friendly reminder from The Lyric Opera House Chicago to wear your mask!

Happy Sewing!

The Princess and I spent 4th of July together! We booked tickets to the Shedd Aquarium and as it was only the second day they were open it was very quiet. V finally touched a stingray in the outdoor Stingray touch exhibit. The smile on her face and her palpable excitement was such a joy!


We took a picnic lunch to the park and had so much fun together!