Showing posts with label shirts. Show all posts

Tuesday, June 26, 2018

Sometimes you just need instant gratification!

There really is nothing closer to instant gratification in garment sewing than sewing up some summer tees!


I love the ease and the fit of Jen Stern The Tee pattern. Yes, it has a couple more pieces than a traditional Tee shirt but the fit is amazing and it is super easy to sew assembly line style plus I can sew it all on my serger.
I have a previous blog post about all the different necklines in this post from 2016.
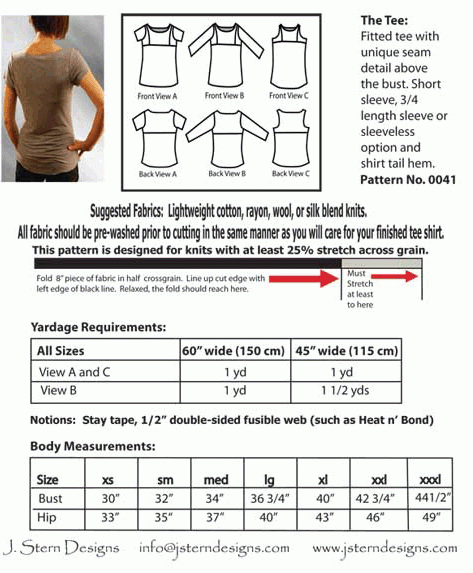


I made several variations by modifying the neckline. Some of these variations are in the Beyond the Boatneck workbook from Jen Stern and some are of my own making.

One change in construction that I now do on all of my tees from this pattern is to make the center upper front piece with a facing. I find that this gives a nicer edge and the quality of the tee holds up better in the long run. Jen does give directions for a full facing but I just like to do the very front piece and then treat is as a single piece in the rest of the construction. This means that the back neckline is a simple turn and coverstitch  or topstictch and the front has the facing.

These first 2 Tee's, the multi-color butterfly featherweight cotton and the red cotton jersey one from the last post both have the original neckline.
This has the original boatneck neckline. You can see below how the CF piece is faced and then treated as one piece.


This purple bamboo knit has a soft V neck that is very flattering and comfortable in the hot summer weather and is a perfect companion to the summery A-line stretch cotton skirt I made earlier this spring.

 Here is another variation in the multi-color butterfly featherweight cotton. This time I completely eliminated the center front piece to make a tank top! I did re-shape the side front pieces to be a more flattering fit on me. I curved them in a little bit and widened them at the top so they easily cover my bra straps.

The tank top version of the Tee. I still used a partial facing technique, this time just on the side front pieces. You can see this in the photo below.


This last Tee did take a little longer to make just because it is a lovely silk knit with a stretch lace overlay that is part of a work wardrobe collection I am in the middle of making.
The neck line on this is a drape neck that I drafted myself and have used in the past. I used only the lace for the draped neck part and self faced it to give it some weight to correctly drape. The sleeves are modified into a wing sleeve and that is single layer lace with raw edges. The lace and the silk knit were treated as one for the side fronts and upper back and at the upper front and back seams. For the lower body the lace and silk knit is kept separate so that they can swish independently.
silk knit tee with gold stretch lace overlay

Close up of the details. top photo shows the faced lace draped neck portion, bottom left shows the un-hemmed sleeve shape and the bottom right shows how both layers treated as one for the beck neckline.
The photo below shows how I kept the body portion of the lace and silk knit separate.


One of the reasons that I really love this pattern is that I was able to modify it so that the lower front is a little bit on the swingy side while keeping the shoulder and bust area fitted nicely.. This really means that I can grab this shirt and always feel comfortable even on days that my pancreas is misbehaving and causing me to have a bloated abdomen. On the bad days it can increase my measurement by almost 2 inches!

Do you have a favorite or TNT tee shirt pattern?

Happy Sewing!!

The princess turned 4 this weekend! We celebrated with a beach party :)
I cant believe my grand-baby is getting so big!


Saturday, March 27, 2010

Retro shirt from Silhouettes: Nancy Blouse

This is a pattern is one that I have been meaning to try for a while now. It is from Peggy Sagers Silhouettes line. I have attended several different classes given by her over the past couple of years at sewing expos. I like her methods and her garments.
The sizing on her garments are finished garment sizes and having known this I have bought patterns from her that resemble one or more of one of my favorite pieces of clothing already in my closet. Her instructions are clear and concise, the only negative that i have is that the pattern printing had some mistakes. The notches were not always correct and one of the darts were not printed very well, almost completely invisible.
The Fabric is a 100% cotton lawn fabric with a retro inspired print. I bought this at Mood in NYC over this past Christmas. I fell in love with it as soon as I saw it! It is perfect for a warm weather blouse.

Close up of the fabric

Fabric


Brown synthetic suede cloth for the neckline detail.


I chose a size 4 with the b-cup front


All cut out and ready to go


Reverse facing front detail.
SO far I have the front darts finished, both bust darts and vertical darts,
the shoulder seams and attached facing.


I still need to embellish the neckline facing and finish construction, this is sure to be a fun shirt to add to my wardrobe!

Thursday, March 25, 2010

Finished Shirt: SImplicity 4878

I finished the hems on my latest shirt. I used a very fine fusible straight tape on the hem of the body. I serged the edge and caught the tape in the edge of the serging. I then pressed up the hem 1 1/4 inches and did a line of stitching. I like using the tape on the hems of my knit shirts, I find that it keeps them from stretching out of shape and from getting wavy and it also gives just a tad bit more stability/weight to it.
The sleeve hems, I just serged the edge, turned up 1 inch and stitched.

Below are a couple of pictures of me modelling the shirt. Still need to work on the self portrait skills!! LOL not sure where I am looking at.,.

I took pictures at a variety of 'poses' so that I could see how the shirt looked. For the most part I am quite satisfied... As usual, it is the body underneath that I always end up critiquing!

And I did change how the collar was pressed, I had to fold in half and press when sewing it in and I did not like how that looked. To change it, I just set up my steam iron and pulled the collar apart and super steamed it so that it was nice and floppy and soft. So much better!

Please excuse the very bad hair... did not feel like doing it for the photos :)

Arms straight

arms up and still looks good

Kneeling down and no back gap between the waist of my jeans and the hem of the shirt! woohoo!
(although there is the dreaded back fat!! must do more exercises!!)


Monday, January 11, 2010

Dad's shirt is done and shipped off!

It is still quite cold here in Chicago land. This weekend was in another deep freeze... other than trips out to the barn, I was perfectly content with staying indoors and playing in my sewing room!
My Dad's birthday shirt is done! It came out great and I can't wait until he gets it. I really want to see a picture of him in it.

I mock flat-felled all the seams so the inside has a very clean finish. Top stitched all the details on the outside and went with the orange buttons. I did change both the direction of the buttonholes as well as the button spacing from what the pattern called for. I double and triple checked all my husbands 'Hawaiian' Shirts and they all had vertical buttonholes (change #1) and the spacing of the buttons was at either 3 3/4 inches to 4 inches apart with a minimum of 5 buttons on the shirt. That was change 2, the pattern directions called for only 4 buttons spaced 4 1/2 inches apart.

The shirt front on hanger

Flat on the cutting table


Collar detail

side vent detail
The funniest part of the entire thing was shipping it. I originally had asked my DD to wrap it up in an extra Kohl's shirt box so we could take it to the Post Office, stick it in one of those free cardboard priority mail boxes and ship it to NJ. The problem was that the shirt box was too long for any of the free priority mail boxes... so, I was just going to purchase a bigger box and then pay the shipping on top of it. Oh NO! My DD is a very frugal college senior living on her own and she saw no reason to pay all that extra money!

Make a long story short she unwrapped the shirt, carefully folded it into the smallest possible bundle, wrapped it in birthday tissue paper and a plastic grocery bag for protection and then stuck it and 2 cards into the smallest box they had! and in the process saved me $7.02.
When I started to complain about wrinkles her comeback was ironing is free and Grandma is really good with her iron!!! Too funny!

Small Flat Rate Box
Domestic Rate: $4.85
Size: 8 5/8" x 5 3/8" x 1 5/8"
Good for: Brochures , Small Electronics, Jewelry

Now to ponder my next project!! Always so many ideas to choose from :)


Wednesday, January 6, 2010

A birthday gift for my Dad

The frost on my den window
I am working on a new project. It is a birthday gift for my Dad :) I don't think that I have ever sewn him an item of clothing before. Maybe always thinking that I was not quite good enough or doubting my abilities. However, lately I seem to have majorly thrown all of those issues over my shoulder and am just enjoying myself and my creative time.

It is a short sleeve Hawaiian style shirt with vents at the side so it can be left out or tucked in. The fabric was one from my stash that I bought several years ago because I just liked it. I had just enough fabric for the shirt. Not enough to fussy cut and match all the seams but I was able to match the breast pocket quite nicely.

The pocket is on, the collar is made but not attached and the front and backs are together at the shoulders. I did not have my Dad's measurements but I know he wears a size large in RTW. After a search on patternreview.com I found that most people felt this ran true to size of RTW. So I am keeping my fingers crossed that it will fit well. It should since it is a pretty basic shirt and not a fitted shape.

Pattern: McCalls 2149

The fabric with my 2 choices of buttons...
ivory or orange???


The pocket, matched pretty nicely!


Sewing helper #1: Chloe
she is the good one, stays on the other side of the cutting table and out of the way.


Sewing helper #2: Baby Blue
Always having to lay down right under me!
75 lbs of hound dog always in my way :)

MOM... don't show Dad!!!

Sunday, October 18, 2009

Me in my 2 new shirts

I took both of my new shirts with me on my work trip this week. I got my hubby to take a couple picks of me in them.

The striped one I wore on the plane and it was quite comfortable. The only adjustment that I may make is to add about an inch to the length. The sheer green and blue was perfect. I wore it our to dinner with customers and received a nice compliment on it.


Me, at dinner in my new shirt... glad I had the lobster bib to keep it clean!

Sunday, October 4, 2009

2 new fall shirts

After a bittersweet week spent in NJ (bitter because my 'Babi' passed away and sweet because I spent time with my family) I needed some creative me time in the sewing room.
I was a little bad when I was with my family and went out with the girls for some retail therapy, well retail therapy and to get something for my sister to wear to the services. I broke my vow and bought 2 shirts and a pair of black pants... I know it was bad of me, but it was the first time I have gone to a clothes store in a 4 or 5 months. (except for horse riding breeches!)

Anyway... I have been trying very hard to use up my never ending stash of fabric... which just keeps on growing thanks to donations from my mom!

The first shirt is a striped knit with a little bit of 'sparkle' in it. Perfect for the current metallic trends. It has 3/4 length sleeves a fitted body and a crossover piping detail at the neckline which adds some interest.


The second shirt is made from a semi sheer fabric with some nice drape that has also been in my stash for a while. I just could not think of what to make with it with those large bands of color. No matter what I draped in horizontal or vertical I was just not pleased at all. Then I had one of those 'ah-ha' moments and cut the fabric on the bias and I really like the look of it and how it hangs. I kept the neckline, and hem finishes simple using a dark blue woolly nylon in my serger and making a rolled hem. A combination of the bias cut and semi-boat neck allowed me to leave off any neckline closures for a nick sleek and clean look. The sleeves are 3/4 length and slightly flared.
I must admit that I was not expecting this shirt to turn out as well as it did. Between the decision to cut everything on the bias along with the slippery nature of the fabric I was preparing myself to trash it if necessary. I just took my time, used lots of pins and my serger on the entire thing and it came out just fabulous!


Next on the agenda is my Halloween costume (a pink 50's poodle skirt) and then on to some mending and hemmimg, then maybe a re-fashion or two if I am inspired before back to the fabric stash! I am really wanting to try a pair of pants...