Now I don’t partake in the cocktails part but I will drink a fizzy water or a nice smoothie J
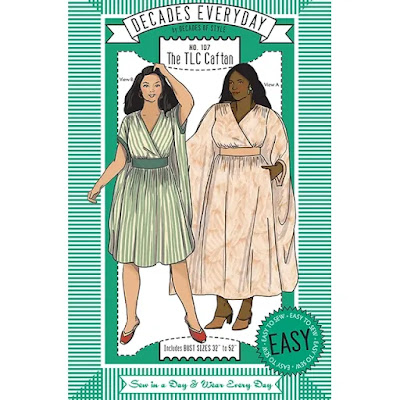
Pattern: Decades of Style – Decades Everyday – No 107 The TLC Caftan – View B
Pic 2 Pic 2a
Fit Changes: none! I decided to be a rebel and not make a muslin. I used the size chart to determine my size and just jumped in. I did think about what would happen if this ended up being a wadder, I figured that the pieces were sufficiently large that I could reuse most of them. There are no regular side seams just a side panel with front and back side panel seams. This meant that there are lots of large pieces of fabric.
Pic 3
Design Changes: None- kept the design as is. Not my normal outfit choice so I decided to keep it as is and just see how it worked out.
Fabric: Main fabric is a rayon challis that I believe I purchased from Style Maker Fabrics. It is super soft and flowy and simply delightful to wear. The coordinating fabric is the very last bit of the washed coral linen from Blackbird Fabrics that I used in my Tunic Dress. I originally wanted to make the longer version but this baby is a fabric hog!! The full length version takes 5-6 yards of 60” wide fabric I only had 3 so view B it was.
Interfacing: Fusible tricot for just the facing side of the front and back waist pieces in linen. I also used lightweight Japanese Fusi-Web from The Sewing Workshop. I used this on both the armhole facings and waist facings to fuse them done to hold them in place before topstitching. Works like a charm and you don’t have to worry about anything slipping. I particularly like this when I had to place the waist facing on the inside and then want to stitch from the front. It was either hand baste, painstakingly pin, use a glue stick (tried once but makes my needle sticky) or use fusi web.
Notions/Buttons/Zippers: For the inside ties, I used 2 pieces of elastic, the kind you use with kids clothes that has the button holes in it, sometimes called adjustable elastic. Plus 2 buttons from the button collection. The pattern calls for the use of twill tape or 4 pieces of elastic. I liked the idea of having this adjustable.
PIC 8
Seam construction and seam finishes: Seams were all sewn on my sewing machine with the seams being finished on the serger with a 3 thread overlock stitch. I did do a French seam on the shoulder seam since the pattern directions said that this seam may possibly be seen. As a note in view B you do not see this seam. For the inside fitting/ties I used the button elastic and have the elastic attached to the back waist facing and a button on the front inside. I have been leaving one side buttoned and when I put it on or take it off I button the other side to where I want it. It is nice having it adjustable! Just know that this requires you to hold the skirt portion up to make the adjustment or take it on or off, not something that you can do while in public.
Hem Finishes: The neckline is finished with a bias binding; next time it may be interesting to do this in the coordinating color for a contrast look at the neckline. The arm slits are done with a facing that is sewn and pressed to outside and topstitched/edge stitched into place. The skirt hem is a simple turn and stitch. Or in my case I always do a stitch, turn on stitching, press, turn again and press, and stitch into place. That first line of stitching is a guide. So if you know you have a total of 1-inch hem allowance, I stitch at ½ inch. Use this as a pressing guide. Way easier and faster than trying to press and measure with ruler or a pressing template for an entire hem.
Final Thoughts: I really like this caftan dress. The length feels good and it doesn’t feel too overwhelming in the volume of fabric. The neckline actually fits great and I have no gaping at all and no other malfunctions when sitting! I have worn this dress several times out and about and it feels a bit decadent to swan around in this breezy, soft and light fabric!
Of course… a matching mask! For this mask I basted the rayon to an extra layer of muslin prior to regular construction to make it stable and make sure that I had enough of a mask to be purposeful in its use and not just decorative.
I’m currently working on some more masks. Some for a friend who has a long beard and asked for a beard pocket mask, some outdoor only exercise masks (playing with fabrics that may be a little more breathable but still want to be protective of other people while exercising outdoors, and some more basic ones to donate to those in need.
Also on the
sewing table is a birthday gift, a Suki robe for me and slowly working on my
coat for the ASG Chicago virtual fashion show. Needs to be done by September!
Lots to do and that is really good since I really need the distraction for some
time each day from the external world.
**For best picture quality please go to the blog and read**
Happy Sewing!! Stay safe!!
PS- here is the Princess and I from a visit together this past weekend!


Thanks for such a comprehensive review - the caftan looks lovely on you, and I really appreciate the tip about the adjustable elastic!
ReplyDeleteThank you!! I have been really happy with the adjustable elastic! It is working out perfectly.
Delete