
As a reminder here is the dress we are talking about with 4 inset corners to be sewn.There are actually quite a few additional corners in the dress but some are faced corners at the neckline and the others are built in during construction.


Here is a close up look at the inset corners

On the pink floral dress two of these inset corners had to be sewn in a single long seam. In the photo below you can see, on the left , the 'T' shape portion of the dress and in the upper right the portion of the skirt that needs to be sewn to it in order to complete the construction. The 2 upper corners on this bottom piece are one pair of inset corners. You can see in the bottom right picture the black outline of where this seam is.


To start the process I first added a small square of fusible interfacing to the outer corner (upper right).
I then also draw in the seam lines on BOTH sides, Faint white line in upper left and pink line in the other photos. I then do some stay stitching just a smidge under 5/8ths seam allowance at a tiny sticth length to reinforce the corners. On these I used 1.6 stitch length.
Next step was to clip ALL the way to the corner on the outer corner. (this is why testing is so crucial! If you don't clip far enough there will be a bubble, if you clip to far then there will be a hole!)
The stabilizer and the stay stitching both help to keep the integrity of the corner intact.

The next step is lining up the corner to prepare for sewing. In the case of this there are fairly long seams coming up the these corners. This meant that I pinned from the corner out to make sure everything lined up properly. I put a pin in exactly at the corner, folded back the fabric to make sure it then went in exactly at the marked corner on the back piece and the pinned this in place. I also added on other pin along the seam at the notch.

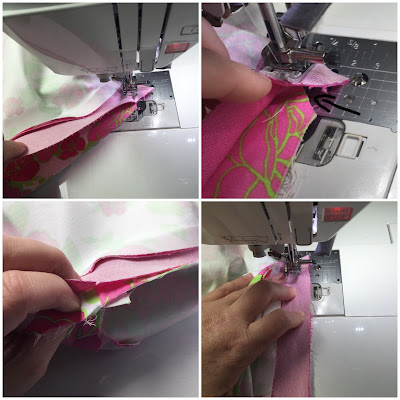
The start of the seam is normal, until you come the the corner where you have to rotate the fabric all the way around to match the next seam line! This is where accurate marking AND a good clip are most crucial!! As I approach the corner I drop my stitch length and carefully and slowly sew to the exact mark. Leaving the needle in the down position, I left the presser foot and rotate the Top fabric all the way around to match the next seam line. This in effect takes that outer corner that was clipped and opens it all the way up!

Once the fabric is rotated, you need to take a minute to line everything up correctly. I make sure everything under the preser foot is as falt as possible and that there are no bumps to sew over (this means a bubble will form) I also make sure that the notches along the seam are also lined up. In the upper right photo you can see the clip in the outer corner fully opened up on the bottom layer where the black arrow is.once everything is line up I take several tiny stitches before returning to my regular stitch length.

After sewing take to the iron and give everything a good press! You can then go back and finish off your seams with a serge finish or pinking. I have done a mix of both in this floral dress.

Happy Sewing!!
This is an excellent tutorial! Thank you.
ReplyDeleteThank you very much Daisy! Sometimes i'm not always sure if what makes sense to me will be good for anyone else!
Delete