 |
| iART Jacket and Silk Culottes and tank on the runway |
My Inspiration for this jacket came from some of my sisters art work. We have often talked about doing some sort of collaboration together, we just hadn't been able to solidify any ideas. Earlier in the year there was a Haute Couture club of Chicago meeting that was all about designing your own fabric and various fabric printing services that were available. The lightbulb in my head went off immediately! Here was something my sister and I could do together. When my sister came up for the Christmas holidays she brought with her a slew of her favorite drawings that she had done. Some were just line drawings and some had been colored in. Together we went through about 40 small drawings and I picked the ones I liked best and scanned them into my computer so that I could have them to play with. I was instantly attracted to the bright colors and knew that for this project I wanted something big, bold and bright!
 |
| Cloud series- works in progress |
 |
| Cloud Series at Installation |
After scanning and playing with the images on the computer for a while I decided to use Spoonflower to have my fabric printed. I uploaded several of my images and using their software I played with the scale and the repeat of the design. As you can see on my jacket, I really went for big and bold! I used a half drop vertical repeat, this looked most pleasing to my eye. I took a deep breath and ordered 3 yards of the linen/cotton canvas. I was so excited when it arrived!!! My
husband had this part comical, part skeptical look on his face like 'what the heck are you going to do with that??' Well, I did something fantastic with it!
The fabric was quite stiff. Stiffer than I had expected. However I washed and dried it in the dryer about 4 times and it finally softened up. On the down side it also shrank right up as well! I lost about a third of a yard in length from 3 yards. Yikes!!!
 |
| Drawings done by Jennifer Torres- Bottom left was used for designing of this fabric |
I had 2 contenders for the jacket pattern. A OOP Vogue Marcy Tilton Jacket and the Counterpoints jacket pattern by Gail Yellen of
Gail Patrice Designs. I decided, with some valuable feedback, to use the counter points jacket. I already had made both previously so I was able to put them on and see how they would affect the overall silhouette. Counterpoints was the better option for this garment.
With the limited fabric and the large scale print I really had to be careful in my pattern matching. If I use this fabric from Spoonflower again in the future I will make sure to purchase extra fabric. I think part of it was also that seeing the pattern on the screen versus in person was slightly different. Not a bad different at all, just different.
 |
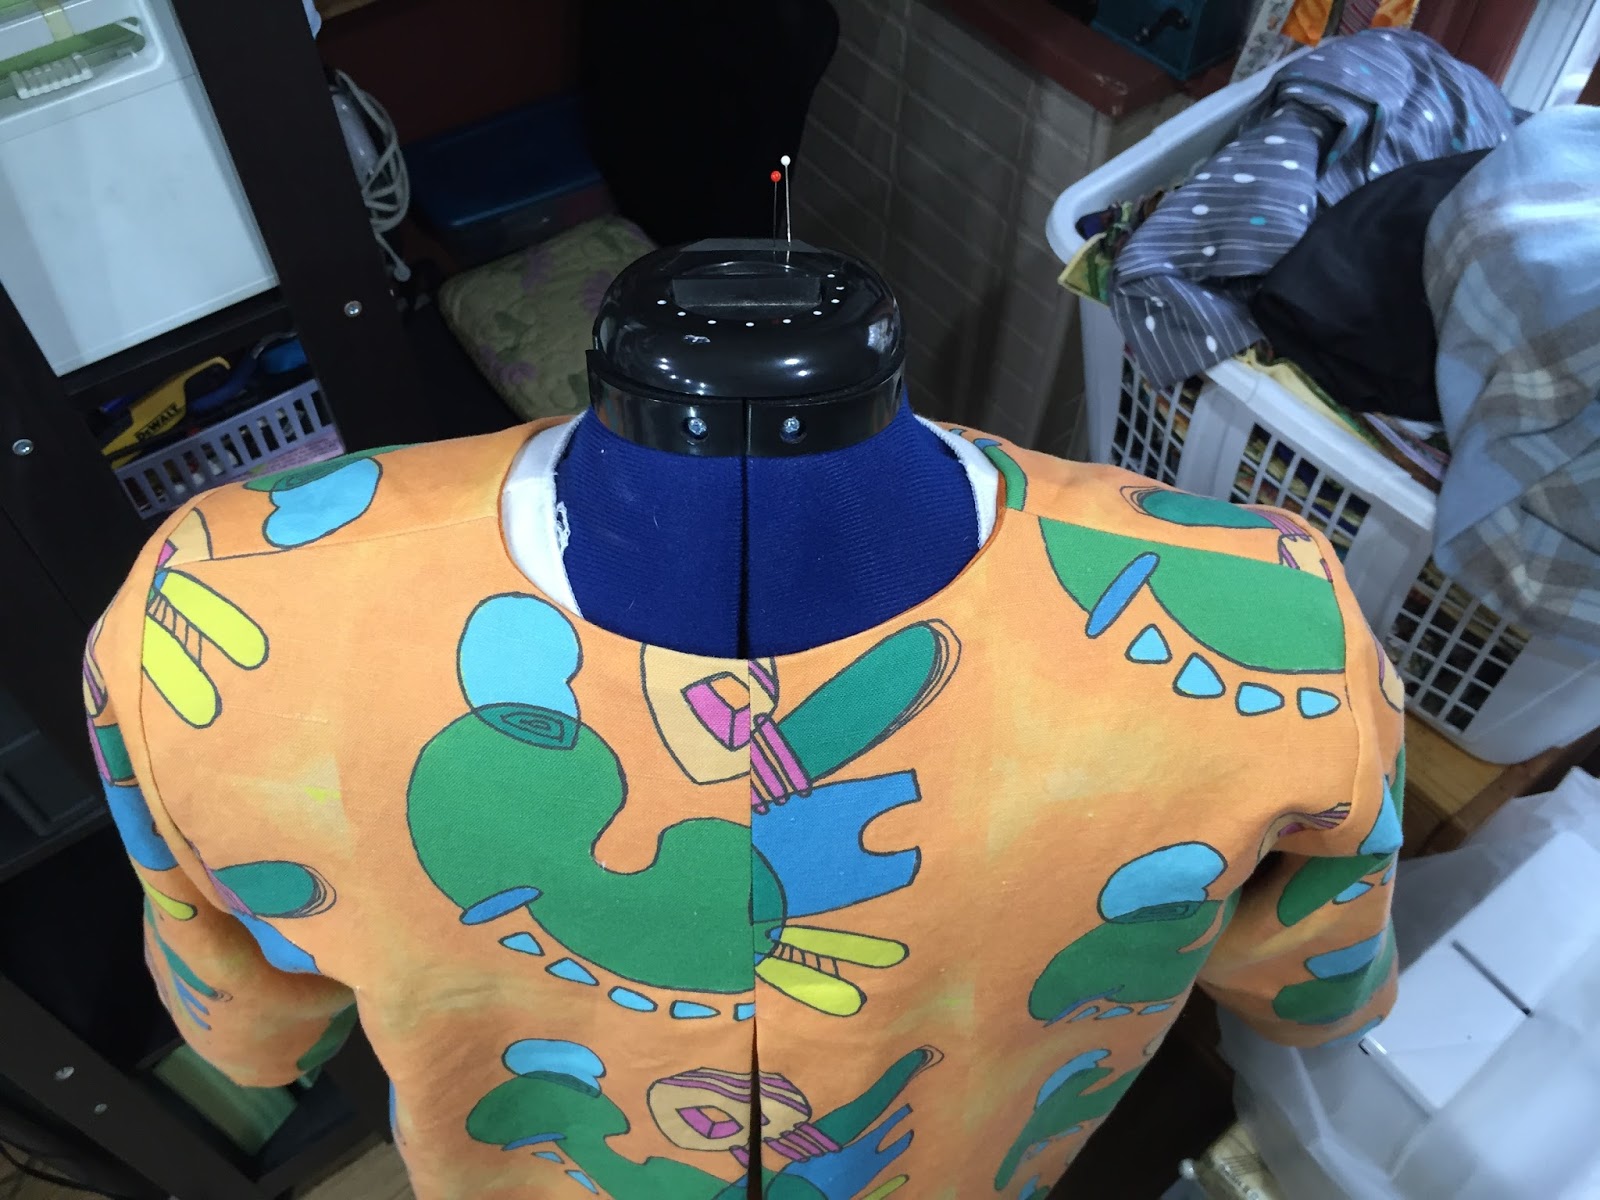
Matched pattern as carefully as possible across the front and back.
|
I very carefully matched the pattern across the front upper chest where the neckline meets as well as the center back across the pleat. I did limited matching at the side seams. This was mostly to make sure the repeats were inline with each other. I also did a lot of testing and playing with several different ideas and print placements. I knew for sure that I did not want one of those big bold prints right on a boob. I mean how bad would that look!?
I also knew that I wanted the print placed down the center of each sleeve for symmetry purposes. I am really happy with the outcome. Reminds me that it just takes a few minutes to step back and really think about the fabric and the print that you are using to come up with a pleasing and effective arrangement.
 |
decisions, decisions... long or 3/4 length sleeves?
I went with 3/4 length |
 |
in-seam pocket
|
 |
| matching print across front |
 |
| back pleat detail |
 |
| back pleat detail |
 |
| inside out! |
The lining is an orange silk lightweight twill that had been in my fabric collection for many, many years. It matched perfectly and I was happy to use it on a great project. For the inside top of the pleat I used a little piece of embroidered ribbon with dogs on it that I purchased from Soutache in Chicago. Having just lost my best furry pal ever it made me feel good to have it there.
Several changes were made to the pattern so that it would suit my vision perfectly! The first was that I rounded off the points. The print on the jacket is full of soft and undulating curves and to have these sharp front jacket points seemed out of place. I used a teacup and just drew around the base and rounded off the corners quite nicely.
The second was that I shortened and slightly narrowed the sleeves. I wanted this to be a fun, fresh spring jacket and the shorter 3/4 length sleeves fit the bill exactly.
 |
| rounded off the points |
The third change I made was to use a hidden snap for the closure. The fabric and the print is the real star of this jacket and I did not want anything to take away from it. I had auditioned several vintage buttons but in the end the snap just won out. I think it may also have to do with where this single closure falls on my body and I just don't like it. It's right exactly between my boobs. I tried moving it up but then the V was too high and lower just didn't look right either! So hidden snap it was. This darn snap took me several try's to get it in the right place correctly. The first time I somehow lined it up wrong and my matching was off about half an inch. The second time was matching perfectly BUT I sewed the damn thing on upside down so no snapping was happening! Double ugh. Third time was the charm and it lined up great.
 |
| used a hidden snap |
The last change I made was to eliminate the bias binding. I tested several out but each time I thought ugh it's just breaking up that print across my chest too much! And darn it, I worked really hard on matching that up perfectly. So I trimmed all along the lining edges a quarter of an inch and sewed the lining to the edge right sides together leaving a 4 inch opening at the side bottom. Trimming the quarter of an inch allowed for the favoring of the print fabric when turned right side out. I then slipped stitched the opening closed and slipped stitched the sleeve hems as well.
 |
| lined to edge |
Now for the rest of the outfit! I made green silk 4-ply culottes and matching Tank from silk that I also had in my fabric collection. Not quite as old as the orange silk, but still a couple years old.
I used two pants patterns, Eureka! pants that fit by
Fit for Art patterns and
Butterick 6178. For the pants I basically used the crotch, hips, waist from my my Eureka! Pants pattern and then Butterick 6178 for the legs. I would have drafted the legs myself but I happened to have this pattern in my collection so I just used it. Saved me a bit of time! These legs are really, really wide. More like a split skirt then traditional culottes. I made these up in a poly crepe first as a muslin and decided to add more width to the legs to make it more skirt like. I loved the effect it has when walking and they do feel very dreamlike when wearing. So light and airy. The lining is a lime green China silk that I ordered from Mood on sale.
I used a lapped zipper application for the center back zipper. I was planning to do an invisible zipper but just could not find a good enough color match for what I wanted. Lapped zippers in the center back of pants always make me feel more secure anyway ;-)
 |
| top and pants |
 |
| back zipper detail |
 |
| lining in a lime green china silk |
The Tank is self designed from my own master top pattern. I think this top may have originally started as Silhouette pattern many, many years ago. It has since gone through many fitting and design alterations to make it all me. This time I made a wide scoop. I started by drawing out a square neckline but rounded it off because I wanted it softer looking for this project. Same reason why I rounded the points on the jacket. Out of all three pieces this gave me the biggest trouble!! I took the time to make self faced facings but when I applied them it was just too bulky and showed right through to the right side. So ugly that I could not even take a picture! I very carefully took those out and decided instead to do a wide bias facing out of the lime green China silk with multiple rows of top stitching. Let me tell you, multiple rows of top stitching on a spongy 4-ply silk crepe is a bitch to do! Especially around curving necklines and armholes. It got done, it's not perfect but oh well! You don't even see the tank when worn with the jacket anyway!
 |
| topstitching detail on tank |
 |
| bias binding in lime green china silk |
This was my first of three garments worn at the Haute Couture Club of Chicago 2016 Fashion Show. The photographer did an excellent job in capturing how great I feel in this outfit. It makes me feel alive and happy!
 |
| garments tagged and hanging in the model staging room |
 |
| action shot on the runway! |
 |
| I love this look! |
Happy Sewing!!


You look fabulous in this outfit. Thank you for sharing your process.
ReplyDeleteThank you Wendy!
DeleteLove this--the fabrics, workmanship, and the garments themselves are indeed a work of art!
ReplyDeleteThanks you so much Robin!
DeleteI also had a lovely email comment from Gail Yellen.
ReplyDeleteCongratulations and wow! Your outfit is a perfect intersection of creativity, fun and skill. It's a perfect example of using a pattern as a "jumping off" point for inspiration and vision. You looked so confident and happy in the photos—pure joy for you and the audience. Thank you for including me in your wonderful ensemble.
Gail Patrice Yellen