Thursday, December 28, 2017

Show your Bias ensemble!

This year the Sew Chicago neighborhood group challenge for the ASG Chicago chapter annual fall luncheon and fashion show was about Showing our Bias! It was a really fun challenge and 4 of us from our Neighborhood group participated. See Sew Chicago blog post here.

For my outfit I knew I wanted something fun, semi fitted and a play off of men's clothing. I had some ideas in my head loosely based off of some previous garments. I put these on my dressform and made some sketches. Then I draped the 2 main fabrics, the yellow wool gaberdine and the grey and yellow wool super 120's plaid. Both of these fabrics were purchased at Fishman's Fabrics just down the road from me.

With the main fabrics decided upon for the skirt (grey and yellow plaid) and the vest (yellow gaberdine) I needed to soften and pull the entire look together with a top and lining for the vest. This was a hard one! I had several strong contenders from my fabric collection. Ultimately I decided to use a gift I received: a Spoonflower fabric inspired by Gustav Klimt called after Klimt woman green.

With Fabrics decided upon I set out to create my ensemble. I started with the skirt first. I used a combination of my master skirt pattern and ideas from Sandra Betzinas Sewing on the Bias Craftsy class. I watched class on one of my work trips, makes the flights go by much faster. Ultimately the only extra information that I got from the class was to use wider seam allowances. It was a good review of not expecting any 2 fabrics to behave the same on the bias and to remember to let the hem hang out for some time before hemming.

I used my straight skirt master pattern, added 1 1/2 inch seam allowances, cut them asymmetrically and used an elastic waist. This meant I did not sew in any of the waist shaping. After letting the hem hang out for a week or so I sewed on a faced hem using  black Grosgrain ribbon. I really wanted some weight to the hem so it would hang as I desired and I was able to shape the grosgrain as needed to the wide curves. I then lined it with Ambiance lining with a simple double fold hem.
To keep with my mes wear inspiration I added a yellow double welt front pocket to the skirt. Knowing that I was also going to do welt pockets on the vest, I decided to make a couple of samples to warm up my hands to the skill. Doing this may take some extra time but feeling the fabric exactly as you will be using it is an important step when I want the finished product to be as best as I can make it. You can see my process in these photos.


The vest came next and I used my darted master bodice pattern to start. This has 2 parallel bust darts that I kept, Back waist shaping fisheye darts that I used. I did ignore the front waist shaping fish eye darts for a little extra room. I cut the shoulders in a bit and matched the neckline curve to the neckline curve of the shirt I was planning to make. The yellow wool gaberdine was a bit fickle to press and mark since the gaberdine shows off every mark possible! I used tailors tacks to mark the darts and pocket placements. The welt pockets were then angled to match the angle of the parallel bust darts, with the welts made from bias strips of the skirt fabric.

 It was lined with the Spoonflower Klimt fabric and I used bias facings to finish the armholes. I added a back tab which was also cut from bias strips of the skirt fabric.

The buttons were ones that I picked up in NYC for another project... I had to use them they were perfect for this project! I was having a hard time deciding on how many buttons to use. I took photos of 5, 4 and 3 buttons pinned on to the vest and sent them to my sewing pals and consensus of 4 (which was my first choice as well) was the winner.

The shirt, out of the Spoonflower Klimt fabric, was a breeze to make! I used my master princess seam bodice. Made sure the curve of the neckline matched to the vest and changed the collar shape to have a more rounded appearance. Thee is a back zipper to accommodate entry and exit with the collar split in the back.

I wanted to make this soften the look so I lengthened the sleeves and just gathered them softly to a narrow bias binding and slit. To these I added the smallest of buttonholes and used matching buttons from the vest! It came out great and I love it! It is great in my Show Your Bias ensemble as well as being wonderful to wear on its own paired with jeans.


 This was a really fun project to design and construct. I am pleased with my ability to turn my ideas into reality. It doesn't seem to always work out so well. LOL! I guess the old adage of practice makes perfect really does work.


I hope everyone had a wonderful Holiday with your family and friends.. and the friends who are your family!
The Princess Victoria and I enjoying brunch on Christmas Eve and a very hilarious picture of her on the day after Christmas looking like a bedraggled aviator with her swim goggles on her head and enjoying the book I gave her with pictures of all the time we spent together over 2017.


Tuesday, December 12, 2017

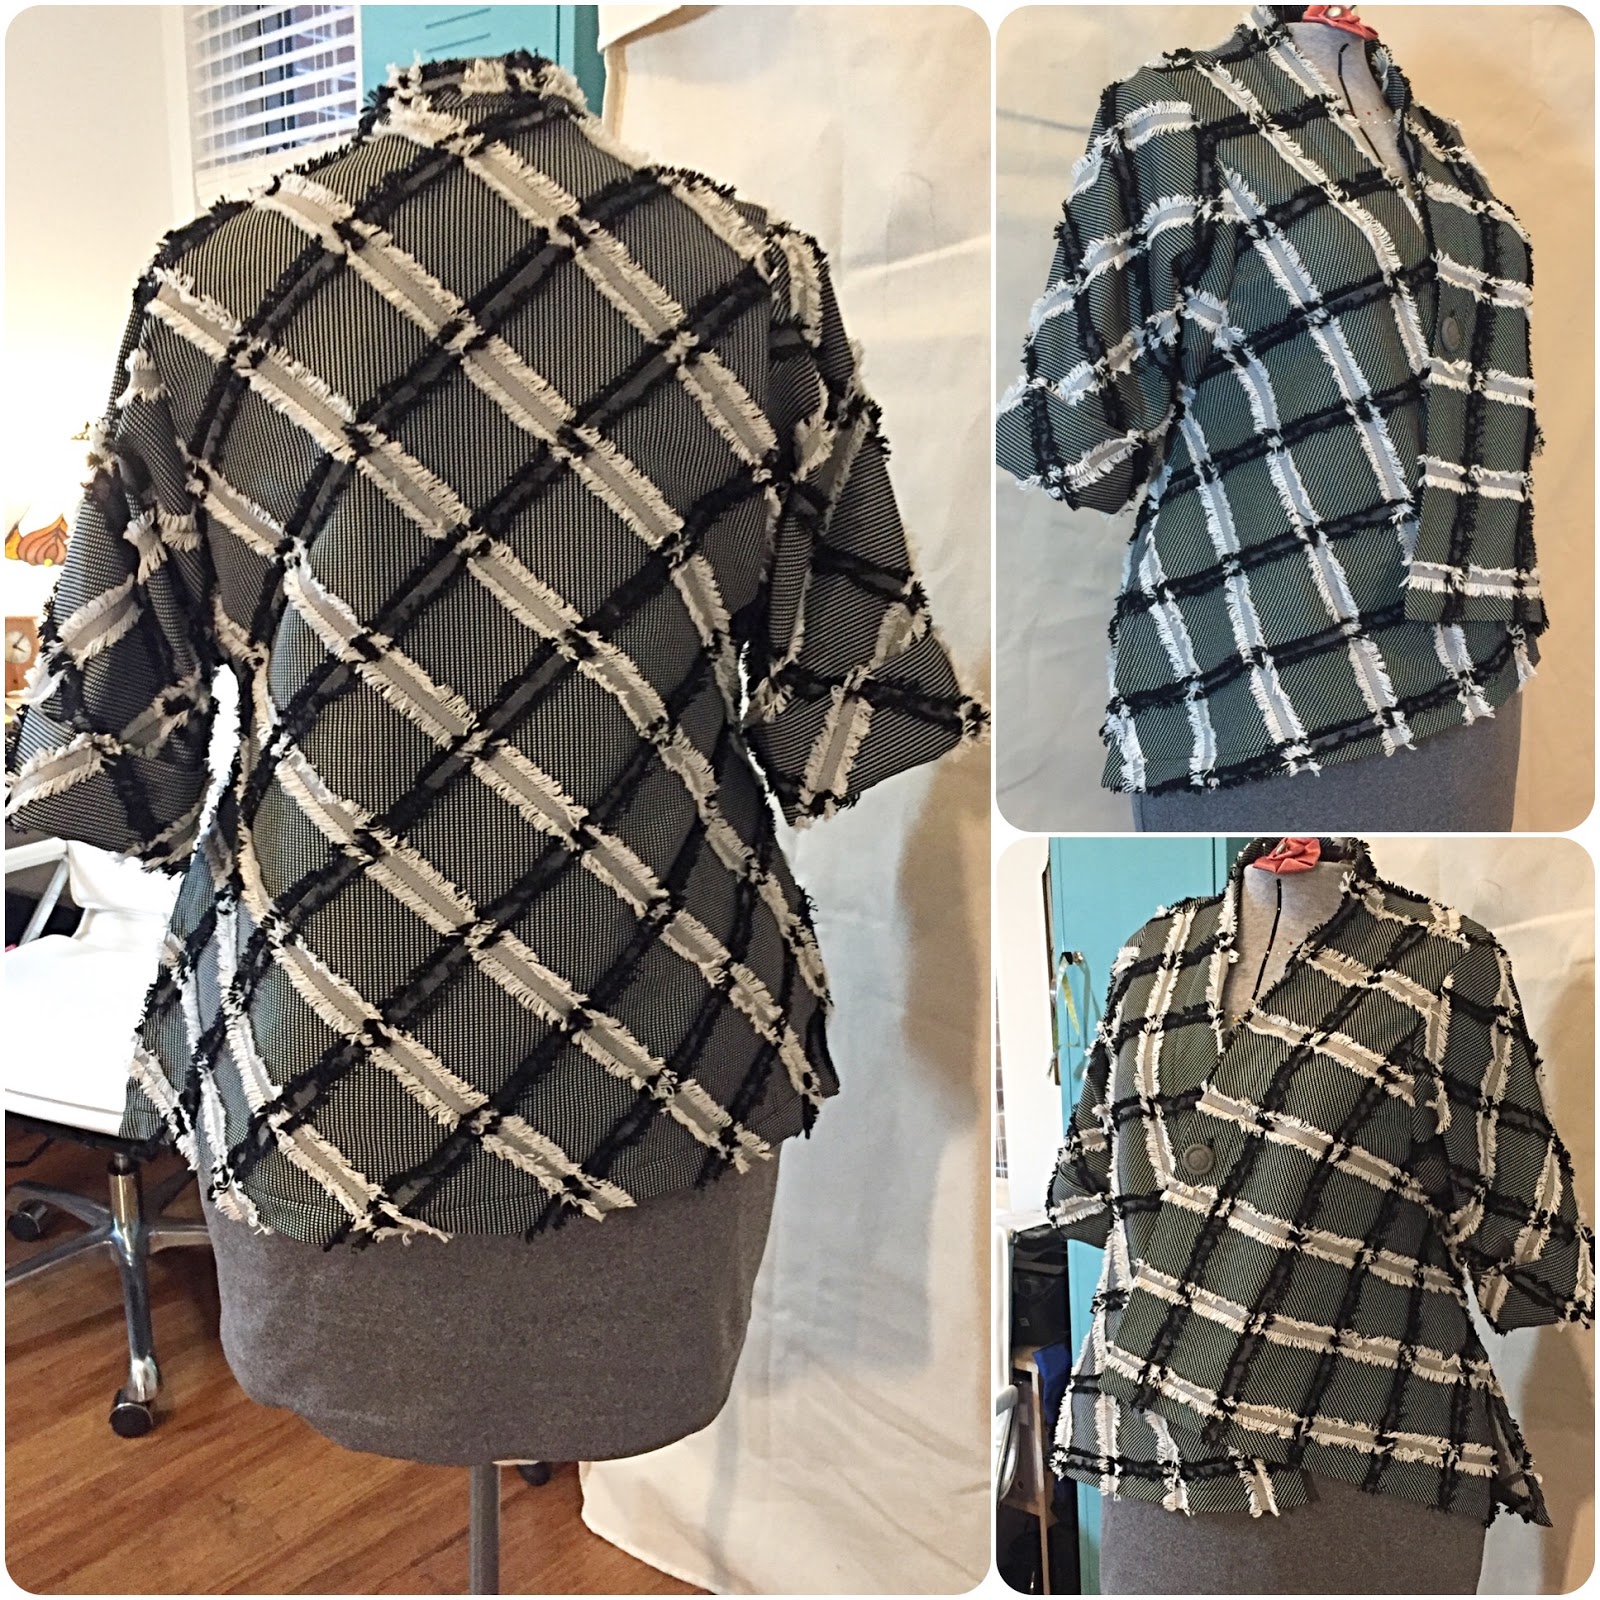
A pair of Tremont Jackets

This is a fairly easy pattern from Linda Lee and The Sewing Workshop: The Tremont Jacket.. I usually find that I need to do too many pattern modifications to get a good fit for me for this type of garment.  However, I gave this one a go for a day long class at Sewcial 2017 winter workshops in Michigan and I ended up really liking it!


I needed to make a item for the ASG Chicago Chapter sewing challenge. The theme this year was all about sewing Green. I had this fun knit from Emma OneSock that fit the bill for the color and decided to sew it up for the challenge. My original plan was to make it reversible but i really did not like the look of it! To me it just looked like one side was the right and one side was the wrong... I have seen many garments made this way and worn reversible and I honestly never like how they look. 

At the same time as this was happening, my daughter asked if I could make her one as well. Due to her stature, I had to take some length out, as well as take it in in some areas. The longest part about sewing up her version was deciding how to place the plaid design. As you can see in the photo below I alternated the direction of the black and white stripes for the front.


Here are some additional details on the version I made for me. The front band is cut on and just turned and sewn. There is a side split and all the corners are mitered, making the inside nice and tidy and eliminating bulk.
I added a little bit of shaping at the side seams just to make it fit me better. I did not overdue it, otherwise I would have needed a bust dart and then the entire silhouette would have changed. 
Here it is on me... I have since changed the button to a black one- see the very first photo.  This green one just bothered me a bit, stuck out a bit too much on this side of the fabric. I also lowered the button a little bit. For this type of garment I really dont like the button to be right smack between my boobs! And that single green button was like a beacon...LOL!

In this last photo you can see the differences between the one I am wearing and the one for my daughter. The overlap is in the other direction and it is overall an inch and a half shorter.

I am thinking of futzing with the sleeves a bit. The folded back and tacked cuff is nice but in my textured knit is feels a little bulky. I will have to wear it a couple more times and maybe pick out the stitches tacking it up and seeing if I like less bulk. and the 3/4 length sleeve versus this half length.

The Princess and I spending time together! I took her to get a Christmas dress and shoes and we a great adventure together :) However... no Santa pictures! She wont touch that with a 10 foot pole!!

I am off on Holiday to London and The Netherlands so check my Instagram feed for holiday photos! You can find me on Instagram as Siouxzeegirl. 
Happy Sewing!!


Friday, December 8, 2017

A tale of 2 tee's! Islander Easy V and Cashmerette Concord

Late this past summer I played around with 2 different tee shirt designs. I have my all time favorite tee shirt pattern, which is my highly modified Jen Stern Designs- The Tee. I love this tee I have endless variations that I can make and it fits and looks great. The only downside is that it has a bunch of pieces to it. (which is why it fits so well!)

I was and continue to be on the quest to find and fit a Tee that is a super breeze to put together and has only 3 pattern pieces; front, back and sleeves.
Modified Easy V on left and Modified Concord on the right.
This fabric is very thin and clingy.
The back of the modified V is just not good. lots of drag lines.

Enter in 2 new patterns:
1. Islanders Sewing Systems- Easy V express. This has an interesting neckline AND my main reason for using it was that we had a summer challenge (which sort of fizzled out) for the Haute Couture Club of Chicago to make the Easy V express. I'm always up for a challenge and the pattern was for sale at the HCCC June banquet. I always try to be a good group participant so I decided to play along.
Close up of the neckline of the Easy V.
Has a pleat that starts in back neckline and comes around to the front.

2. Cashmerette- Concord T-Shirt I purchased this pattern when it first came out. Mainly because I really wanted to be supportive of this Indie pattern company who designs for woman with curves! I liked the options for different lengths, sleeves and necklines.
Easy V on left Concord on right

Round 1: bad, so bad. So bad that I didn't even take pictures...
Let me start off by saying that I took my measurements and cut the corresponding size per the patterns charts and made my first mock-ups and they were both just awful. (Hence why I draft my own patterns from my master patterns.) The Easy V was way too big and boxy and the Concord strangely enough was too tight around the middle and weird across the upper chest.

Round 2: better but not perfect.
For the Easy V, I took my master knit pattern and grafted the neckline of the Easy V to it. Basically this meant it had a bust dart slightly different armhole and was narrower across the upper chest/shoulders. I basically kept the same back (due to the neckline construction) and just modified the back armhole slightly.
For the Concord, I basically just took my master sloper and used the neckline shape. SO a bust dart was added and armhole slightly changed. Plus I used my back master.

Modified Easy V on left and Modified Concord on right
Both now have a bust dart.
Round 3: hasn't happened yet! My plan was to add the 2 tees to my closet rotation and decide over time which I liked and which I dont. Then, pick one and make some final tweaks.
Somehow August has turned to December and I am now just thinking about this again. I just did not have enough interest at the time to push forward with it!

My final thoughts....

  • this knit fabric, while cute, is just too thin for my likes and would be best suited for a very loose fitting garment or underneath layering pieces. (I've had it for years in my collection and glad I have finally used it)
  • I like the scoop neck version with this fabric layered with a linen summer vest.
  • There are no perfect patterns
  • I have become a fitting snob
  • I doubt I will ever make the Easy V again. I just dont like the way the neckline looks on me.
  • I need to just go back to my master and play with necklines that I like.
  • I really like the scoop neckline that I took off the Concord.
Happy Sewing and Happy Holiday Season to All!

Celebrated my Son-in-Laws birthday with a lovely lunch
 and a performance of the Chicago Symphony Orchestra playing
 Harry Potter and the Sorcerer's Stone. What a treat!!
Can't wait until the Princess is old enough to participate :)