Showing posts with label Shirt. Show all posts

Thursday, December 28, 2017

Show your Bias ensemble!

This year the Sew Chicago neighborhood group challenge for the ASG Chicago chapter annual fall luncheon and fashion show was about Showing our Bias! It was a really fun challenge and 4 of us from our Neighborhood group participated. See Sew Chicago blog post here.

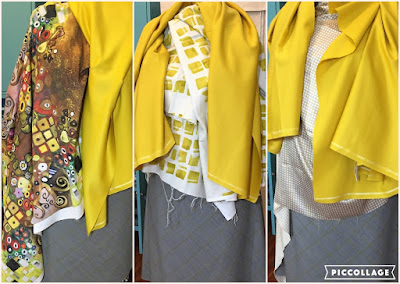
For my outfit I knew I wanted something fun, semi fitted and a play off of men's clothing. I had some ideas in my head loosely based off of some previous garments. I put these on my dressform and made some sketches. Then I draped the 2 main fabrics, the yellow wool gaberdine and the grey and yellow wool super 120's plaid. Both of these fabrics were purchased at Fishman's Fabrics just down the road from me.

With the main fabrics decided upon for the skirt (grey and yellow plaid) and the vest (yellow gaberdine) I needed to soften and pull the entire look together with a top and lining for the vest. This was a hard one! I had several strong contenders from my fabric collection. Ultimately I decided to use a gift I received: a Spoonflower fabric inspired by Gustav Klimt called after Klimt woman green.

With Fabrics decided upon I set out to create my ensemble. I started with the skirt first. I used a combination of my master skirt pattern and ideas from Sandra Betzinas Sewing on the Bias Craftsy class. I watched class on one of my work trips, makes the flights go by much faster. Ultimately the only extra information that I got from the class was to use wider seam allowances. It was a good review of not expecting any 2 fabrics to behave the same on the bias and to remember to let the hem hang out for some time before hemming.

I used my straight skirt master pattern, added 1 1/2 inch seam allowances, cut them asymmetrically and used an elastic waist. This meant I did not sew in any of the waist shaping. After letting the hem hang out for a week or so I sewed on a faced hem using  black Grosgrain ribbon. I really wanted some weight to the hem so it would hang as I desired and I was able to shape the grosgrain as needed to the wide curves. I then lined it with Ambiance lining with a simple double fold hem.
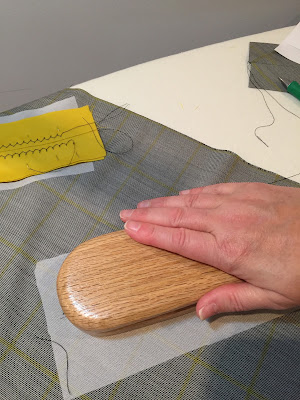
To keep with my mes wear inspiration I added a yellow double welt front pocket to the skirt. Knowing that I was also going to do welt pockets on the vest, I decided to make a couple of samples to warm up my hands to the skill. Doing this may take some extra time but feeling the fabric exactly as you will be using it is an important step when I want the finished product to be as best as I can make it. You can see my process in these photos.


The vest came next and I used my darted master bodice pattern to start. This has 2 parallel bust darts that I kept, Back waist shaping fisheye darts that I used. I did ignore the front waist shaping fish eye darts for a little extra room. I cut the shoulders in a bit and matched the neckline curve to the neckline curve of the shirt I was planning to make. The yellow wool gaberdine was a bit fickle to press and mark since the gaberdine shows off every mark possible! I used tailors tacks to mark the darts and pocket placements. The welt pockets were then angled to match the angle of the parallel bust darts, with the welts made from bias strips of the skirt fabric.

 It was lined with the Spoonflower Klimt fabric and I used bias facings to finish the armholes. I added a back tab which was also cut from bias strips of the skirt fabric.

The buttons were ones that I picked up in NYC for another project... I had to use them they were perfect for this project! I was having a hard time deciding on how many buttons to use. I took photos of 5, 4 and 3 buttons pinned on to the vest and sent them to my sewing pals and consensus of 4 (which was my first choice as well) was the winner.

The shirt, out of the Spoonflower Klimt fabric, was a breeze to make! I used my master princess seam bodice. Made sure the curve of the neckline matched to the vest and changed the collar shape to have a more rounded appearance. Thee is a back zipper to accommodate entry and exit with the collar split in the back.

I wanted to make this soften the look so I lengthened the sleeves and just gathered them softly to a narrow bias binding and slit. To these I added the smallest of buttonholes and used matching buttons from the vest! It came out great and I love it! It is great in my Show Your Bias ensemble as well as being wonderful to wear on its own paired with jeans.


 This was a really fun project to design and construct. I am pleased with my ability to turn my ideas into reality. It doesn't seem to always work out so well. LOL! I guess the old adage of practice makes perfect really does work.


I hope everyone had a wonderful Holiday with your family and friends.. and the friends who are your family!
The Princess Victoria and I enjoying brunch on Christmas Eve and a very hilarious picture of her on the day after Christmas looking like a bedraggled aviator with her swim goggles on her head and enjoying the book I gave her with pictures of all the time we spent together over 2017.


Wednesday, October 26, 2016

A Tale of Two shirts- Cynthia Guffey T2025

First off... a quick apology for the lengthy time between posts. I was sick again, in the hospital again and it just sucked all the energy from me, again.

I have been sewing, just not quite at the pace that I would like. I don't have as many pictures as I would like. Mostly due to the energy thing. However, if I wait until I'm all better we may never see another blog post! SO without further ado

You saw a peek at these two shirts in my last blog post In the Sketchbook- September 2016.
My green floral silk top with ribbon V neckline and vintage green buttons.

This shirt has history!  I first posted about this shirt back in June 2016 in this post. You can see pictures off all the pattern changes and how they compare to the original pattern. Since that post I have been in the hospital 2 more times, each for a week and each time losing more weight. I first made my first muslin of this shirt almost exactly one year ago. Crazy to think that the very first muslin I made of this shirt was done almost exactly one year ago!

This shirt has some very lovely details and I really wanted to re-create this shirt on me! The actual original pattern was drafted quite well and went together easily. Well, as easily as any Cynthia Guffey pattern. Her patterns are not for beginners, these are geared to advanced sewists who are looking for more advanced details and construction techniques. The problem with this shirt on me is that is was not drafted for my body shape. Basically Sarah and I redrafted this pattern on me to fit me. I think that every single seam  line has at some point been altered for a better fit on my body.

The real kicker here is that I'm still not happy with it. It needs a slight bit of tweaking at the back armhole and across the back. In the green floral it just pulls ever so slightly. However, it is quite evident on the orange silk twill shirt. I can feel the tightness and you can see the pull wrinkles after being worn all day. The issue is much more more pronounced on the orange version which leads me to believe that it is directly related to the the sleeve. On the orange version I have 3 layers of sleeve with  one of them being a stay of silk organza with no give.  The green floral only has 2 layers ( the outer sleeve and the facing) and it only has a slight pull and much more give.  A definite question to ask during a mentor session with Sarah Veblen.
You can see the in the top Green/floral version that the pull lines are only when I bring my arms all the way forward. In the bottom photos of the orange version you can see the bad pull lines from the bottom back armhole. Not pretty!

 It also need to be lengthened just a tad, maybe about an inch. If i were to stand and put my arms up say to reach an upper cabinet or to put a bag in an overhead bin on the airplane you would be able to see my tummy and I do not like that. So for these two shirts it is just something that I am aware of and I can always wear a bodysuit underneath and not worry about any indecent exposure! I really wanted to make a version out of a piece of liberty of London fabric that I have been saving but. However, i need to add just a tad more room to the CB in the mid-upper back for this next version along with a little more length.
Just a tad more length needed!sorry for the baggy jeans...

I also changed the neckline. Many of Cynthia Guffey's patterns have quite a modest jewel neckline that does not look good on more nor am I comfortable in. I have re-designed the neckline into 2 different versions. The orange version is very similar to the original design only the 'U' neckline was deepened by almost 2 inches. keeping the relative same shape allowed me to use the same type of collar design that Cynthia drafted for this pattern. The green floral shirt I changed to a soft V neckline. This is one of my favorite types of necklines, very flattering on my body.

Even though this shirt has taken quite a while to get done, and sometimes caused me to lose patience, I am glad that I stuck with it! It was a good learning experience.

For the green floral V neckline I choose to use a gathered ribbon for the neckline treatment. This broke up the floral expanse and gives the eye a place to rest. I am in the middle of constructing a ling green wool pencil skirt to pair with this top. It also goes quite well with a casual pair of jeans. My husband likes this shirt but thinks my floral fabric choice is a little old fashioned. pfft. I disagree.
I always like to give my necklines the bend over test! Especially if they are a garment that I am considering to wear for work!

The orange shirt was born out of the idea that I needed to make a garment for the Chicago Chapter fashion show and Luncheon fabric challenge entry. We had a small amount of the challenge fabric and I happened to have the pattern sitting out waiting to be made up again with the neckline changes.
The 8 garment entries for the ASG Chicago chapter annual luncheon and fashion show.

This was the perfect opportunity to practice the pattern again while combining several fabrics for the challenge. I started by sketching several ideas and this was the final outcome. I must say that inserting flat piping between to ruched layers was so very much not fun. I used quite a few creative words and gained valuable one on one time with my seam ripper. sigh. I decided that each piped seam only got 2 chances. After that I just made up my mind to be good with it and allow it to not be perfect. I even hand-basted those suckers and it still was off...
Final details of the orange shirt. The challenge fabric was the print and I used orange silk twill for the main pieces and blue silk for the flat piping. The buttons are vintage plastic from my button collection. I also finished the facings with a hong-kong finish using the challenge print fabric.

Anyway, I realized that I now had this nice top but literally nothing to wear with it. I mean nothing. My fabric collection had this lovely deep maroon rayon ponte that went with my color scheme perfectly. I used my straight skirt master pattern, for wovens, and went about creating a master pencil skirt for knits. At the center front and center back I placed the fold off the edge at half an inch. effectively reducing the circumference by 2 inches which was perfect for a knit. I also pegged the side seam in an inch at the hem.I basted the side seams and tried on for fit. I may have taken in the side seams about an additional 1/4 inch for a total of 3 inch reduction in circumference, This worked great for a stable knit pencil skirt. I serged all the seams and topstitched all my seams in orange to coordinate with the top.

The green shirt with the wool fabric currently being turned into a skirt.
The orange shirt with the new maroon ponte pencil skirt. pay no mind to the awkward pose and face!!

Happy Sewing!!
I leave you with the Princess blowing her nose (actually pretending too) then wading up the tissue and pulling out another. Wash, rinse and repeat until the entire box was empty! 


Monday, September 26, 2016

Perfecting my button down shirt: Simplicity 3684

I have been sewing this past week. YAY! Although it has been slow and careful going. Sometimes my brain just doesn't want to cooperate with what I want my body to do.

Actually, there are 2 projects in the works. One is a 'challenge' project for the Chicago Chapter ASG fashion show in October. The chapter decided upon a fabric and whomever wants to participate gets half a yard of that fabric to be incorporated into a design. At least 3/8 of a yard of the fabric must be used to qualify in the challenge. There are several categories and I am entering mine in the Adult Apparel category.

The fabric is a polyester chain print and I am actually having a lot of fun incorporating this fabric into a design and playing with fall colors. Here is a sneak peak!

The other project I am working on is Simplicity 3684, a traditional button down shirt.
I have made this once in the past, several years ago, as a beach shirt coverup. For that version I just simply made the largest size in a lovely white cotton from Mood and didn't even worry about the size. I wanted big, oversized and loose. I wore this shirt on several lovely vacations and it suited my needs wonderfully!

However, now I want an actual shirt that I can wear. One that is fitted and looks good and looks like I spent a ton of money on! As many of you know, my ever shrinking size has caused me to become quite adept at making muslins and making many changes to the fit.

Let me start with the changes

  • Changed the bust dart to a parallel bust dart. The intake on my bust dart is pretty good size and between the bust dart and the waist fitting dart I was getting to much pouching of fabric. Changing to a parallel bust dart. I was able to move half of the dart superior to the existing dart by 1/2 inch. this gave the fabric more space to smooth over the curve.
  • Adjusted the front and back waist darts and the side seams to skim my curves.
  • Changed the armhole to reflect my body.
  • Changed the sleeve to a 2 piece sleeve.
  • Made many, many mockups of this sleeve to fit mu upper arm.
  • Changed the number of pleats into the cuff and cuff circumference to fit my wrist.
  • Dropped the neckline and lengthened the collar stand and collar. I will NOT wear this shirt all the way buttoned up to the next and wanted a more relaxed feel the neckline area.
  • Next version I will open the neckline up even more into a gentle V and change up the collar to reflect even more of my desired style.
I was a feeling mentally challenged with this project because I don't really wear button up shirts because I have never had any that actually fit well. However, a funny thing has happened through the journey of this shirt! The more I made fitting changes to reflect my body and style changes to reflect my design, the more I am falling in love with the button down! All of a sudden I am imagining a slew of these hanging in my closet and ready to be worn with all typed of outfits. Funny how that happens when you get the fit perfected!

Original dart on left with pouch, parallel bust dart on right with beautiful fit. Actual dart intake is the same.

Top is the pattern work, left original dart and right the parallel dart.
The bottom is a close up of the bust area with the parallel dart and the waist fitting dart.

Lets talk more about that darn sleeve.... I actually wrote on my white board next to my sewing machines 'sleeves are going to kill me!!!!' well, not really! but it made me chuckle every time I glanced at it and kept me from getting to aggravated.

The first thing I did was change the sleeve to a 2 piece sleeve via the Sarah Veblen method. This allows for an outer seam where you can have enough ease in the bicep with out sacrificing the ease in the sleeve cap. If you have her book, The Complete Photo Guide to Perfect Fitting,  there are wonderful directions on doing this starting on page 172 in the discussion on Set-In Sleeves. Basically you split the sleeve in half and then walk from the underarm up the shoulder on each side and adjust the sleeve cap ease as necessary to fit properly. 
Sleeve after first draft of a 2-piece sleeve and first round of length changes. On left you can see the excess I pinned out of length. On the left can see the extra poufy at the sleeve cap. 
Final sleeve! With all of the length, width and seam shape alterations.

From that point I made a muslin. This was back in June. I wasn't very happy with the fit and worked on it then and got something closer. Then I got sick again and have since lost more weight and redistributed some weight. All of these things causing my sleeve to look, well, wonky. I was having a hard time determining if I needed to adjust the length of the sleeve or the width of the sleeve. I worked on the fitting of this sleeve in a couple of my mentorship meetings with Sarah as well as on my own quite a bit. The final determination was quite interesting. Changes were made to the length at the sleeve cap, literally raised the sleeve cap almost 5/8 inch. Changed length again in dong a closed wedge over the bicep area. Changed width by shaving off and flattening the curve of the outer seam. These all got me really close. However, I still was just not happy with it! I put it aside for a day and came back to it and decided to really look at the pattern pieces and the relationship of the seam that was offending me. It was like a darn light bulb went off in my head!! I did a little happy dance and reshaped the front sleeve seam. considerably! Cut, yet another muslin and OH Happy day!! It worked! 
The front and back sleeve pieces. The original pattern iece is underneath and I have outlined in dark red the all the tissue that has been removed for the new pieces! Quite a change on the front sleeve!

I am now ready to cut into my fashion fabric and make this up as a real shirt. I will still work on the muslin just a tad to make the final changes to the neckline and collar. For this first version they will stay as is. Who knows I may want a full button up to the high neck shirt one day and I will have the pattern pieces ready to go. 
My fashion fabric and sketch for the final garment to be worn at the ASG Chicago chapter fashion show as part of our neighborhood group challenge.

This shirt is also going to be showcased at the Chicago Chapter ASG October Fashion show as part of our Sew Chicago Neighborhood Group challenge. Several of us will walk the runway together to show off our button down shirt creations.
A meeting of the mentees! Several of us participants in Sarah Veblen's mentorship program met up for a nice ling lunch and discussion about all things sewing and of course about our wonderful experiences in the mentorship program.

Monday, June 20, 2016

The saga of the Cynthia Guffey shirt T-2025! A Work In Progress!

This shirt really is a saga, an epic journey of the many muslin kind! At one point I was really ready to give up and throw in the proverbial towel or in this case wad up the millionth muslin, throw it in the can, recycle the pattern and forget the damn thing ever existed. Except i'm darn sure that this thing would have come back to haunt me... in a stray thought, in a dream or more likely a nightmare, in a photo in a magazine when I least expected it. There would be my shirt with it's coveted shirred sleeves and beautiful style lines staring back at me and mocking me.

Well! I sure do have a great imagination! LOL! It was more like sheer determination on my part to succeed in making this shirt. I hate giving up!

I first saw this shirt made up and on display at Cynthia Guffey's booth at the Original Quilt and Sewing Expo in Chicago a couple of years ago. something about it really enamored me and I shelled out the $18 for it. (you can find her patterns on her website) I don't recommend her patterns for beginners, the directions are not always the easiest to follow. However, she has some really interesting designs and details and I have made a couple of her other patterns and have liked them and gotten many good comments on them.

I ended up making 5 muslins for this shirt! This included redrafting the entire sleeve, armhole, upper side front and upper side back to fit me perfectly. I don't have pictures of every muslin, only the ones where Sarah was helping me make changes. I think with every change that I made I was so determined to make the changes and move forward because I was darn sure each time that THIS change would be the one to make it perfect. Hah! what a lesson I learned.  I'm also pretty sure that I would not have been able to get it quite to where it needed to be without the help of my mentor, Sarah Veblen. I would have gotten about 50% there and then thrown it all in the garbage!
Muslin number 3- Feb 2016

Muslin number 5- May 2016. You can see the huge improvement in fit particularly at the back armhole and sleeve.

The great part about making so many muslins on a tricky pattern is that by the time you get to the actual construction in fashion fabric you just nail it.
Muslin fitting in front of a mirror is an invaluable tool! Thanks to Wendy for taking pictures of the process.
To get a better idea of what the shirt is supposed to look like when completed, here is a picture of the line drawing for the pattern.
Line drawing from Cynthia Guffey T-2025

Here are comparison pictures of the original pattern pieces to the final pattern pieces that I have. The white paper is the original Cynthia Guffey patterns and the tissue papers are my adjusted pattern pieces.
Sleeve back on left and sleeve front on right.
Big difference in the Side back pieces!
Big difference as well for the side front pieces. Alot more shaping over the bust was added in.
Only small changes made to the front(shown) and back pieces to account for finessing the shaping.

One of the details that really drew me to this pattern was the shirring of the sleeves. Due to the large changes of the actual sleeve pattern I was not able to use the pattern piece that was included. At first I was at a loss as to how to re-create this shirred look that I really wanted. After conferring with my mentor, Sarah, I was off and running. Of course, once she explained it I was thinking to myself that I should have known that!

Here is a muslin sample of the sleeve front with the base sleeve and the shirred oversleeve assembled. I cant wait to make this shirt!!


Here is the in-process picture of developing the shirred overlay for the sleeve. This was done with the slash and spread method.

Here are the shirred over- sleeve pattern, the base sleeve pattern  and my sample side by side.

I have several projects on my workstable at the moment! 2 dresses for my granddaughter, Princess Victoria, one for her baptism and one for her 2nd birthday party. An outfit for me to wear to the baptism, this Cynthia Guffey shirt plus another button down shirt with fitting darts. I'm hoping to have at this shirt sewn up in time for the ASG national conference in July!

Happy Sewing!
Princess Victoria enjoying her first piece of corn on the cob!

Wednesday, August 27, 2014

Vogue 1385 Sandra Betzina Top with cool neckline detail!

LAnother successful make! Last week was a good one in the sewing room :) 


As part of my fall sewing plan I wanted a true transition piece to get me from  summer into fall and this fit the bill perfectly. The fabric is a cotton/silk voile blend from Fabricmart. I bought this after I bought the red denim hoping that it would be a great match and it is dead on! I LOOOVE it when that happens!!! I wasn't to worried if it didn't because I also like wearing teal blue. The label in the fabric said to dry clean which I will do now that it is a finished product. However, I totally bucked those directions and pre-washed and dried this fabric not once, but twice before I cut it out. I'm so glad I did :) it totally softened up a bit and, like with ten red denim, I used a color catcher in the wash to gage the amount of bleeding. There was some general color discharge but nowhere on the fabric did the colors bleed together, whew!!! I took a chance! 

The pattern is vogue 1385, a Sandra Betzina design. I made the shorter view. I think with my hips and tush the longer view could end up looking tent like unless I employed a belt with it. In fact I think the illustration of the longer view looks a bit blah and dowdy. Am I wrong? I do also think it is interesting that the neckline or rather the height of the neckline on the photograph on the pattern does not look as high as my finished shirt. I'm going with the fact that this model has an enviously long and graceful neck whereas mine is not so! On me the height comes closer to my lower jaw which I really like! Maybe the model is just lehgthenig! Hah!!


I will really have to dry clean this shirt because I used silk organza as an interfacing for the front edges and the neckline. I needed something nice and crisp yet not stiff to 1. Hold up that beautiful detail and 2. Not show through on this voile. If I was it now all the goodness of that silk organza will wash away and I will have a limp mess. I don't want that!

Above: the silk organza hand basted to the neckline facing.
Below: the power of silk organza! holding this voile up without being  'stiff'!


This is a fairly easy pattern to construct you just have to PAY ATTENTION, take your time and use lots of tailor tacks!! This top did take a lot of time, why may you ask?
Well....
1. Cut out fronts as a single layer to be able to match the print down the front.
2. I hand basted the silk organza interfacings to the facings. 
3. I thread traced all the tucks/darts in the both front pieces, top of the sleeve/shoulder pieces, both sleeve hems, and then all the corresponding lines into the facings. (This was after trying to mark them with a tracing wheel with no luck!)
4. Tailor tacked every circle and square and  triangle marking. 
5. Every seam, except for the facing seams at Front edge and neckline, were done with french seams. Looks beautiful and a nice strong seam for a lighter weight fabric BUT... Double the work!
So as you can see time consuming but I really just slowed down  and enjoyed the process, it was very fulfilling. 


I even contemplated binding the facing edges but the serger just one out on this one! I just did a three thread overlock edge making sure it was a nice balanced stitch. Came out nice!

The sizing of this shirt is not such an issue because it is a looser fitting design but next time I do think that I will cut one size smaller for everywhere but the hips to just give it a slightly sleeker silhouette. Due to my large booty, hehehe, I had to move the back fisheye darts up 5 inches! I probably also could have shortened those darts a half inch or so just to have room for a nice drape down my back and over my tush. If I had not made that change the back just gets stuck on my butt, bunches up and then the upper back looks too big because it can't hang nice. This is one reason why I LOATHE ready to where shirts. Those darn darts are never in the right place for my body :)

Back to my fabric decision, you may think a voile for fall? Well, I did actually say transition piece ;) cool enough for a warm fall day but coverage for cooler evenings or indoor air condition. It remains to be seen if this piece will make into the true Chicago winter wardrobe. Although with the looser fit I could layer a wool knit camisole under it for warmth.... Hmmmm, good idea!

I had NO problem with the buttonholes on this baby! That silk organza provided the nicest hand to the voile and just enough umph to sew out 6 perfect buttonholes with embroidery thread... AND can you believe those PERFECT covered buttons!!! Those were in my stash of a gazillion thrifted and antique buttons. I never dreamed they would get used on a garment! They were made for this shirt!

Again, I had no photographer and nasty weather so all my photos are on the dress form. I'll post some of the shirt and the red jeans together soon! Although, when I tried this on for my hubby to get his reaction he really liked it and complimented the neckline immediately. I must I was a little surprised, in a good way of course! He is a little bit more conservative in thinking what looks good on me. Whereas I am, let's say, a bit more adventurous!! :)


I really, really LOVE the details of this shirt with the beautiful and unique neckline and the sleeve detail. I feel like I could have played with the depth of the sleeve darts a little more to make the sleeve hem detail even more pronounced. 
The red denim jeans really go nicely with this shirt! they even go great with regular jeans or a pair of slacks. 

I have a 9 day work trip out to San Francisco coming up in a couple of weeks and am hoping to get a couple more pieces made. This outfit will be a great addition to the travel wardrobe.

Next up on my work table, a self drafted textured black knit skirt. This photo has been lightened so you can see the texture detail.

And if I'm lucky a Jacket as well out of this printed linen. The black on the linen and the black of the knit above match perfectly! 

Happy Sewing!

Hehe, had to share! My Grandaughter has found her tongue!