Showing posts with label tops. Show all posts

Saturday, January 5, 2019

Kicking off 2019 with 3 Knit Tops!

To kick off the new year, and my birthday, I decided to do a couple quick projects.
AND in an effort to remedy my lack of blogging in 2018 I am attempting to share more and not worry about being a perfectionist.

All 3 are knit tops and well needed additions to my winter wardrobe.The first of the three is the yellow long sleeve tee. The knit is a cotton knit from EmmaOneSock. It is a nice beefy knit that holds the shape of the fun sleeves quite well. I technically finished this on December 29th to wear for my birthday :) 


On my birthday dinner I paired this relatively simple top with a silk scarf and my wool cashmere skirt. It was quite a fun and happy outfit. The only drawback to those sleeves is that you need to take care when eating to not get them in your plate!


The second long sleeve tee is this red and purple one. Both of the fabrics were leftovers from previous projects. It is the same pattern as the yellow one with a couple small tweaks to the back armsyce and back shoulder. These small tweaks have made for a better fit and less excess fabric. The red is a rayon knit and the purple is a bamboo knit, both so very soft and comfy!

The last of the new tops is a modified Stella from Linda Lee. I have had this in my pattern rotation for many years. The one I currently have in my closet is starting to show some wear so I used a sweater knit from Marcy Tilton to make a new one. This top is a bit oversized with drop shoulders and a comfy V insert in the front that is cut on the bias. 


What’s on my sewing table now? A trio of nice ponte and double knits to try making an outfit from. I have some ideas about making a knit jacket but possibly using my regular jacket pattern since it is a very stable knit. The brain is working away on some fun ideas!

Happy Sewing!
PS- using a new blog app on my iPad to try to make my life easier! Hopefully this goes well.

One of my favorite pics from over the holidays! My sister came and spent the week, it was wonderful :)


Friday, August 10, 2018

Designing off a base blouse pattern- changing necklines, sleeves and more

I found myself in need of some blouses. As I work through my never ending quest of defining and nailing down my style I see the gaps in my wardrobe. I try to keep track of the items I no longer wear and try to figure out why. Answering this question helps determine if it is that I don’t like the fit, the color, the fabric or if it is just something that has become old, tired and worn out. I also try to jot down the times when I look in my closet and say ‘I wish I had XXX!’

90% of my wardrobe is handmade and I have no problem with the idea of sending garments to the resale shops if they are in good condition or to the recyclers if they are worn out. It wasn’t always that way, I used to keep everything I made just because I had made it! I know only do that for special garments. Like fancy dresses or French style jackets, as long as I love them.

I really found a lack of blouses for the summer. Tops that could be used for business casual meetings or evenings out with friends or just some nicer summer tops. I worked off of a princess seam pullover blouse that I really like. Originally, I had designed this top with a back neck zipper but have found that I really don’t need it for most blouses. In cases where I think I need a little extra room I have been using a small opening in back with a button and loop closure.

In these 5 tops I have played with 4 different necklines and one with a fun collar, 2 sleeves and different types of sleeve finishes. All of them use a neckline facing and a baby hem for the body.  The short sleeves are finished 3 ways. 2 are finished with a baby hem, 1 is completely faced and one has a 2-inch hem with a side split. The last shirt is long chiffon sleeves with a cuff. I also played with the fullness of the top around the waist. 3 of them have a fuller body and the last 2 have a slimmer fit.

The necklines are a simple scoop, 2 have square necklines. One is a soft V with a collar and the last is higher and what I call ‘the Stephanie Boat neck’ it is as high and as wide as I can do or rather as I like! After all, isn’t the ability to sew all about making things that I like and that I want to wear!

The first shirt is very simple. A scoop neck, princess seams with a small back opening with a button and loop, short sleeves and all hems done as a baby machine sewn hem. This fabric is a bit of a throwback to the 1980’s. It is a rayon challis that I got from our ASG chapter neighborhood group leaders meeting this spring.


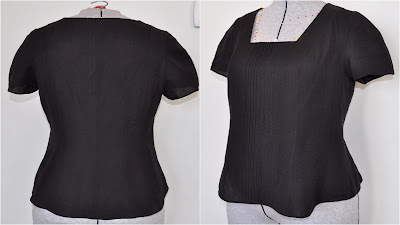
Shirt number 2 is a square neck with no extra opening. The sleeves and hem are machine sewn baby hems. The front of the blouse is embellished with pin tucks. The fabric is a silk/cotton voile. This is proving to be a favorite already!
In the photo on the right you can see the pin tucks. Always hard to see details on black fabric.


Number 3 is also a square neck without a back opening. The sleeves are completely faced and as you can see, I added a ribbon embellishment. The fabric is a wonderful Nano Iro triple gauze. The colors in it are amazing. However, the overall look of the fabric is lighter and the ribbon embellishment really helps to provide definition between my skin and the garment as well as provide a resting place for the eye. The sleeve facing a neck facing are from a soft pink cotton/silk voile.  (I know, I know... lots of voiles! They have been accumulating in my fabric collection and are finally being used!)


Number 4 is a blouse that I made for a refresh of my work wardrobe. It has a higher neckline, my version of a boat neck with a back opening with loop and button, a slimmer silhouette around the waist and a mixture of fabrics. The front of the blouse and the cuffs are from a hammered silk charmeuse, the back and the sleeves are from a matching silk chiffon. The back pieces are completely underlined with a rust colored silk/cotton voile to give strength to the seams and provide coverage. The sleeves are longer than usual so that they have a bit of pooling at the wrist. I only had 2 small pieces of the matching silk, less than a yard each and I had been wracking my brain with what to do with them, this was a great use! I even managed to mostly match the like colored wavy plaid. The front and across to the sleeves came out great. The back is a little off. However, seeing as I had just tiny pieces of scraps leftover I am quite happy with the result.


Number 5. This one was also a bit of an experiment. I had this remnant piece of cotton lawn leftover from a project maybe 10 years ago. It was time to use it up and get it out of my collection! This has a soft V neck, a split rolled collar and a loop and button closure at the back neck. The sleeves are finished with a split hemline and a 2-inch hem. The hem of the body was done with a machine baby hem. The silhouette of this top is a bit slimmer then the above shirt sleeve blouses. Between the print, the split collar and the split sleeve hem this shirt has a funky retro vibe that just makes me smile! The details on this one can be hard to see due to the print.


Sorry no real photos of me wearing any of these,except for the 2 mirror selfies as I was planning my wardrobe for a trade-show convention! My work schedule has been brutal and I am racking up the airline and hotel points big time this summer! Writing this from 30,000 feet! The times I have been home have been spent with family and friends and squeezing in some sewing and relaxing time for me. Doesn’t leave much time to set up the tripod and take photos.


I really LOVE having a great base pattern to work off of and play with different details. In a class a couple years ago we worked on defining different necklines that work on each individual. When I returned home after that class I used different color pins to pin these different necklines onto my dressform. It really helps to have them handy and to check a muslin or garment neckline.

The Princess and I enjoying a nice day at the Shedd Aquarium together!


Monday, June 6, 2016

Draped/cowl Necklines and perfecting armholes! Summer Sewing

Last month we had a couple days of quite warm weather for spring in Chicago. As I went to grab for some of my warm weather clothes I quickly realized that my supply of well fitting clothes were rapidly dwindling. I tried on a couple of tops and they were just swimming on me! A couple of them I decided that I could probably easily make adjustments too so they will fit. However, the majority were just too much work to try to redo. These went into the donate pile! (In fact I ended up going through my entire wardrobe and collecting quite a few garments to go to the donation center.)

I decided I need to make several new tops. I also needed to re-make a good TNT knit draped cowl neck top. I like having a drape necked top in my wardrobe. It adds a little interest and softness. The thing to be careful of is that depending on the knit fabric choice the drape can be quite different! 

Top #1
 I started with the knit snakeskin cotton/Lycra. 
This top started with some adjustments to the garment width to take into account my weight loss. I first made this up with no sleeves to see how well the armhole would fit on me. It needed some fairly good changes. From this muslin I made several changes to the pattern; scooped out the back armhole, added height to the lower armhole and flattened it out, as well as adding ever so slightly to the front armhole. 
Since I had the sleeves already cut out I decided to put them in to see how well they fit. The entire fit is okay. Good enough for a wearable muslin for the summer. You can see in the photos of me wearing it how the armhole is just not right.
A great summer top but changes were needed in the armhole!
To make the changes, I literally stand in front of the mirror with my small clear ruler and measure with top on with no sleeves in. I measure from the cut edge to where I think the armhole should be and make the changes to the pattern. Sometimes I will also place a couple of pins and/or masking tape to mark areas. This took me a while to feel comfortable doing this and feeling like what I was doing was correct. All I had to lose was my time and maybe a bit of frustration... Using muslins and making several mockups is such a valuable tool to try out changes.

Top #2
Once I made the changes to the pattern (which also included a change to the depth of the drape) , I cut out a second top from a fabric remnant to make a sleeveless version to really test out the armhole fit. I love how the changes worked out. This knit is a bit beefier, spongier and heavier so when the neckline was draped the double weight was pulling to low for me so I added the tucks to the upper neckline. Win-win for me!!! This make it work moment gives the neckline a lovely interesting design detail. I played with pinning up the fullness to see how much I would need to change and ended up liking how the tucks looked pinned in. 

This is the same bodice pattern pieces as top#1 but with the armhole changes. I really liked the changes but since I did not have enough fabric for sleeves this became a sleeveless summer top!


These 2 photos on the dress form show the tucked drapes on either side of the neckline.


Top #3 
This fabric is a very lightweight poly/Lycra knit from a 1 yard remnant.  Perfect bright and fun summer top.The last top I made was to make changes to the actual sleeve. I used Sarah Veblen's technique described in her book The Complete Photo Guide to Perfect Fitting to give the sleeve more room and shape yet still fit in the perfected armhole. For this sleeve I split it into 2 down the center line and then walked each pattern, marking the shoulder point and just added the amount of ease that I wanted. My first try resulted in a  seam that stuck out to much for the look I was going for. I flattened the outer seam curve quite a bit to make it fit nicely. The second try on the sleeve, which you can see here, is much better. Not quite perfect but much better. 

I am done with this pattern for a while. I will probably pull it back out in the fall to make several 3/4 and long sleeve versions and at that time I will perfect the 2 piece sleeve.
The armhole fit on this top is so much better than the first one! You can see in the pictures where the upper bust area meets the sleeve how much better it looks and feels.
Side by side comparison!


My Last draped garment is the Colette Myrtle


The last draped neckline garment I made was a Colette Myrtle dress. I wanted another easy knit dress pattern to add to my Appleton knit wrap dress pattern.
This is the same fabric as my first top above. A very soft, light-mid weight cotton/Lycra knit in a snakeskin print from my stash. 
This is a sleeveless dress and very easy to make with a cute shoulder sleeve detail.
Likes: the armhole fits well. The shoulder detail. Inseam pocket. The front bodice is a double layer. The elastic waist is cute and comfortable. Perfect length. ( I used the longer length) 
Dislikes: the draped neckline is slightly deep. I just have to be careful when bending over or reaching down to get something from a bag. I will change the pattern for the next time I make it.


Fun, comfortable, cute summer knit dress!
Shoulder detail. I put this on so that it could be used as not just a detail but also as a bra strap keeper!

Love the inseam pockets!

I have to be honest. I originally didn't like this dress too much. Not sure why, maybe I thought it was too simple and too casual. But, it has grown on me and I find myself reaching for it quite often! This dress will be great on its own when the weather gets very warm and with a cardigan for spring/fall weather.

With this dress addition, I am done with draped necklines for a while! time to play with some other styles. 

Happy Sewing!
Me, My daughter, Melissa and my granddaughter, Princess Victoria enjoying time together at the Morton Arboretum.

Happy Sewing!

Friday, December 11, 2015

A trip to Les Fabriques and a new top, McCall's 6963


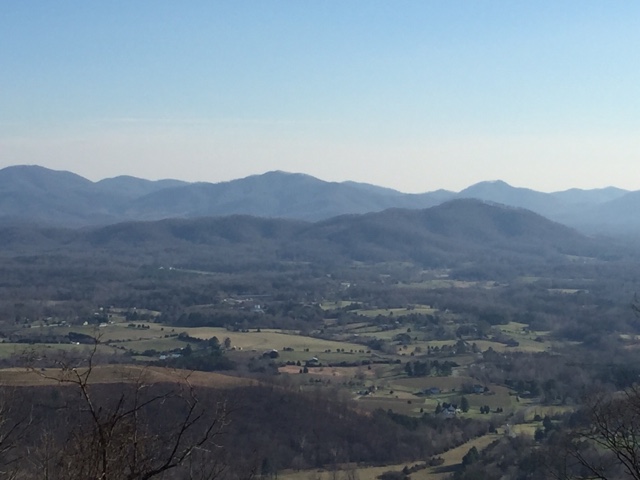
I had a quick trip this week down to Fisherville, VA. Think southern Virginia right smack in the middle of the Blue Ridge Mountains. Beautiful area, stunning blue-grey mountains layered upon each other with a softness about them that you just don't get in the western US. 

My meeting finished up by 2pm and my flight home wasn't until 6:30. A little research was done as I grabbed a bite to eat that turned up an eclectic looking fabric shop in the town of Charlottesville, just a few miles from the little airport. Armed with my GPS and a couple hours to spare I headed to Les Fabriques. 

The store was comprised of a fabric shop with a great variety of specially curated fabrics. Think a little bit of everything with all of it being high quality. There was also a large selection of vintage patterns, think patterns that have been picked from garage sales and estate sales. Everything from vintage woman designer vogues to great 1950's children's pinafores. Rounding out the shop were a beautiful selection of notions and buttons, again quality was abound in all the products. 

At the end of the shop was a small resale shop area that had a great selection of clothes and handmade jewelry. 

The almost haphazard way the fabric was strewn on the periphery shelves was very charming and invited you to touch and pull out fabrics and pet and feel them. I took my time and took it all in, such a pleasure to have time to browse and peruse the goods. 

I ended up leaving with 2 cuts of fabric, how could I not?!?  After all, there was a 20% of everything in the store ale happening for the holidays! 
I purchased one yard of this mat bronze sequined fabric! So pretty... Maybe a new top for my birthday!
The second is a beautiful silk that was priced at 36$ a yard but since it was an end cut with only four yards left they gave it to me for 64$. The best part was, I had no idea that it was on sale! The colors and print and feel of the fabric just grabbed me. They had a roll in a purple color way as well but that one just looked a bit more harsh! 

Late last week I finished up a new top. Having been sick I needed to work on some comfortable and easy fitting projects and I kicked off on an unplanned knit fixation! I will get back to my previously scheduled works this week!

Along my diversion into knits I wanted to use this double faced 2 way stretch ITY knit. It has been marinating in my stash for a while and the fabric closet had spit it out for me to use! I had 3.5 yards enough for a dress (to yet be blogged) plus this top.

Last winter I made 2 versions of this top, one very similar to this one with a deep cowl and long sleeves but in a lightweight ponte and one with long sleeves and a higher shallower cowl out of a weird nylon double knit. I like the fact that even with the deeper cowl you can lean over, bend and pick things up and not necessarily flash all of you r boobs to everyone around you!


I like this top and I wanted long sleeves. Actually I wanted extra long sleeves, sometimes I like the feel of the fabric pooling slightly at my wrist. Especially in the winter! Looking at the photos the sleeves look a little long... And this is why I love to sew!!! I can make them exactly how I want them.

This top is multi purpose. I can wear it as shown in these pictures as a casual wear. I can also wear it belted with a cardigan over it with a skirt to make it business casual .  Good versatility! 

So when do you consider a pattern to be a t-n-t pattern? I have this pattern with all adjustments made so I can just pull it out sew away without much thought to fit. I think with knits you have a leeway of weight gain/loss before you have to reassess fit. Of course you always need to keep in mind the type and stretch of the knit. I used my tripod and wireless fob to take these pictures and being too lazy to check anything but the first picture for frame and focus I realized after I put everything away that the photos from the back look like crap. I didn't straighten out the top at pull it over my bum hence it looks a bit wonky.  Part of that has to do with my generous bum, if I want something to stay down over it all the time it needs to be more of a tunic length versus a top ending at the high hip. 

I think I need to write out a cue card checklist to keep with my camera setup. 
- smile, I always look so serious like I'm sending mental brainwaves to the camera to please work as intended!!
- straighten the clothes out
- stand up straight
- check all photos before changing outfits or putting all the camera crap away!

Happy Sewing!!!

Family day at the Field Museum! 


Sunday, May 31, 2015

Vogue 1291: bat wing shirt in silk

I realize I have been a bit behind in my blogging! There are several items/outfits that I have not blogged and will probably just do a quick recap blog of them. Mostly so that I can keep track of what I have made!

In my closet I have 2 tops that are quite old that I have been wanting to replicate. Both are made from chiffon, poly chiffon I believe and both are oversized with a blouson effect. I have really been wanting to add some of these to my wardrobe. 

Vogue 1291 was a pattern that caught my eye as a great contender. It is an oversized loose top that is supposed to be tighter at the hips to have blouson effect. 

I had several issues with this pattern right from the start. The recommended fabrics are both knit and woven yet the pattern sizing is clearly for a stretch knit.... Beware when you make this top and take careful flat pattern measurements! 

I was going to make a muslin but realized that regular muslin fabric just would not be a good idea due to no drape. So instead, I used the yellow butterfly print silk charmeuse that I got from Fabricmart.com on a super sale. 

I started off with very careful flat pattern measurements and made an adjustment for the hip. I needed to add width at this area when compared to the rest of the pattern size. 

I followed the directions carefully and they were quite simply to follow. Attaching the back sleeve overlay could be tricky if you don't pay close attention. I skipped the step of finishing the neck until the end because I had a feeling that I was going to need to cut it down. Once it came to the side seams I just basted them with a 5.0 stitch length and tried the top on. At this point, armed with pins and my hand mirror, I stood in front of my full length mirror and pinned in the side seams and where I thought I would like the new neckline to be. For all the seams I used a 2.5 stitch length and then serge finished the seams together to reduce any bulk. All of the hems were done on my regular machine using the small hemmer foot. This mostly worked out great! I had one or two spots that the 'roll' did not roll under but I'm not worried about it. The neckline is a narrow bias band. 


With these marks I went back to my work table and made some changes. I left the hip where I originally basted it. However, from there up and along the bottom of the 2 part sleeve I took off an additional 5/8". There just seemed to be too much fabric!

Using my French curve, I redrew the neckline about 3 1/2 inches lower. It made a big difference! I felt that there was just too much yellow fabric and that it was overwhelming me. The lowered neckline helps. I also think that making this in a chiffon would make a big difference where you can actually see the silhouette of the body through the fabric woud be a better choice.
Imagine this neckline way up high.... Ugh.

All that said, there is something about this top that quickly grew on me. Even my husband felt that as he took my photos that the top grew on him. Ten top felt great out of this lightweight charmeuse and will be lovely to wear on a hot day. Nice and cool but still plenty covered up.

I will probably have to wear a light camisole under this because if you hold your arm out just right you can see right in. It would not be an often occurrence but, knowing me it will happen at the worst possible time!!!! LOL!!

Will I make this again?
Possibly.....
In a woven
- maybe add an elastic casing to better keep the blouson effect OR make a separate hip pattern piece out of a coordinating knit fabric.
- definitely out of a chiffon! 
In a knit it would need to be a very light knit or it will just be too much fabric sitting on the body.

My sewing work table is chocked full of projects :) mostly stuff to enhance my work wardrobe. 

Here is my happy granddaughter, Princess V, learning to pick up and eat food. She has 2 little front teeth now. :)