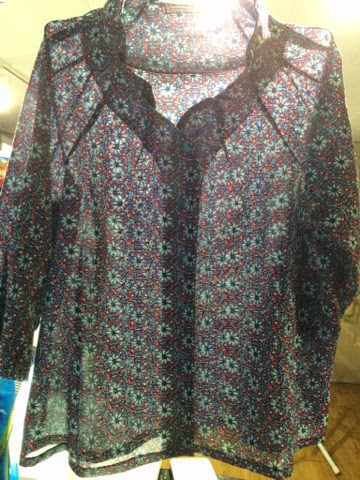
As part of my fall sewing plan I wanted a true transition piece to get me from summer into fall and this fit the bill perfectly. The fabric is a cotton/silk voile blend from Fabricmart. I bought this after I bought the red denim hoping that it would be a great match and it is dead on! I LOOOVE it when that happens!!! I wasn't to worried if it didn't because I also like wearing teal blue. The label in the fabric said to dry clean which I will do now that it is a finished product. However, I totally bucked those directions and pre-washed and dried this fabric not once, but twice before I cut it out. I'm so glad I did :) it totally softened up a bit and, like with ten red denim, I used a color catcher in the wash to gage the amount of bleeding. There was some general color discharge but nowhere on the fabric did the colors bleed together, whew!!! I took a chance!
The pattern is vogue 1385, a Sandra Betzina design. I made the shorter view. I think with my hips and tush the longer view could end up looking tent like unless I employed a belt with it. In fact I think the illustration of the longer view looks a bit blah and dowdy. Am I wrong? I do also think it is interesting that the neckline or rather the height of the neckline on the photograph on the pattern does not look as high as my finished shirt. I'm going with the fact that this model has an enviously long and graceful neck whereas mine is not so! On me the height comes closer to my lower jaw which I really like! Maybe the model is just lehgthenig! Hah!!
I will really have to dry clean this shirt because I used silk organza as an interfacing for the front edges and the neckline. I needed something nice and crisp yet not stiff to 1. Hold up that beautiful detail and 2. Not show through on this voile. If I was it now all the goodness of that silk organza will wash away and I will have a limp mess. I don't want that!
Above: the silk organza hand basted to the neckline facing.
Below: the power of silk organza! holding this voile up without being 'stiff'!
This is a fairly easy pattern to construct you just have to PAY ATTENTION, take your time and use lots of tailor tacks!! This top did take a lot of time, why may you ask?
Well....
1. Cut out fronts as a single layer to be able to match the print down the front.
2. I hand basted the silk organza interfacings to the facings.
3. I thread traced all the tucks/darts in the both front pieces, top of the sleeve/shoulder pieces, both sleeve hems, and then all the corresponding lines into the facings. (This was after trying to mark them with a tracing wheel with no luck!)
4. Tailor tacked every circle and square and triangle marking.
5. Every seam, except for the facing seams at Front edge and neckline, were done with french seams. Looks beautiful and a nice strong seam for a lighter weight fabric BUT... Double the work!
So as you can see time consuming but I really just slowed down and enjoyed the process, it was very fulfilling.
I even contemplated binding the facing edges but the serger just one out on this one! I just did a three thread overlock edge making sure it was a nice balanced stitch. Came out nice!
The sizing of this shirt is not such an issue because it is a looser fitting design but next time I do think that I will cut one size smaller for everywhere but the hips to just give it a slightly sleeker silhouette. Due to my large booty, hehehe, I had to move the back fisheye darts up 5 inches! I probably also could have shortened those darts a half inch or so just to have room for a nice drape down my back and over my tush. If I had not made that change the back just gets stuck on my butt, bunches up and then the upper back looks too big because it can't hang nice. This is one reason why I LOATHE ready to where shirts. Those darn darts are never in the right place for my body :)
Back to my fabric decision, you may think a voile for fall? Well, I did actually say transition piece ;) cool enough for a warm fall day but coverage for cooler evenings or indoor air condition. It remains to be seen if this piece will make into the true Chicago winter wardrobe. Although with the looser fit I could layer a wool knit camisole under it for warmth.... Hmmmm, good idea!
I had NO problem with the buttonholes on this baby! That silk organza provided the nicest hand to the voile and just enough umph to sew out 6 perfect buttonholes with embroidery thread... AND can you believe those PERFECT covered buttons!!! Those were in my stash of a gazillion thrifted and antique buttons. I never dreamed they would get used on a garment! They were made for this shirt!
Again, I had no photographer and nasty weather so all my photos are on the dress form. I'll post some of the shirt and the red jeans together soon! Although, when I tried this on for my hubby to get his reaction he really liked it and complimented the neckline immediately. I must I was a little surprised, in a good way of course! He is a little bit more conservative in thinking what looks good on me. Whereas I am, let's say, a bit more adventurous!! :)
I really, really LOVE the details of this shirt with the beautiful and unique neckline and the sleeve detail. I feel like I could have played with the depth of the sleeve darts a little more to make the sleeve hem detail even more pronounced.
The red denim jeans really go nicely with this shirt! they even go great with regular jeans or a pair of slacks.
I have a 9 day work trip out to San Francisco coming up in a couple of weeks and am hoping to get a couple more pieces made. This outfit will be a great addition to the travel wardrobe.
Next up on my work table, a self drafted textured black knit skirt. This photo has been lightened so you can see the texture detail.
And if I'm lucky a Jacket as well out of this printed linen. The black on the linen and the black of the knit above match perfectly!
Happy Sewing!Hehe, had to share! My Grandaughter has found her tongue!


