

After looking at all the sketches that I did I decided that I wanted to first work on what I am calling the Asymmetric Gathered tunic.

1. Just a quick recap of how I got here.
2. Started with a well fitting master pattern of my tunic.
3. Used a sketch done in Procreate on my iPad to create design I really liked.
4. Used an approx. ¼ scale pattern to practice the flat pattern work to be done to original pattern to get to new design.

For the Asymmetric Gathered Tunic, I started by taking my base muslin and with it on my dressform I used red narrow tape to plot I my approximate design lines using my sketch as a basis to work off of.


With my design taped off I moved into flat pattern work. I started by tracing off my master pattern onto clean pattern paper. My master pattern is on cardstock with no seam allowances making it very easy for me to trace and make changes to.
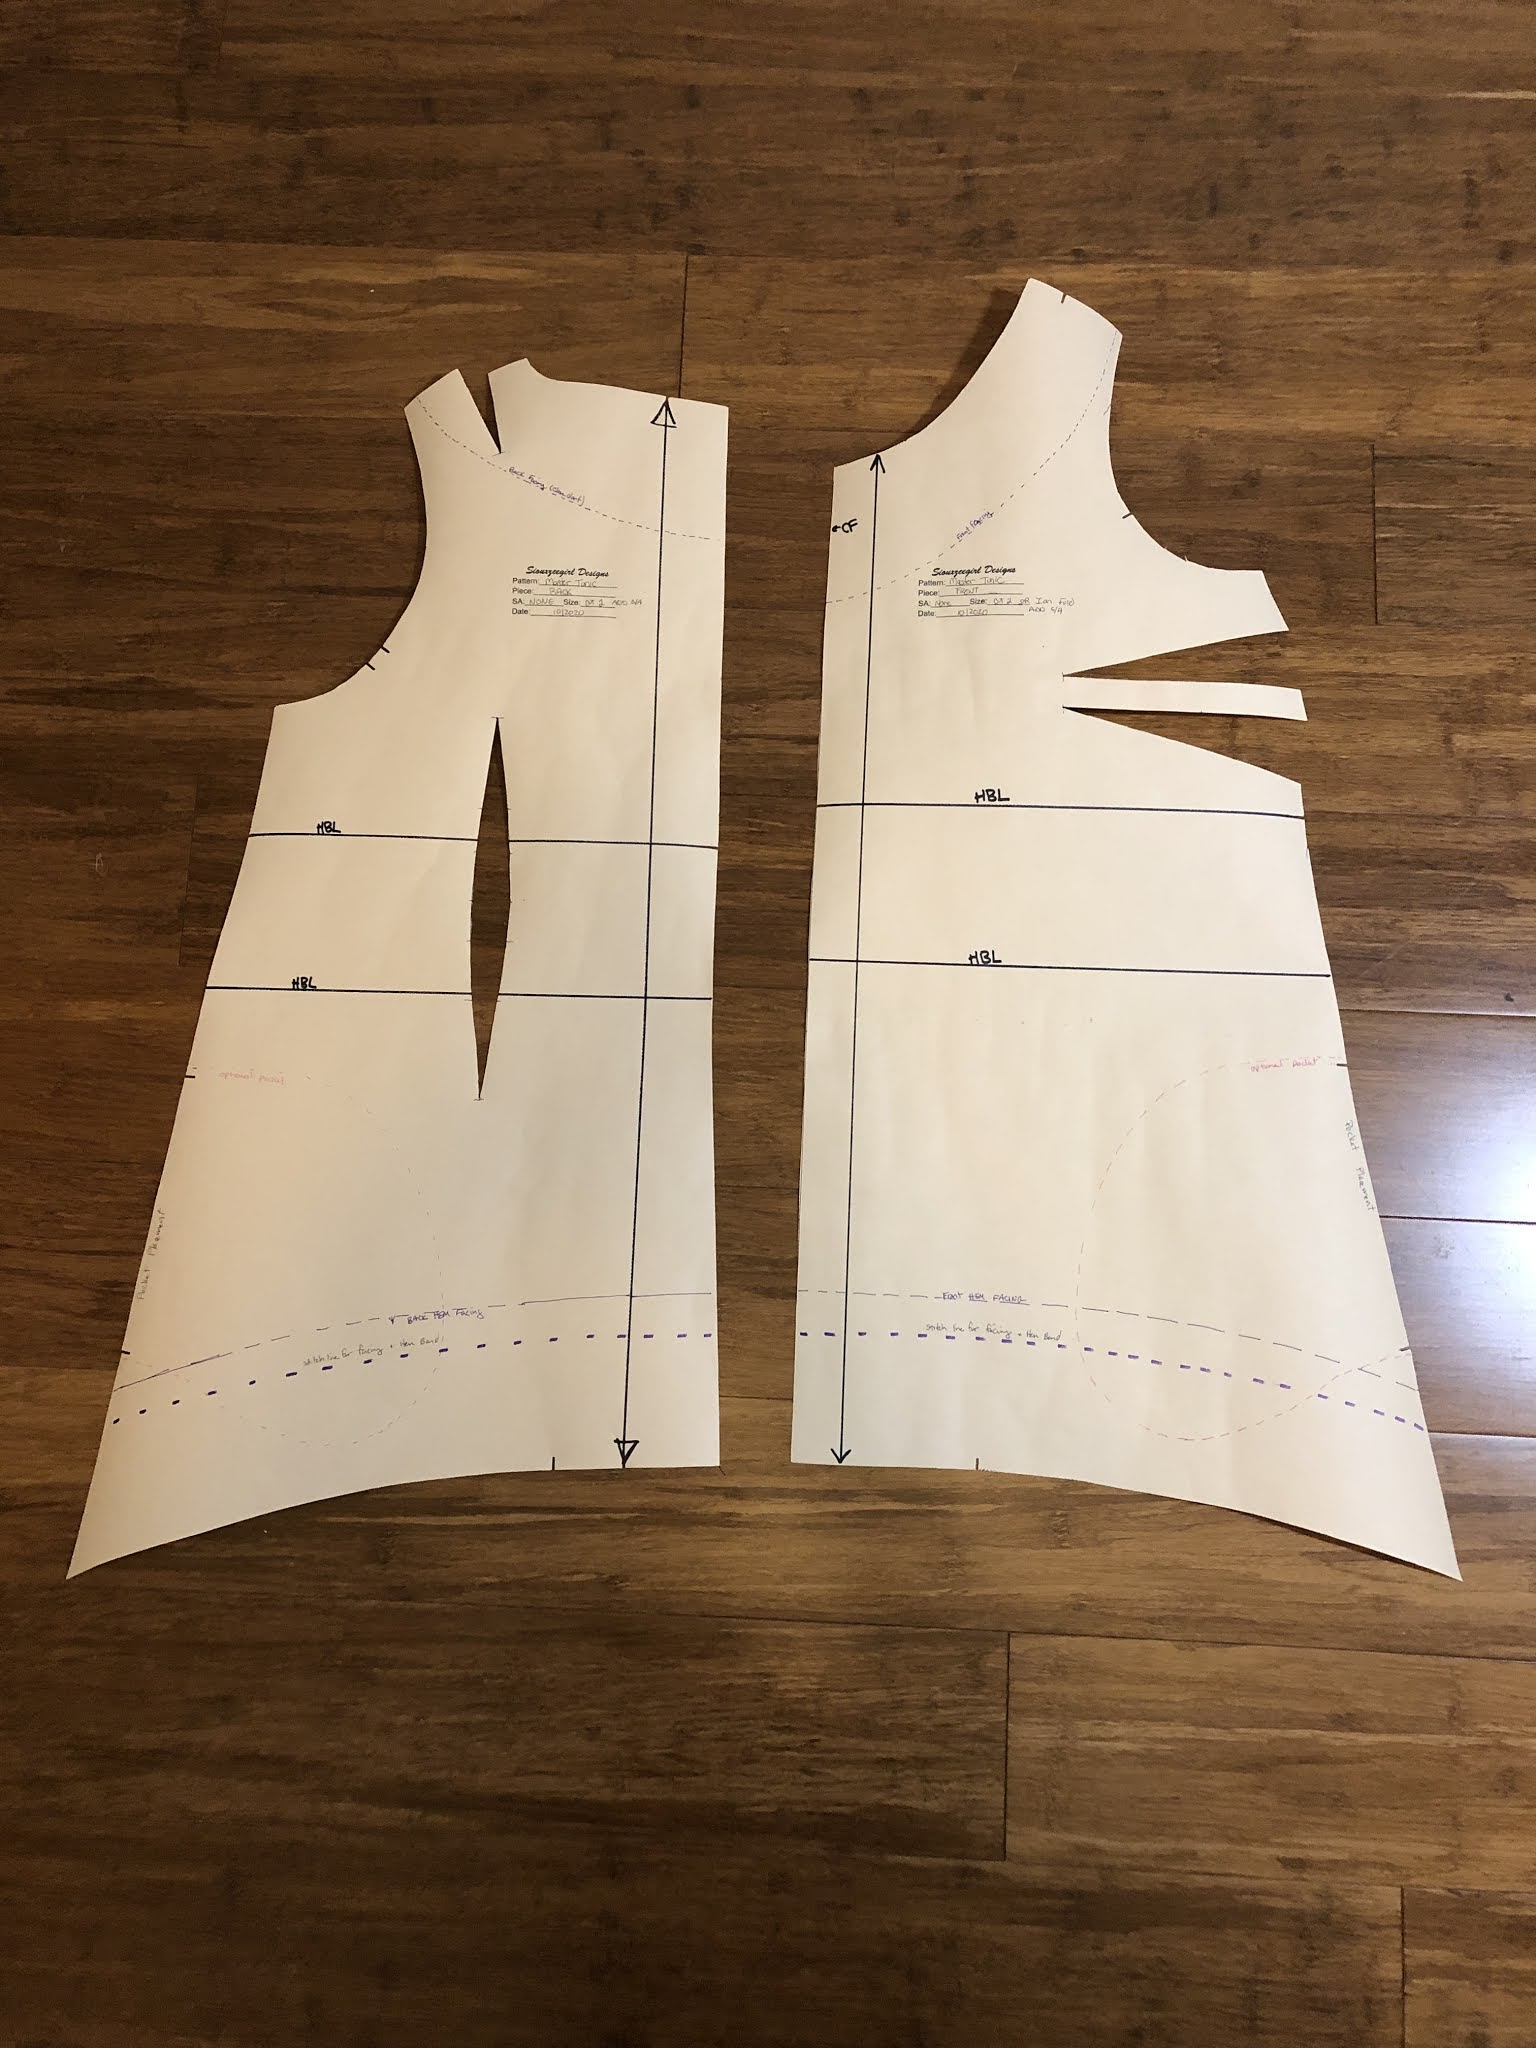
With the clean pattern and the front cut as a full pattern, I started with my flat pattern changes to get to my new design.
This is what I did:
Front Pattern (most changes)
- 1. Moved the neck line in at the shoulders by a ½ inch
- 2. Changed neckline to a soft V
- 3. Cut pattern in half along the diagonal line
- 4. Closed the bust darts on the left side and transferred them into the diagonal seam line.
- 5. Closed the bust darts on the right and transferred them into the gathers going into the seam line that runs under the right breast. This is a starting point and is then fine-tuned through muslins.
 |
| Steps 1,2 and 3 |
 |
| Step 4 |
 |
| Step 5 |
Back Pattern (minimal to accommodate front neckline changes)
6. Move neckline in by ½ inchSleeve pattern (changed hem shape- different from sketch)
7. Added a shaped hem
The shaped sleeve hem
Once I had these changes made on the pattern paper. I once again pulled out the tracing paper and traced these onto a clean pattern paper and added seam allowances.
 |
| Final pattern with seam allowances and the change indicated below to gathered area. |
Then I moved into making a muslin. For my muslin I knew I needed to use a test fabric that would mimic the type of fabric that I wanted to use in the final garment. Luckily I had some poly silky from a fabric swap that I took to use for making test garments. The biggest unknown here was the gathered area along the diagonal seam line. I had several decisions to be made. The amount of gathers and if I needed/wanted to add additional gathers, the size of the area to gather into, the placement along the seam line to put these gathers. I did my best guesstimate by playing with the fabric in my hands and seeing how much gathers looked good. I started with a 4:1 ratio. SO I knew I wanted my gathered area to be across 4 inches so I slashed and spread to get to a total of 12 inches of fabric to be gathered.
The important part to remember here is that I knew this was just going to be a starting point and that I would end up making several versions and several muslins to come up with the final design. I also knew that there was a possibility that it would never go to garment stage and I was OK with that!
Version one was so bad and looked so frumpy that I just
laughed!!! Basically the gathered area was in the wrong place and too poufy! It
was in-between my breasts, not a good luck! The muslin/test fabric I used was not conducive to pics, it was all I had so I used it.
I unpicked the seam and redistributed the gathers to a
better placement. This helped a lot and I felt like I was on the right track. In the photo below you can see the progression of the placement and amount of gathers. Red was first try, green second and blue final success!

I still had to move the gathered area further down the seam line as well as removing some of the fullness and reduced the size of the gathered area down to about 3 inches. To reduce the amount of the gathers I did a closed wedge so reversed my slash and spread to a slash and close to the amount of fabric that I had pinched out.

I made another muslin and realized that I still had too much poufiness in the area. I was starting to think that maybe this was not going to work for me. Then I decided to unpick the seam line and see where the fabric in the upper area relaxed too. Basically I let it fall under the seam and pinned it. This worked!! I realized that when I first converted the darts to the gathers that I had too much length. Not so easy to true up this area.

The fabric underneath was what I originally had and was causing poufiness. You can see how much "length" I removed to clean up the fit!
With that change to the flat pattern made I then made 2 more muslins in 2 different fabrics to check the fit. SO MUCH BETTER!!!

One of things that I really like about this design is how the drape of the fabric is also affected asymmetrically. It has a super pretty drape coming off of the left breast and down the side front of the garment. SO soft and lovely.
With the final muslins looking good I decided to make it up in real fabric.
I am trying to NOT buy any fabric, I have so much already. I used a rayon challis William Morris print. It makes the detail of the gathers and seam line a little hard to see but I was okay with that. The fabric is so soft and lovely. Feels so great to wear!
In using the patterned rayon challis, I had some considerations I had to make when cutting it out. I wanted the right and left backs to mirror each other so I carefully cut them on single layer. Very happy with how this worked out! I also wanted the outer sleeve seam to mirror each other. I was less successful in this. However, I am okay with how they turned out.
 | |||
| Center back seam lines up so nicely!! Made me very happy! |

On the front I wanted to make sure that Center front remained along the same line in the print down both upper and lower pieces to maintain continuity where it could be maintained. On the side seams I just made sure that the horizontal lines or bands of print were maintained.


I am very happy with the outcome of the print placement on this design! The neckline is also perfectly placed on me, no wardrobe malfunctions. This is definitely a benefit to designing your own clothes!


Now to find a solid-ish fabric in the collection to make
this in to really show off those design details!
The pics of me in this tunic are not the best. We have been having lots of rain and grey cloudy skies- not the best for taking pictures but these will have to do! Does anyone else take all sort of strange pictures of themselves in garments?


I caught this smirk of a smile on the princess the other day :) She is getting do big!
I love this! Thank you for sharing your process. The results are lovely.
ReplyDeleteThank you so much Rory!
Deletewhat a great job you've done & so thorough in your process! GO YOU!!!
ReplyDeleteThank you so much Keron!!! I appreciate the comment :)
Delete