Showing posts with label dress. Show all posts

Friday, June 19, 2020

Metamorphic Reversible Dress review

Metamorphic Reversible Dress

I have had my eye on this cute dress from Sew Liberated for a while now. Something about it just struck me as being soft and lovely and comfortable! The reversible nature of the dress is also quite fun. I admit to have been being curious as to how they managed the technical construction of the reversibility.

Add caption

I purchased the pattern and the fabrics from Oak Fabrics, a local Chicago online retailer. The fabrics are both Ikat woven and so very soft and amazingly lovely to work with. Making this as a reversible dress meant that I really did not need to worry about lining.

I do want to talk a little bit about the actual pattern. I started with making a muslin of the pattern as is out of the box using my measurements to pick the size. The pattern is drafted well, all notches match and this went together just fine. I think with no darts and being meant as a layering garment that it worked out pretty well but not the fit that I like.  (unfortunately I did not take any pictures of this!!! And have already re-used part of it so not possible) I made the decision that I wanted to be able to wear this as a standalone summer dress and not as a layering piece and that the lack of bodice shaping would bug the heck out of me! The main block that they use is very different from my body. Instead of going through the process of completely changing the Sew liberated bodice I just used my own base darted bodice pattern.  My bodice uses double darts and when I laid out the pattern I made sure to place the darts between the rows of squares and the darts just disappear! I am pleased with how this turned out.

Can you find the double darts???

I used the same skirt pattern pieces and I used the directions that they provided for most parts- particularly the ‘reversible’ burrito portion. I know how to do this burrito method and I have used it in other areas but for some reason my mind just doesn’t want to hold it The directions included were nice to refer to and this is the first time I have done it for a sleeveless bodice.  It does require a bit of coaxing, tugging and pulling so taking into consideration the fabric type is important. If this was a more delicate fabric, I would have done it differently.

Add caption

I do want to point out that the line drawing that is included does NOT match the actual dress. So if you use the line drawing as a technical line drawing to evaluate the pattern then you will be disappointed. I did a google and Instagram search for images and to see how others have made the dress. The project photos from Sew Liberated are very accurate.

Line Drawing above and photo below from Sew Liberated web site
and are official pattern drawing and photo

The differences really have to do with the waist seam location, bodice length and the lower peek-a-boo area.  Yes, this is picky but it is misleading. The actual dress has a shaped waistline seam and is more of a raised waist. More similar to what I think of as a baby doll or a low empire.

I finished this dress just as Chicago was totally shut down from rioting and then I got sick. I was hoping to get photos out and about with the family but that did not happen! Now, I am just finishing up a couple weeks of isolation and finally feeling well again. So photos were taken on my balcony using my phone as a remote.

I really like the ‘square’ side of the dress. I like the contrasting patch pockets and the peekaboo at the bottom. And I think it just looks better! The zig zag stripey side is nice as well. However, it is not as pleasing to my eyes. The stripe does draw my eyes horizontally and nothing to break it up.

This dress is slightly shorter than what I usually make. I am actually showing my knees! Gasp! I did take some pictures of me sitting so that I could see how it looks. No flashing and the bodice stays in place nicely as well.

Both sides have pockets. What I am calling the front side- the black ikat squares have simple patch pockets. The reversible side, zig zag stripe has inseam pockets. I really think the reversibility is fun! It would definitely be quite useful when packing for vacation J

As you can see in these photos I made a reversible mask as well. In Chicago we are being told by the local government that if you leave the house you need to wear a mask. Not everyone complies but I do think it is important to be safe and to keep other people safe and matching masks are just fun!

I am really happy with this dress! I wanted a fun summer dress and it fits the bill perfectly. I really like the photos of people using the dress as a layering piece. It is not a look that I usually do, I always sort of feel sloppy when I try it. Maybe I need to keep trying or maybe it is not a look for me…. Something for me to think about and play with.

Next up on my sewing table and list is working on playing with some tunics based off the Style Arc Daisy Designer Tunic. I have already made 2 and now I am playing with other ideas. Having fun exploring this :)

Happy Sewing and Be safe!


Friday, April 3, 2020

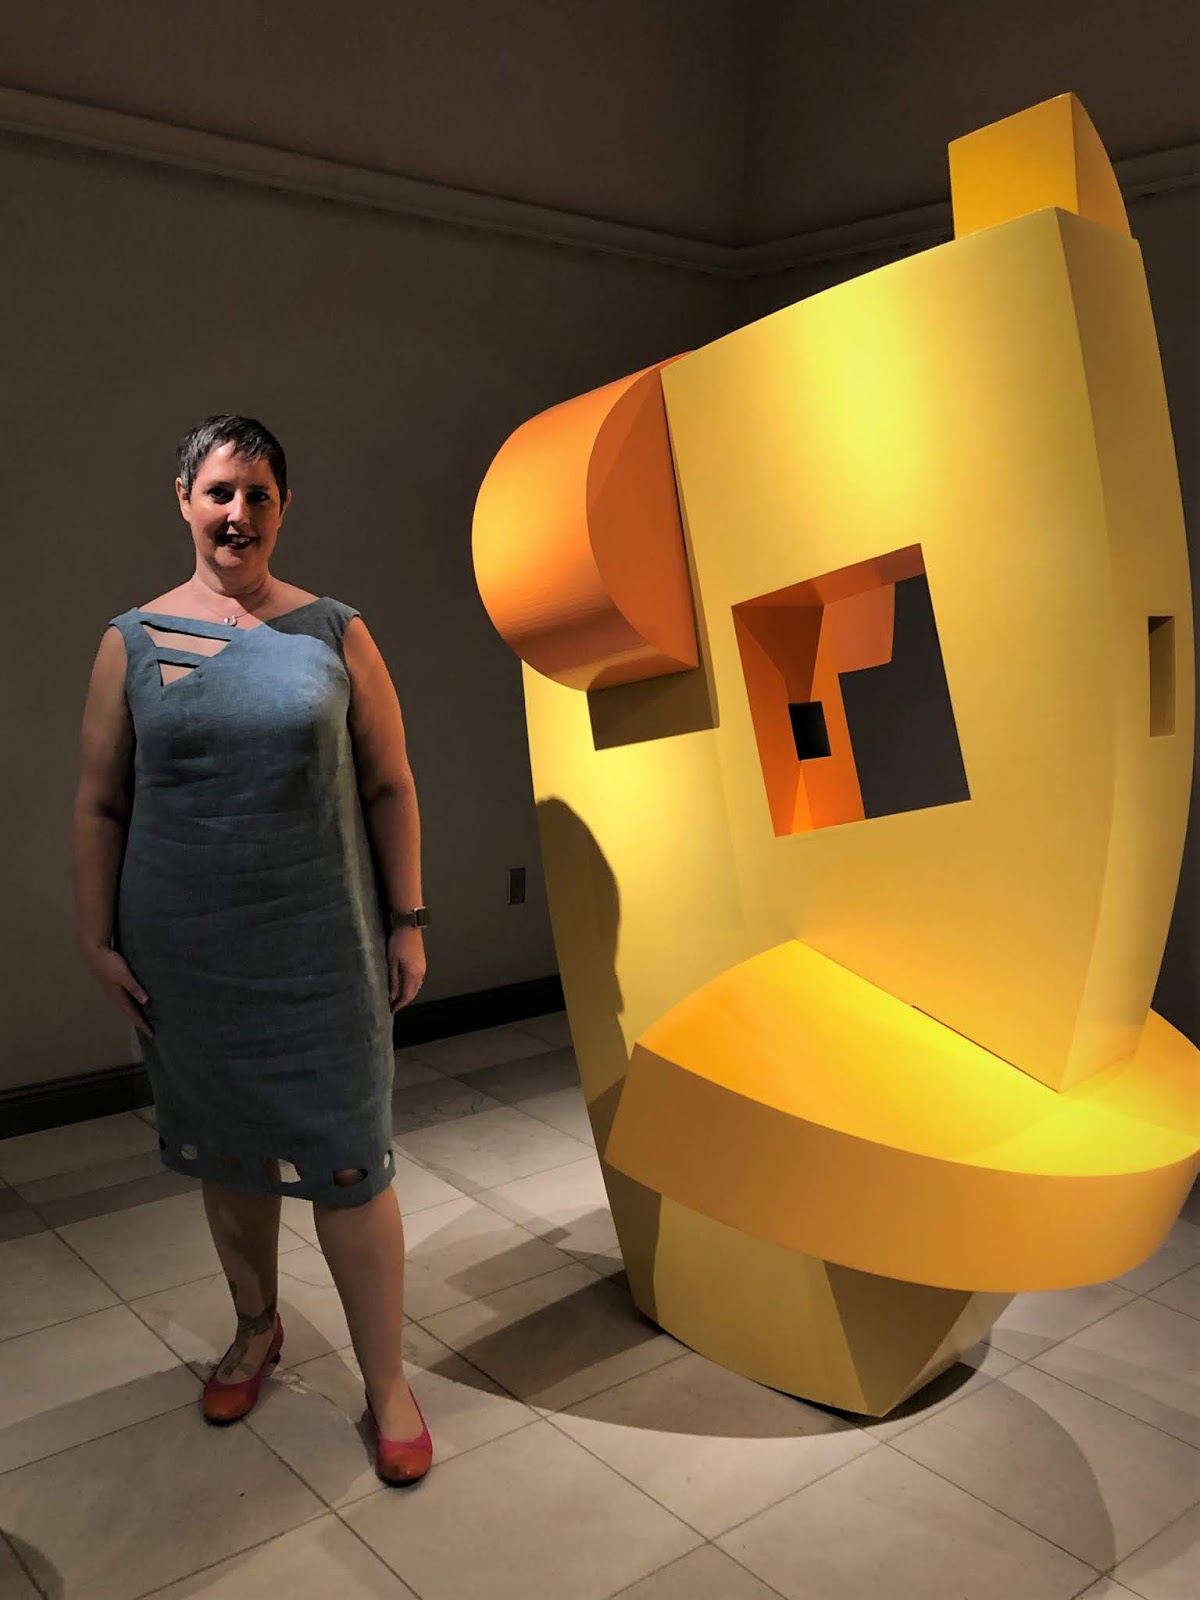
The Weirdo Dress- inspiration from an artist


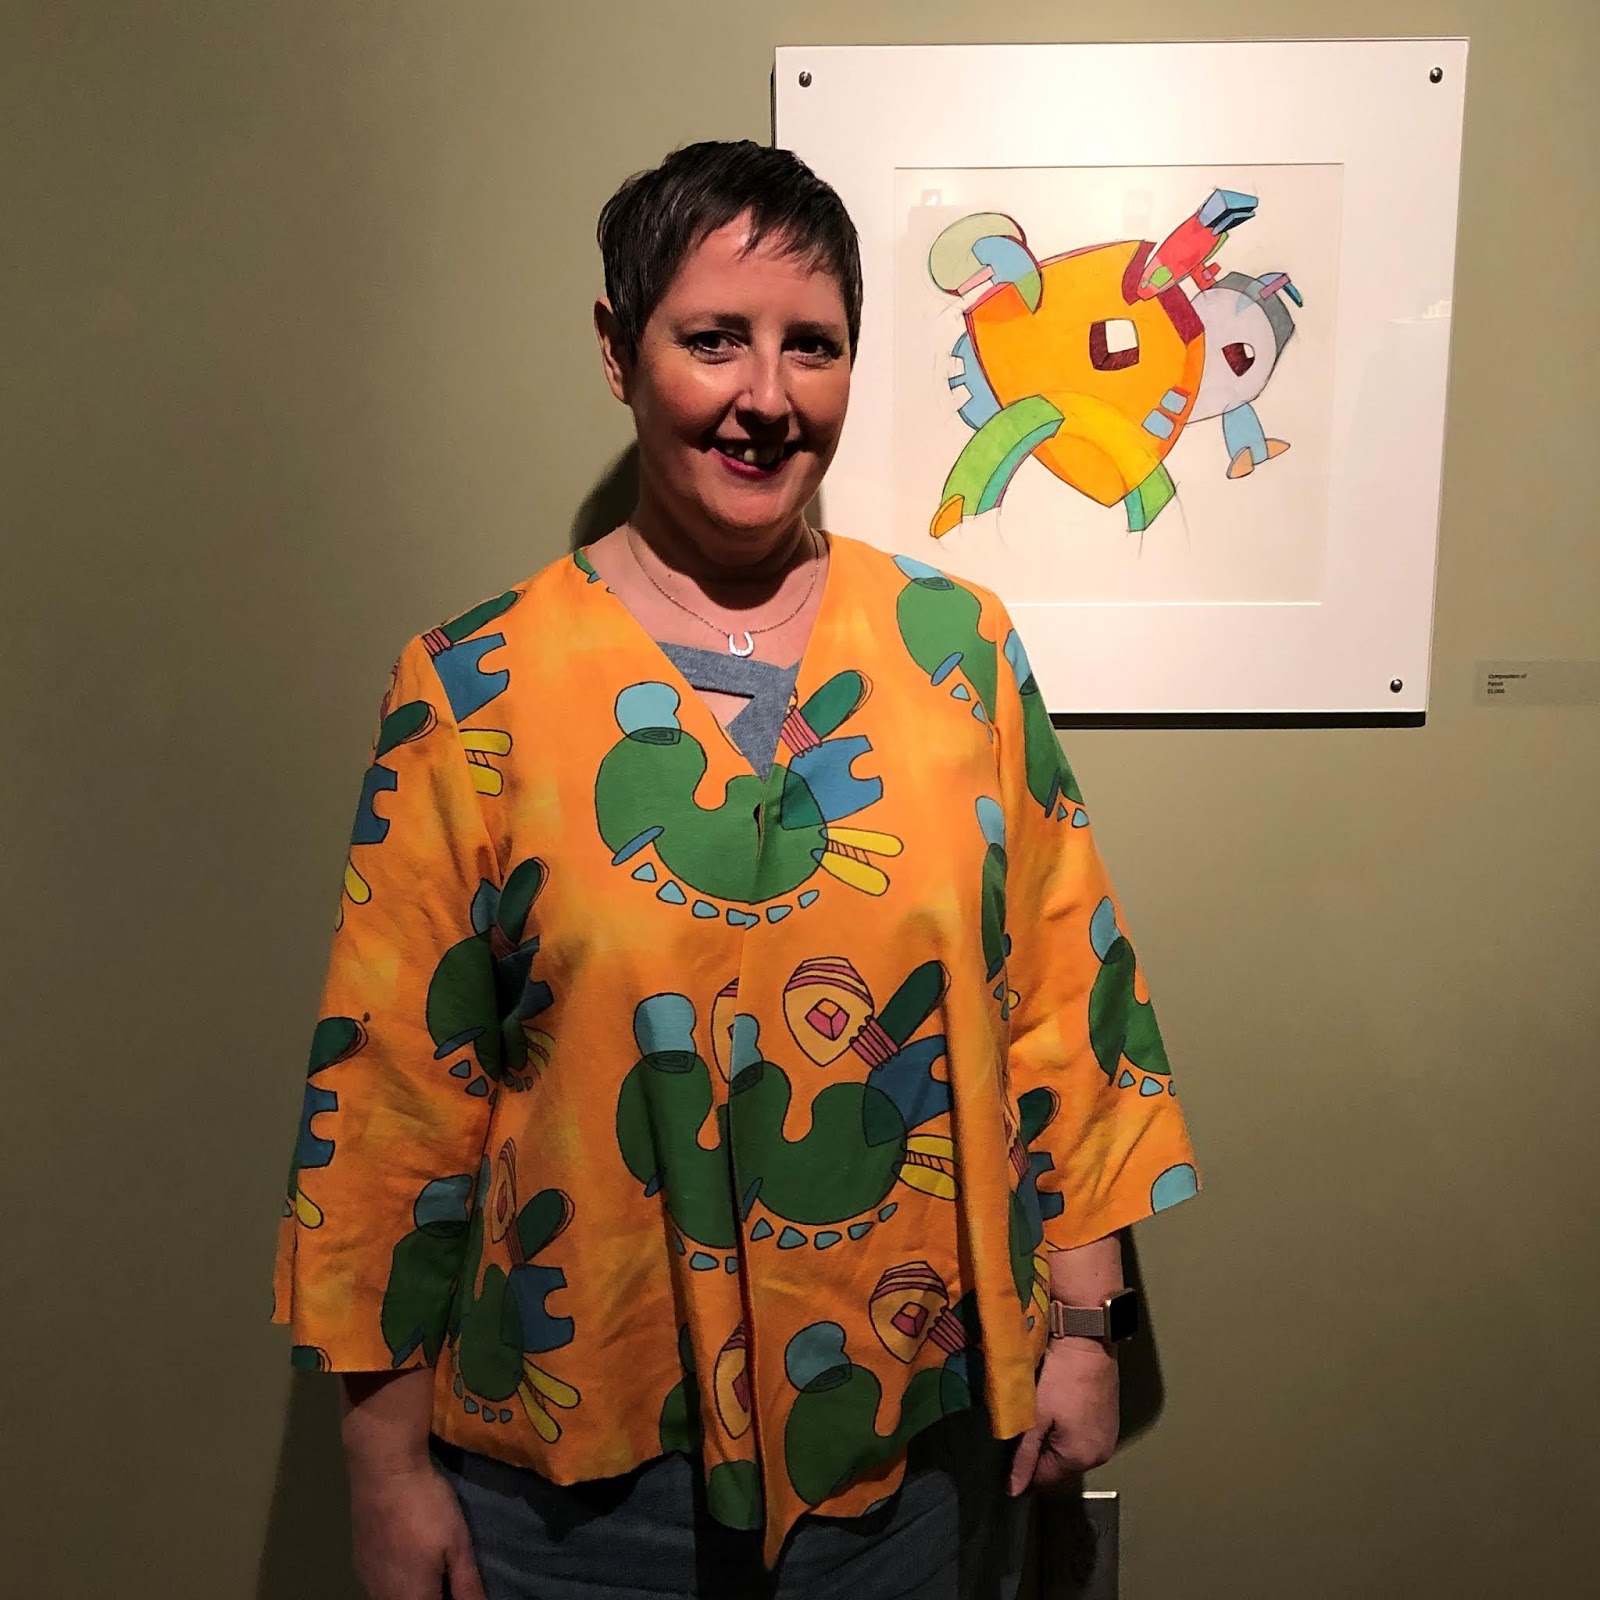
When my sister told us all about her solo art show some time last year I knew that I wanted to make a special garment for her, The velvet jacket and of course one for me! You can read all about her jacket in this post and construction details in this post.

For my outfit, I knew that I wanted to wear the jacket that I made using one of her designs that I had custom printed on fabric at Spoonflower. You can read all about the jacket and the original outfit HERE. From 2016.


For this special event I really wanted to create a dress that was fully inspired by my sister’s creative mind and her artwork. I spent some time going through my fabric collection to pick a fabric that would work with the jacket. At the same time, I worked on sketching out ideas in Procreate on my iPad using My Body Model Croquis. Here you can see the original design that I sketched out and used for a guide in creating my dress.

I used my princess sheath dress pattern as a starter and made new front panel and back panels to try out the idea. With the muslin on I then placed the straps to create the upper design element. With this done I drew and then cut out the motifs at the bottom. To create the shapes, I used the shapes from the print on the jacket run under the main green shape.

With the muslin done and me being happy with the design I finalized the pattern pieces and got to work on the garment. The fashion fabric is a beautiful wool/linen tweed from with blue and green yarns that I purchased from Michael Fabrics/ A Fabric Place in Baltimore. I underlined these pieces with off white silk organza and lined with a blue silk.


If you look closely at the back neckline you can see that the left and right sides are slightly different. This is because of the princess seams at the front being asymmetrical up to the shoulder. I did my best to create a similar shape on each side and moved forward. I could have purposefully done something asymmetrical on the back neckline as well but I thought that from a design perspective it was too much.

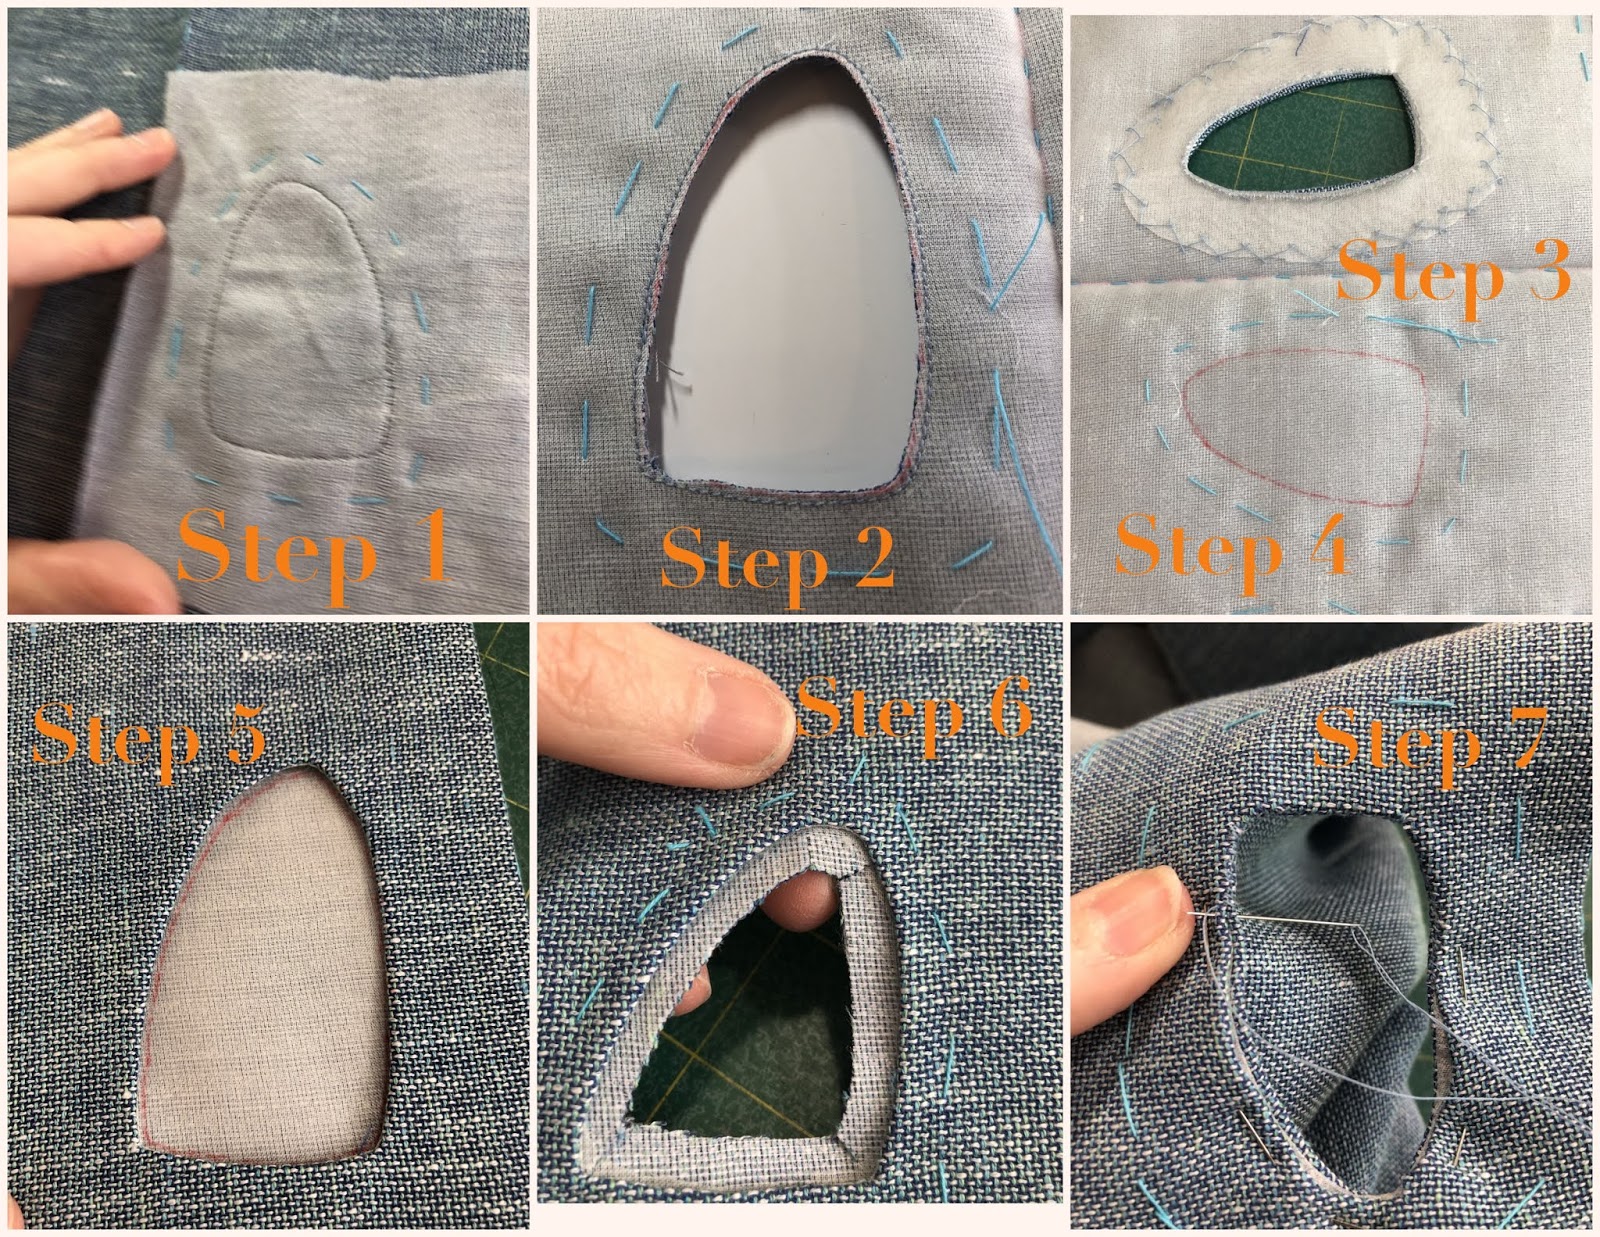
To create the cutouts around the bottom hem I first made sure that the hem was deep enough so that the inside was wide enough to cover the entire cutout area and used a lightweight fusible interfacing throughout the entire hem area. It was helpful to have the muslin so that I could carefully plan where the shapes would be placed so that they looked even and did not interfere with the kick pleat.


From the front, on the hemline I stitched an organza patch, cut out the center, pulled it through to create a window and then secured the organza on the inside using super fine Japanese fusi-web and tiny catch stitches. Then when the hem was folded up I basted around each shape and then very carefully cut out the shapes leaving about ¼ inch and carefully snipped and folded these under and slip stitched the back to the front along the window edge. If interested more in the window technique Gail Patrice Yellen has a book called It’s all about Embellishment! that has more information on this.

The only ‘issue’ that I had with this garment was that my bra wanted to keep peeking out of the cutout in the corner. To fix this I just put the bra on with the least amount of show- and also happened to be one of my older bras- I marked it with a frixion pen to where it was showing and then since it was a foam cup I could easily just cut away the area and no more peeking! I also made bra strap keepers to keep everything in place.

The day of the event we got to the museum early before the opening and my daughter played photographer. It was so MUCH fun to have my garment photographed with the artwork that inspired it!!! You will have to forgive the wrinkles – I did have to sit in the car to get to the museum and this fabric has just enough linen to wrinkle. It shows its character!!

PS - in case anyone was wondering why I have called this my Weirdo dress- as my sister was creating many of her art pieces she would refer to them as her weirdos or her weirdo army or weirdo friends. So, I felt right at home in that ‘space’. Hence the name – Weirdo Dress!


Happy Sewing and please Stay Safe and Stay Home!

Monday, March 12, 2018

Pink draped dress


One of the sketches that I had done for In The Sketchbook was done from an idea that came to me when I draped some of my fabric on my dress form.
It all started when my lovely friend Wendy from Couture Counsellor gave me 2 sets of opera gloves for Christmas. A beautiful hot pink stretch satin pair and a black lace pair. The pink was the most perfect shade of pink for me, it was MY color!!

Wendy and I at the Lyric Opera House

I took those gloves home and went right to my fabric closet and ran those pink gloves up against my hanging fabric and BAM!  Hot pink silk dupioni and hot pink and black lace on  netting jumped out at me. I really had no idea what I wanted to do with them just that I wanted to use them.
My new opera gloves along with several options of fabrics that I pulled from my fabric collection.

 So I draped them on my dress form and let them take their time in talking to me. Thinking about the free form draping workshop that I did with Sarah Veblen, I was inspired to look over my notes and photos from that workshop. Then I decided to just let my fingers play with the lace fabric. No right, no wrong, no  judgement, just playing. I ended up with the lace draped as one single long piece, with tucks around the body from front to back on each side, I then wrapped the silk around the top to simulate a bodice.
My fabric choices draped on my dress form in a loose idea of what I was 'seeing' in my head.

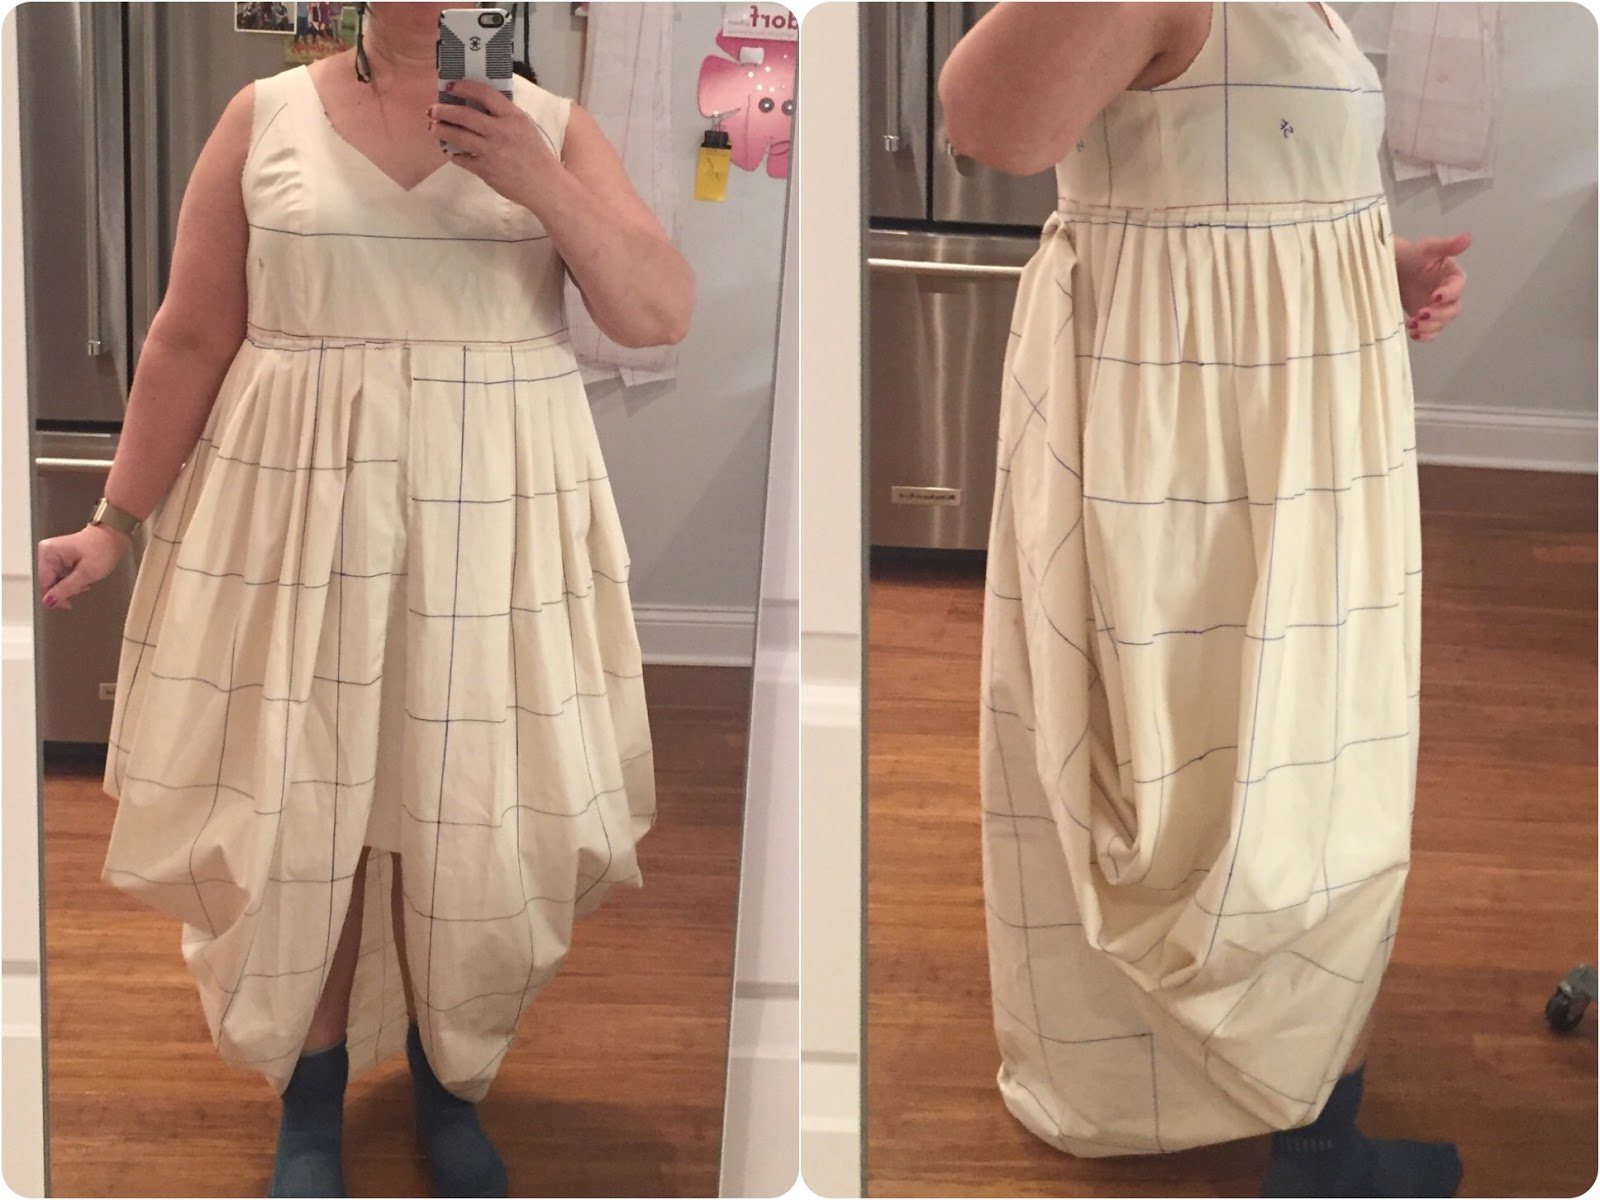
Leaving that on my dressform, I took some photos and then decided to make a couple of sketches to fill in the details. My first idea was that it would be a knee length sleeveless dress with a defined waistband with the lace attached to the waistband and a bolero type jacket/topper. I spent some time thinking about the silhouette and realized that I had a dress pattern already that I could use as a starting point. In fact, I still had the muslin. This was from the black/red/later cut scuba dress that I made last year. I quickly tried on the muslin and in the mirror drew some changes on the muslin in sharpie. I took the muslin off, snipped here and there and pinned some other muslin on. From here I transferred the changes From the muslin to a newly traced pattern and made a new muslin. With this second muslin I took a piece of muslin that was the exact measurements of the piece of lace. I marked it up with the grain lines and pinned this to the muslin in several ways until I came up with the perfect size of pleats to make a symmetrical drape. The drape was originally inspired by how Balenciaga used and constructed Fabrics in his dresses my brain made the leap to draping and from there it is all history.
Muslin on the dress form. You can see the grid ,arks that I drew on the muslin prior to draping.

Back to my process, I made the changes to the pattern for the princess dress. specifically to the neckline and the amount of ease. I wanted something that was slightly more relaxed so I wouldn’t have to wear shaper wear underneath ( I don’t mind a smoother to smooth out the appearance of the.. ahem, rolls..but , I really don’t like wearing spanx or. Similar garments!) with these changes I took the dress muslin and literally cut it in half at a high waist level, sewed in the giant piece of pleated fabric and sewed the dress back together and that was the muslin.
Final iteration of the muslin in the fitting and design stages.


Making that muslin really helped with a couple of things. I was able to know exactly how the ace fabric would attach and I was able to work out the construction method. In order to make this lace insert the easiest or more practically, the method with the most control was to construct the top of the dress. Each piece of dupioni was underlined in silk organza and lined in a deep purple ambiance lining. Wit the top constructed, I moved to the bottom half of the dress. Thee were also underlined in organza, however not all the way to the hemline. I only did it that way because I didn’t have enough silk organza and since the bottom of the dress was going to have the lace overlay, I wasn’t too worried about it!
Dress details: sweetheart neckline shape, view of the purple Ambiance lining (this helped keep a strong pink color). Bottom 2 photos show detail of the skirt front. I was careful to keep the front panel flat with the pleats not starting until the side front. This minimized some of the bulk at the front.

Once the bottom was constructed I basted the pleased lace to the it and then sandwiched the top over it and sewed it all together. With some trimming and pressing everything laid quite nicely. The zipper was next to go in. I had a 22 inch invisible pink zipper that I installed by hand with a small back stitch. I was originally a little nervous about putting an invisible zipper in by hand! There was NO need for that nervousness, putting that zipper in by hand was so easy and afforded me much more control.
The dress in a final try on prior to adding the hooks/eyes and snaps for the bustle. I am just holding it up in these pictures with my hands. 

The lining was sewed together at the neckline, clipped, graded and  under-stitched and the pressed the neckline. I’m not 100% happy with the neckline. The shape is gorgeous but for some reason the lining wants to peek out. I pressed again and realy let is set and this seems to have helped. The lining was attached to the zipper by hand and for the armhole I tried a different technique. I trimmed the lining back to the seam-line and then hand rolled the fashion fabric around to the inside and hand stitched it down. I really like how it looks and the lack of bulk.
The invisible zipper was set in by hand, such amazing control when done this way! The lining was then hand stitched to the zipper tape. My label and bra strap keepers were added as the final details.


With the dress lined and all the finishes done the last thing I needed to do was to figure out how to bustle the lace. This gave it the distinctive shape that I was looking for with the deep draped sides. Playing with pins, I figured that I needed 4 hooks and thread bars. 2 on each side of the zipper with the thread bars being just at the level of where the lace attached into the dress. After my first wearing I realized that this was not going to work… unlike were a wedding dress is bustled which is usually at the butt level or below, this was at my high waist so every time I sat down the fabric would push up and come right out of the thread bars. I had to carefully smooth the fabric down before sitting and that was a bit better. The next day I added 2 clear plastic snaps. One on each side just above the outer most thread bars and this helped greatly to give it just the extra security it needed to keep the hooks in.
Close ups of the bustle hardware. the top shows the 4 thread bars and the 2 plastic snaps at the back of the dress on either side of the zipper. (double click on the photo to see it in a larger view) The bottom photos show the hooks sewn on to the lace. I used tiny bits of silk organza under the hooks to give them a little bit of stabilization.

I didn’t make the bolero topper. 2 reasons. 1- I tried on one that I made for a different project, different fabric but just to see how it would look. Not good. Remember I used a high waist to attach the lace drape and it would have had to be so very short and look fairly ridiculous and with the regular bolero length it was way to much. Pleated fabric all around my waist and then a bolero. Took away any shape that I had. The second reason that I was secretly happy about the bolero was not good was a time factor, I was just about out of time!

Close up of the shawl. the top shows the fussy cut portion. I only tacked down the lace in several areas and caught it in the side seam. This left the bottom scalloped edges free and the fussy cut portion just tacked.
With the bolero out I went and got a one of my shawls and this was a much better option! I had enough silk dupioni left to makes long shawl and just enough lace to fussy cut and add it to the ends of the shawl. I love it!,
The dress and shawl hanging. I am leaving the bustle down while hanging to minimize the pull on the hooks/eyes and snaps.

The final dress on my dress form. Top show front and back. Bottom photo shows side front and side.


The entire outfit along with the elbow length hot pink gloves looks amazing! I wore this dress to the opera on a Saturday night. I am just loving living downtown Chicago, so close to so many of the things that I have always wanted to be a part of.

At intermission during the opera.
One of the nicest things was that several other opera goers had commented on how nice my dress was! It really felt nice to bring this cool garment to life!!

Some fun candid shots!!
Special thanks to Wendy for the hot pink gloves, Sarah Veblen for the draping knowledge and to Balenciaga for the inspiration. 😊

Happy Sewing!!

Kisses from my girls!! 

Tuesday, August 23, 2016

A pair of Corner dresses aka modified Vogue 1404

This project started way back in the spring. Something about the silhouette of this dress, Vogue 1404 Ralph Rucci dress,  really appealed to me. The nod to a sixties silhouette but with updated styling and details.

With mockup in hand I brought it to my mentor, Sarah Veblen, to assess the fit and help me make the necessary fitting changes. For this dress it was easier for me to start with a mock up of the pattern since I did not have any master pattern that was even close to this design. I did a full set of flat pattern measurements and made several adjustments from the start. The fit of the mock up was not too bad! My usual changes had to be made, including re shaping the entire armhole!

With the mockup of the dress on it was cute, it was an ok design but not the awesome amazing design that I wanted! Sarah took a sharpie and just started drawing right on the mock up. What if we did this? changed this? so with our heads two heads working together in collaboration we came up with a final design that still resembles the original Ralph Rucci silhouette but has really been changed to make it all mine!

In the photo below you can see the basic changes that were made to the design.

  • Neckline changed to a square
  • upper side front piece added, this lines up with the lower side pieces and creates a nice line. Also allowed for removal of the dart, acts as a princess seam.
  • Changed the waist inset piece and removed the ties.
  • changed the sleeve to either sleeveless or cap sleeve, also working on a 3/4 length sleeve for colder months.
  • added back shoulder darts
  • modified length.
  • redrafted my own lower band pieces.

Original line drawing versus my design changes.

    Here you can see my sketch of the design and my final product. The sketch still has a rounded neckline, as well as 2 different options for the cap sleeve.  I am very happy that I changed it to a square neckline! Works much better with the overall design of the dress.
 There are some differences between my own 2 versions. This was mostly due to the fabric choice.
The pink/floral dress is made from a floral print woven with some lycra along with the pink linen. I did not want to have so many seams or the topstitching on the lycra because as you know there can be some distortion and stretching with the lycra fabric.  Due to the lycra content the the pink/floral version I eliminated the front and back center seams using only a short side seam zipper for entry into the garment. I also eliminated all of the topstitching. Making these changes also made the construction of this garment much, much faster! The pink floral fabric was from Sawyer Brook fabrics (no longer available), the pink linen was from my stash possibly from fabricmart...

The pink/floral dress has a short side lapped zipper from above the waist inset detail to the underarm. 
The sneaker dress is made out of a japanese cotton twill and was oh so much fun to create!! Every single seam is topstitched using gold jeans thread. This meant I had to make quite a few needle and thread changes but it was so worth it! (of course in hindsight it would have been faster for me to just set up a second machine with the topstitching thread...) I used a 22 inch long invisible zipper down the center back seam. I tested several different colors and stitch types before deciding on the final top stitching. This fabric was from Louise Cutting that I purchased during the ASG National Conference.

Sneaker dress, in three views
The print of this fabric was so much fun to play with. I really took my time at my work table and thought about all of the components and how they work together and relate to each other prior to cutting out the pieces. Each piece was cut in a single layer so that I could place the pattern exactly where I wanted. On the pattern pieces I even lightly drew in the shape of some of the sneakers so that when I flipped the piece over I could make sure that things lined up properly. I am really glad that I purchased 4 yards of this fabric! I used up almost every bit.. I have some small scraps left and that's it! Instead of colorblocking on the this dress I did what I call print blocking. I used the directional print for the garment and in different areas I turned the direction of the print for more interest. In the photo below you can see the arrows pointing to different areas

  • top Arrow: the side front piece print turned sideways so the sneakers come across my body.
  • second arrow: main body of the dress and lower side panels, sneakers going up and down, print carefully cut to keep sneakers in pairs.
  • third arrow: waist inset: sideways print so sneakers go across my waist
  • forth arrow: pockets, sneakers cut sideways to add interest and break up the print on the side panel.
  • bottom arrow: The bottom panel print cut off grain so that the center front has 2 pairs of sneakers lining up to face each other.

Print placements along the dress

What really made this dress challenging was the inset corners. There are 4 inset corners that have to be sewn. The rest of the corners are either faced or seamed. I practiced a bit on the inset corners before sewing them in my fashion fabric! I made 2 muslins of the dress, the original and then one with all the design changes. I also just cut out some scraps and tested my inset corners on my scraps before proceeding.To be succesful with my corners, I did several tests and I documented what I did with my tests so I could recreate the results! Having to pick out an inset corner in fashion fabric would have been a nightmare and the chances of getting a good result would have diminished exponentially! Practice allowed me to give my hands the feeling of what needed to be done so my brain could less worry about if I was doing it right. Hopefully that makes sense!!

The inset corners on the pink/floral dress were harder to do because the lycra content provides a measure of squishiness to the fabric that is not present in an all cotton woven. The corners below look real good to me. Not 100% perfect but that's OK!!

Detail of pink/floral dress inset corners.
Detail of inset corners and top stitching on the Sneaker dress
After construction of the pink/floral corner dress I did have to make a slight adjustment to the dress and the pattern. The armhole was just a tad too high. I wore the dress as constructed to a day long meeting and then when I got home I promptly re-cut the armhole lowering it by 3/8 of an inch. This made a big difference in comfort! I transferred these changes immediately to the master pattern so I would not forget them...The lower armhole is bias bound in the version with the cap sleeve and the entire armhole is bias bound for the sleeveless version. I used pre-purchased bias binding from my stash for both dresses.
Bias faced armholes on both dresses.
Both dresses are unlined and have serge finished seams for neatness. There are a couple small spots on the pink/floral dress that are just finished with pinking shears because I was in excited construction mode and forgot the serge finish them before the next step! I like having them unlined to wear in the hot humid weather however this does mean that I have to wear either a skirt slip or a pair of shorts slip like this one from Soma. It keeps the fabric from clinging to my tush and also removes any chance of thigh rubbing!

inside of the dresses, unlined and 3 thread overlock serge finished for neatness.

Here are some photos of me in my dresses! Unfortunately I don't have any real good ones of me in the pink.floral except for this hotel room selfie! It will have to do for now!.
Pink/floral corner dress with pink and orange leather flats. Perfect dress!

Photos of me being a tourist along the National mall. At the WWII monument and in front of the Holocaust museum. I have paired my Sneaker dress with a pair of yellow converse! I wore this dress ALL DAY and must have walked miles and miles in it and it was wonderful! Comfortable, cool and certainly unique. I received many compliments from strangers that day.   


Happy Sewing!
Cheers from Princess Victoria!!