Monday, August 29, 2016

Inset corner tutorial

While I was making my 'Corner ' dresses I had practiced quite a bit on construction of inset corners. I decided to document the process on the floral/pink corner dress so that I would have it for future reference. What better way to store 'future' reference material than in a blog tutorial!

As a reminder here is the dress we are talking about with 4 inset corners to be sewn.There are actually quite a few additional corners in the dress but some are faced corners at the neckline and the others are built in during construction.


Here is a close up look at the inset corners


On the pink floral dress two of these inset corners had to be sewn in a single long seam. In the photo below you can see, on the left , the 'T' shape portion of the dress and in the upper right the portion of the skirt that needs to be sewn to it in order to complete the construction. The 2 upper corners on this bottom piece are one pair of inset corners. You can see in the bottom right picture the black outline of where this seam is.
To start the process I first added a small square of fusible interfacing to the outer corner (upper right).
I then also draw in the seam lines on BOTH sides, Faint white line in upper left and pink line in the other photos. I then do some stay stitching just a smidge under 5/8ths seam allowance at a tiny sticth length to reinforce the corners. On these I used 1.6 stitch length. 
Next step was to clip ALL the way to the corner on the outer corner. (this is why testing is so crucial! If you don't clip far enough there will be a bubble, if you clip to far then there will be a hole!)
The stabilizer and the stay stitching both help to keep the integrity of the corner intact. 

The next step is lining up the corner to prepare for sewing. In the case of this there are fairly long seams coming up the these corners. This meant that I pinned from the corner out to make sure everything lined up properly. I put a pin in exactly at the corner, folded back the fabric to make sure it then went in exactly at the marked corner on the back piece and the pinned this in place. I also added on other pin along the seam at the notch. 

The start of the seam is normal, until you come the the corner where you have to rotate the fabric all the way around to match the next seam line! This is where accurate marking AND a good clip are most crucial!! As I approach the corner I drop my stitch length and carefully and slowly sew to the exact mark. Leaving the needle in the down position, I left the presser foot and rotate the Top fabric all the way around to match the next seam line. This in effect takes that outer corner that was clipped and opens it all the way up!

Once the fabric is rotated, you need to take a minute to line everything up correctly. I make sure everything under the preser foot is as falt as possible and that there are no bumps to sew over (this means a bubble will form) I also make sure that the notches along the seam are also lined up. In the upper right photo you can see the clip in the outer corner fully opened up on the bottom layer where the black arrow is.once everything is line up I take several tiny stitches before returning to my regular stitch length.

After sewing take to the iron and give everything a good press! You can then go back and finish off your seams with a serge finish or pinking. I have done a mix of both in this floral dress. 

Happy Sewing!!

Friday, August 26, 2016

In the Sketchbook- August 2016

Welcome to In the Sketchbook, a monthly look at fashion design sketches that we are working on for ourselves. Sketching garments on a personal croquis is a great way for the individual couture enthusiast to move beyond the use of commercial patterns and into a world of personalized design! It can be intimidating at first, but with a little bit of practice it becomes something you look forward to. Join us for a look of what we have going on In the Sketchbook! Brought to you by Wendy Grossman of Couture Counsellor and Steph King from Siouxzeegirl Designs.

My inspiration for this month's sketching and designs came from politics and a visit to Washington DC. I was in DC for a full week at the very end of July and beginning of August. While I was there I decided to use another 'What if' scenario to jump start my creative juices.

So this time it was a two-fold what if:
What if I was attending the presidential inauguration and followed up with a what if I was invited to the inaugural ball?

For the inauguration itself I imagined myself in some sort of a smart day dress ensemble and since this event happens in January and is outside I would most likely have on a coat. I decided to ignore the coat for now and just go for the idea that it would be unseasonably warm outside!
Similar silhouettes, one as a dress and one a 2 piece ensemble. The dress on the left, in blue, is meant to be worn with knee high boots. The 2 piece ensemble is one that I really like and is representative of fabrics in my collection. Although I really like these two looks I would not likely wear them to the inauguration, not serious enough to my eye. 

These 3 options represent a more fitted look. All 3 have very different vibes! I think the first one in grey with brown lacy accents is my favorite for the occasion, it is the most serious. The one in the middle is my second choice, the colors give a feeling of hope, something that I feel is really needed in this political climate! The Blue dress with pleating detail is quite interesting and unique but probably not the best choice for the inauguration.

These 2 were my rejects... I included them just to show how I work through different ideas. I was thinking a midi length skirt would work on me but clearly this style looks frumpy. A more fitted silhouette as in the center skirt in the photo above is a much better look on my body. The second look was just playing with angles, I saw this skirt on a work acquaintance and loved the look on her, she is very tall and slim and the a-line with the broken lines gave her some shape. On me this just looks blah. the Jacket has some potential but would need quite a bit of work! Obviously I did not even like it enough to color it in!

Now onto the Inaugural Ball! There are so many red-carpet looks out there on the internet and in fashion magazines that are just so abhorrent to me. Many of them really seem to be all about the hey look at me factor and how much attention can they draw and not necessarily what was beautiful and flattering to the wearer. That was not my goal! My goal was to play with different dress ideas to come up with something that would work on my body, be beautiful as well as respectable!
This first set of dresses is an interesting study. I had in mind yards of beautiful silk chiffon and how would I make that work along with some structure. As soon as I finished the first drawing all I could think of was how OLD FASHIONED and matronly it looked! So I immediately worked on a second design that would give this same dress a much updated look! I think I achieved that but then also made this more into a cocktail dress versus a ball gown.


These three dresses were playing with different ideas.I did not want to just sketch multiple of the same dresses or same silhouettes. The first is representative of a more traditional gown with large inverted pleats on the skirt and lace detail scattered throughout. This would be quite beautiful but maybe a trifle expected. The middle is an interesting draped gown with a bubble hem. It is interesting... not sure I would ever wear that. The hem would have to be very exaggerated and the bodice very fitted to make sure the silhouette came out properly and not just looking like a giant potato sack! The third dress is an all ruched bodycon dress. It has possibilities but there are much better designs for me. As you can see none of these interested me enough to even bother adding color to them!

These two are my favorite! The purple gown was sketched very quickly to try to capture the fluidity and the softness of all the draping. Both gowns are draped and both have elements of asymmetry. I envision the purple in yards of chiffon and the green in more of a crepe de chine or a lovely charmeuse. 

Wendy and I would love to linkup with other bloggers! If you are interested in joining in this creative adventure or just want to share what you have been designing, please leave a comment to this post with a link to your blog post or online photos and we will add the links  to the blog post for everyone to enjoy!

Don't forget to hop on over to see what amazing designs Wendy Grossman of Couture Counsellor has come up with this month!


Tuesday, August 23, 2016

A pair of Corner dresses aka modified Vogue 1404

This project started way back in the spring. Something about the silhouette of this dress, Vogue 1404 Ralph Rucci dress,  really appealed to me. The nod to a sixties silhouette but with updated styling and details.

With mockup in hand I brought it to my mentor, Sarah Veblen, to assess the fit and help me make the necessary fitting changes. For this dress it was easier for me to start with a mock up of the pattern since I did not have any master pattern that was even close to this design. I did a full set of flat pattern measurements and made several adjustments from the start. The fit of the mock up was not too bad! My usual changes had to be made, including re shaping the entire armhole!

With the mockup of the dress on it was cute, it was an ok design but not the awesome amazing design that I wanted! Sarah took a sharpie and just started drawing right on the mock up. What if we did this? changed this? so with our heads two heads working together in collaboration we came up with a final design that still resembles the original Ralph Rucci silhouette but has really been changed to make it all mine!

In the photo below you can see the basic changes that were made to the design.

  • Neckline changed to a square
  • upper side front piece added, this lines up with the lower side pieces and creates a nice line. Also allowed for removal of the dart, acts as a princess seam.
  • Changed the waist inset piece and removed the ties.
  • changed the sleeve to either sleeveless or cap sleeve, also working on a 3/4 length sleeve for colder months.
  • added back shoulder darts
  • modified length.
  • redrafted my own lower band pieces.

Original line drawing versus my design changes.

    Here you can see my sketch of the design and my final product. The sketch still has a rounded neckline, as well as 2 different options for the cap sleeve.  I am very happy that I changed it to a square neckline! Works much better with the overall design of the dress.
 There are some differences between my own 2 versions. This was mostly due to the fabric choice.
The pink/floral dress is made from a floral print woven with some lycra along with the pink linen. I did not want to have so many seams or the topstitching on the lycra because as you know there can be some distortion and stretching with the lycra fabric.  Due to the lycra content the the pink/floral version I eliminated the front and back center seams using only a short side seam zipper for entry into the garment. I also eliminated all of the topstitching. Making these changes also made the construction of this garment much, much faster! The pink floral fabric was from Sawyer Brook fabrics (no longer available), the pink linen was from my stash possibly from fabricmart...

The pink/floral dress has a short side lapped zipper from above the waist inset detail to the underarm. 
The sneaker dress is made out of a japanese cotton twill and was oh so much fun to create!! Every single seam is topstitched using gold jeans thread. This meant I had to make quite a few needle and thread changes but it was so worth it! (of course in hindsight it would have been faster for me to just set up a second machine with the topstitching thread...) I used a 22 inch long invisible zipper down the center back seam. I tested several different colors and stitch types before deciding on the final top stitching. This fabric was from Louise Cutting that I purchased during the ASG National Conference.

Sneaker dress, in three views
The print of this fabric was so much fun to play with. I really took my time at my work table and thought about all of the components and how they work together and relate to each other prior to cutting out the pieces. Each piece was cut in a single layer so that I could place the pattern exactly where I wanted. On the pattern pieces I even lightly drew in the shape of some of the sneakers so that when I flipped the piece over I could make sure that things lined up properly. I am really glad that I purchased 4 yards of this fabric! I used up almost every bit.. I have some small scraps left and that's it! Instead of colorblocking on the this dress I did what I call print blocking. I used the directional print for the garment and in different areas I turned the direction of the print for more interest. In the photo below you can see the arrows pointing to different areas

  • top Arrow: the side front piece print turned sideways so the sneakers come across my body.
  • second arrow: main body of the dress and lower side panels, sneakers going up and down, print carefully cut to keep sneakers in pairs.
  • third arrow: waist inset: sideways print so sneakers go across my waist
  • forth arrow: pockets, sneakers cut sideways to add interest and break up the print on the side panel.
  • bottom arrow: The bottom panel print cut off grain so that the center front has 2 pairs of sneakers lining up to face each other.

Print placements along the dress

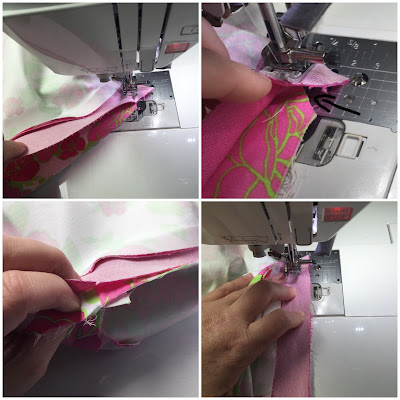
What really made this dress challenging was the inset corners. There are 4 inset corners that have to be sewn. The rest of the corners are either faced or seamed. I practiced a bit on the inset corners before sewing them in my fashion fabric! I made 2 muslins of the dress, the original and then one with all the design changes. I also just cut out some scraps and tested my inset corners on my scraps before proceeding.To be succesful with my corners, I did several tests and I documented what I did with my tests so I could recreate the results! Having to pick out an inset corner in fashion fabric would have been a nightmare and the chances of getting a good result would have diminished exponentially! Practice allowed me to give my hands the feeling of what needed to be done so my brain could less worry about if I was doing it right. Hopefully that makes sense!!

The inset corners on the pink/floral dress were harder to do because the lycra content provides a measure of squishiness to the fabric that is not present in an all cotton woven. The corners below look real good to me. Not 100% perfect but that's OK!!

Detail of pink/floral dress inset corners.
Detail of inset corners and top stitching on the Sneaker dress
After construction of the pink/floral corner dress I did have to make a slight adjustment to the dress and the pattern. The armhole was just a tad too high. I wore the dress as constructed to a day long meeting and then when I got home I promptly re-cut the armhole lowering it by 3/8 of an inch. This made a big difference in comfort! I transferred these changes immediately to the master pattern so I would not forget them...The lower armhole is bias bound in the version with the cap sleeve and the entire armhole is bias bound for the sleeveless version. I used pre-purchased bias binding from my stash for both dresses.
Bias faced armholes on both dresses.
Both dresses are unlined and have serge finished seams for neatness. There are a couple small spots on the pink/floral dress that are just finished with pinking shears because I was in excited construction mode and forgot the serge finish them before the next step! I like having them unlined to wear in the hot humid weather however this does mean that I have to wear either a skirt slip or a pair of shorts slip like this one from Soma. It keeps the fabric from clinging to my tush and also removes any chance of thigh rubbing!

inside of the dresses, unlined and 3 thread overlock serge finished for neatness.

Here are some photos of me in my dresses! Unfortunately I don't have any real good ones of me in the pink.floral except for this hotel room selfie! It will have to do for now!.
Pink/floral corner dress with pink and orange leather flats. Perfect dress!

Photos of me being a tourist along the National mall. At the WWII monument and in front of the Holocaust museum. I have paired my Sneaker dress with a pair of yellow converse! I wore this dress ALL DAY and must have walked miles and miles in it and it was wonderful! Comfortable, cool and certainly unique. I received many compliments from strangers that day.   


Happy Sewing!
Cheers from Princess Victoria!!

Monday, August 22, 2016

and sometimes life throws you a curveball!!

My apologies for the long radio silence or maybe more accurately, I should say for the keyboard silence!

I had several great posts planned and even started to be shared with you for the past month.
July was just a crazy busy month with travel and work and then at the end of July/early August I made my way to Washington DC for a week for work. A grueling 6 nights/7 days of a tradeshow and here is where I started my downhill roll. Felling a little run down and crappy but hey, I figured it was from tradeshow work making me exhausted.

I come home and before a week was out I was back in the hospital :(
I wont go into the nitty gritty, suffice it to say that I thought I was going in for a night or two. You know for rehydration and what not... NOPE... 6 days later I finally made my way home feeling flattened and somewhat destroyed.

Acute pancreatitis is the pitts.

And it isn't like you just rest for a few days and your all better, No, No, No it's a LONG process. it takes weeks for your body to recover and during that time your are walking on eggshells around your body and especially around your GI system. Zofran and Norco become your best friends.

I also realize that I am surrounded by some of the most wonderful people in the world, people who stop what they are doing and come to be with you. To sit by your side and remind you that you are loved. They fill you with hope that this nastiness will one day also be gone. People who are there with you through the good and bad. If nothing else it reminds me that I am not alone and that is so very important.

Any of my longtime readers know that last year I had my first bought with Acute Pancreatitis and the ensuing consensus by the doctors was that my gall bladder was diseased and that it needed to come out. Surgery happened and yes my gallbladder was diseased and yes I felt much better. Fast forward 7 1/2 months and WHAM! another acute pancreatitis attack.

Now what??? Now the docs have to do some serious sleuth work to figure me out. There are a couple possibilities and some ideas as to what is causing my pancreas to rebel. For now, it is a waiting game. I wait for my pancreas to settle down so that we can start the tests in mid september.

Until then, I am getting some well deserved R&R and even starting back to puttering in my sewing studio! Although, being down has not kept me from doing some online fabric shopping!! Thanks to Fabrics and Fabrics and Emmaonesock, I have some wonderful fall fabrics coming to my door!.

I have quite a few things to blog about so stay tuned!!
and Happy sewing!
Princess Victoria playing dressup with my UGG slippers!