Showing posts with label Sarah Veblen. Show all posts

Wednesday, May 25, 2022

Sarah Veblen Choose Your Own Focus Workshop -April 2022

 One of my favorite type of workshops is a choose your own focus workshop! The type where you choose the project and what things you want to focus on learning. In Sarah Veblen’s workshops this does not mean you are just “sewing”. Time is spent learning from the other participants and working on taking another step on the journey of exploration of design and construction. 

This particular workshop was 3 days long and i knew exactly what I wanted to work on! In the fall and winter I worked on perfecting the fit of a new French jacket pattern. Sadly I have given away all but one of my collection of French jackets and I was finally feeling like I had enough of a wardrobe built up that I could take the time needed to complete a new jacket. This time I really wanted to incorporate this beautiful butterfly guipure lace. I had everything I needed!! This spring workshop with Sarah was just what I needed to get my butt in gear to make the jacket. I knew what parts I could easily do by myself and then there were parts that I would have either had to do some research in books and the web OR I could bring them to Sarah.

I had some questions on the sleeve cuff. Actually lots and lots of questions! Of course many of the questions I had were around the best and correct way to execute the sleeve cuff. As expected there is no right or wrong way and it all depends on the design you want and how you want to execute… designers choice! It was really good to have a nice conversation with a sewing professional and several other experienced makers to play off ideas and pros and cons and just to share information. I find it always to be very inspiring and much less boring than just picking a pattern and following those directions! (Although there are times when just following a pattern is so nice and easy!)

Discussions were had around how to construct the sleeve cuff, how to sew on the butterfly lace and then to design where to put the butterflies. We also assessed different traditional French jacket trims and buttons as well. Turns out after spending a lot of time pinning and repinning that the trims, all the trims I brought, were just too heavy and then everything looked too forced and stuck on. So much better without the trim!

I also worked on two muslins, one a straight skirt. Just a front and a back, Sarah draped in the  front and back darts and perfected the fit. I later used this pattern to make a straight denim style skirt and was very happy with the fit!

The other muslin was for Vogue 9187 an armsyce princess seam shell. That muslin is still hanging in my sewing area waiting for all the changes to translated onto the pattern and a new muslin made. 

I think once the shell is perfected then I really only have 2 more master patterns to work on. A button down or button up shirt  and shirt dress. I cant believe it has taken me almost 2 years to remake my entire wardrobe of patterns after all that weight loss. Every time my pancreas acts up I just keep my fingers crossed I don’t have another mega weight loss! 

The 3 days were filled with so much good sewing and design time. Sarah gave us all several challenges over the time. One was drawing necklines on our coquis and exploring designs that we would normally not use along with the exercise of fast sketching. Sketch as many necklines as you can in 10 mins. 

Another exercise was to take inspiration from a nature photograph and put together a color palette that would be corresponding to the photo. I opted to use a photo taken at the Garfield Park Conservatory and use swatches from my big swatch collection for my palette.


We spent time every morning and afternoon gathered together talking, discussing our projects and any other design questions that come up. This discussion time is so key to learning from each other and often leads to lots of exciting discoveries and ideas.

I really enjoy spending creative time with friends new and old! It really is inspiring to see the amazing garments that these ladies create.

Happy Sewing!

Little Arya joined us one day and she enjoyed having her own muslins to work on! 


Friday, February 4, 2022

Mini Lounge Collection! Keeping Cozy this long winter - Part 2

I am back with part 2 on my mini cozy, comfy collection! This blog post I will tell you about the two tops that I made to go with the matching jogger and hoodie.

Boat Neck Tee

Easy Fit and Sew Tank
The tank top is from Jen Stern and is the Easy fit and sew tank top, view A. This tank has a great size range from 2XS to 5XL Bust from 34” to 58” and hip from 36” to 60”. 

The boat neck short sleeve tee is self drafted and the boat neck portion was developed from a Sarah Veblen zoom class on boat necks. Size range- just me!

The Jen Stern tank is my TNT tank top pattern. I have made a couple changes to the pattern over time. Little tweaks here and there. The 2 biggest changes were to lower the underarm 3/8 inch with a little tweak to the back armhole shape and adding about 3/8 inch across the width in the back at the level of mid armhole. I did this because on the first ones my bra strap was peeking out  and i just needed a smidge more fabric. I like that the neckline and armholes are finished with a band. My favorite method of finishing and the neckline is such a nice U shape. Very flattering on me. 

For this specific tank, I had to piece the back together. I originally was planning to make a long sleeved knit t-shirt but since I changed the design to short sleeves, I was blue to eek out both tops but had to do a smidge of piecing. I think it looks very intentional and could be fun for a color blocked version or maybe make that top part out of a fun mesh knit.

The Tee shirt is my self drafted tee with a boat neck that I drafted after taking a zoom class with Sarah Veblen. I never thought that a real boat neck would look good on me and it was a fun exercise last year to develop this neckline on my master knit bodice pattern.


The Fabric is a limeade solid knit is an Oeko-Tex Viscose/Spandex 4 way knit jersey. It is quite a nice knit that feels soft but substantial. It washed and dried nicely and was very easy to sew.

The only interfacings/stabilizers that I used in both tops was to stabilize the very narrow shoulder seams of both tops with SewkeysE Extremely fine fusible 1/2” woven stay tape. 

No other notions except for more fun Kylie and the Machine labels were used.

The construction was done on both the sewing machine and the serger. The shoulder seams were done on the sewing machine with a straight stitch and the side seams, sleeve insertion on the tee and band applications on the tank were done with a 4 thread serger.

To finish the neckline and sleeve hem on the tee I used a serpentine stitch. Very pretty and a little bit of stretch to accommodate the fabric. The hem was done with just a straight stitch with a lowered presser foot pressure to keep the fabric from slipping.

Boat neck Tee details

For the hem finish on the tank I tried something new. I did a blind hem stitch on the serger using a blind hem foot. I am not sure if it was done correctly but I like the outcome! It  gives the tank the effect of having a banded hem finish without the work of attaching a band. A technique to keep in mind for future makes. 

Tank top details

These two tops were quick and easy to make, even with trying a new hem method on the tank. I like taking the time now and then to try a new method, you never know when you will learn a new and better way. 

Happy Sewing!! 

We enjoyed a snow day in Chicago this week. Me, my daughter,  the Princess and the mini-princess all put on the snow gear went to the local park and played in the snow! It was just so much fun!!! I felt like a kid again making snow angels and playing in the snow :)


Friday, May 1, 2020

Apron Time!! Crossback reversible Apron by Indygo Junction


Happy May everyone. This is going to be another very long month for us in Chicago!

I really wish that it was quite different but it is what it is and we must make the best of it and continue on!

With this corona virus lock-down continuing I decided that I really needed to make an apron. It has been on my sewing to-do list for several years. In fact, a couple years ago I made Aprons for all my family and never made one for me… I think at the time I may have burned out on sewing Aprons!!
Part of the reason I love living in downtown Chicago is that, under normal times, I could run out daily if I wanted to go pick up fresh bread or bakery items. Now, in the times of corona virus that has become difficult or near impossible. (with an underlying condition it is recommended that I have as little contact as possible) 

Being totally spoiled with such lovely fresh baked goodies local to me I decided that I needed to give it a try at home. I realized that I needed an Apron!
I had made this Indygo Junction Crossback Reversible Apron as gifts for my granddaughter’s kindergarten teachers last year and they really liked them. So , I made an awesome one for
me!! I traced mine out in size L/XL and I think it is perfect. It has nice coverage down the front, easy on and off and no worries about it loosening while wearing.  (I had made both a bigger and smaller ones before for others and had tried them on)

I had the perfect fabrics in my collection!  These fabrics really make me happy when I put on my apron!! The Klimt inspired fabric was a gift from The Couture Counsellor for my birthday several years ago and the yellow-green painterly squares are from my collection.

I made two changes to the pattern. The big one was to change up the neckline. I wanted to play with a sweetheart neckline inspired by a Pandemic time online learning Live Video Classes via Zoom with Sarah Veblen. (These are great! Checkthem out on her website!) This sweetheart neckline let me play with a new design feature and just added some fun to the pattern. The other change I made was to use pockets on both sides and I shifted them slightly forward.


I had just enough fabric leftover to make the Princess a matching Apron. 

Overall a fun and easy project that I needed!! Plus, I have been having fun wearing my new apron and baking some new things. I have made soft pretzels that I just love! Lots of low fat protein choc chip cookies and Artisan bread!


Happy Sewing!! Stay Safe!

And Princess Victoria and I want to remind you to Wash Your Hands!!

Sunday, July 7, 2019

Yellow mohair and wool challis dress- Self drafted

This dress was so much fun to make and even more fun to wear! The design started in spring of 2018. I purchased the lovely lightweight printed wool challis from Emma One Sock and brought it with me to Design II workshop given by Sarah Veblen.


I instinctively knew that I wanted to pair the panel with a yellow fabric and I also knew that I wanted some textile that had a different texture. During the Design II workshop we had a day to spend at Michael's Fabrics/ A Fabric Place and between doing my fabric exercises, fawning over all the amazing fabrics and shopping I found a wool mohair by Ungaro that was the most perfect shade of yellow and had such a delightful texture. I fell in Love!! And bought a 1/2 a yard which actually turned out to be more like 3/4 of a yard when I measured it at home! (Thank you Jonathan!)


My original idea was a fitted princess seam bodice with a fitted 2 piece 3/4 length sleeve with a shaped fuller skirt attached at the shaped empire seam and curving around the body to hit at the lower back. I had to modify my design a little bit because I felt like the mohair was going to be overworked and some too hot in a closely fitted sleeve. I played with a bunch of different sketches and finally came up with the idea of using a dolman sleeve. I used Armstrong’s Pattern making for Fashion Design to draft the dolman sleeve and then made modifications for the fit that I wanted. Luckily, I had just enough of the yellow Mohair to cut out the longer sleeves which ended up being somewhere between 3/4 length and bracelet length. 

I made one muslin of the newly drafted bodice and then moved into my fashion fabric. Yippee!
I underlined the entire bodice with silk organza and the entire skirt pieces with imperial batiste and then lined the dress in a bright yellow china silk.


After I cut out and underlined all the pieces with hand basting I pinned them onto my dress form just to get a visual of how they would look. AND... It was OK. Just OK. Not amazing and it felt a little flat to me. Which totally bummed me out since I was really excited about the entire project. SO I left it on the dress form for a while just to let it marinate and speak to me. Thankfully I had an ‘aha’ moment and pinned in strips of the printed wool challis to see what that would look like and it was perfect to my eye! It was just missing that pizzazz. I cut bias strips out of the leftover wool challis and used rat tail cording to create beautiful piped princess seams and piped neckline. This detail really brought the design together and made it cohesive.


The dress was done in time for the Haute Couture Club of Chicago Autumn colors challenge, was worn to a Broadway in Chicago Musical and to the Opera over the winter and also worn in The Haute Couture Club of Chicago annual fashion show. For the fashion show, I paired it with a beautiful fascinator that was made by another member of the club for the raffle. It was so much fun wearing the fascinator on the runway!


Designing, sewing and wearing this dress really ticked off a bunch of boxes for me!
- I let the fabric ‘speak’ to me and adjusted my design to what the fabric would be best in doing.
- This led me to drafting dolman sleeves
- Dolman sleeves are out of my normal fashion box, let me push my boundaries.
- Took the time to assess my design midway through the process.
- Sewing piping into princess sleeves using mohair as the fashion fabric required accuracy and patience!
- I had FUN


Happy Sewing!!

The Princess turned 5 in June and we celebrated her birthday on the beach with a bunch of her friends and had a lovely day!! I can't believe my grand baby is 5...


Friday, May 10, 2019

Metallic neutral sheath dress, jacket and skirt

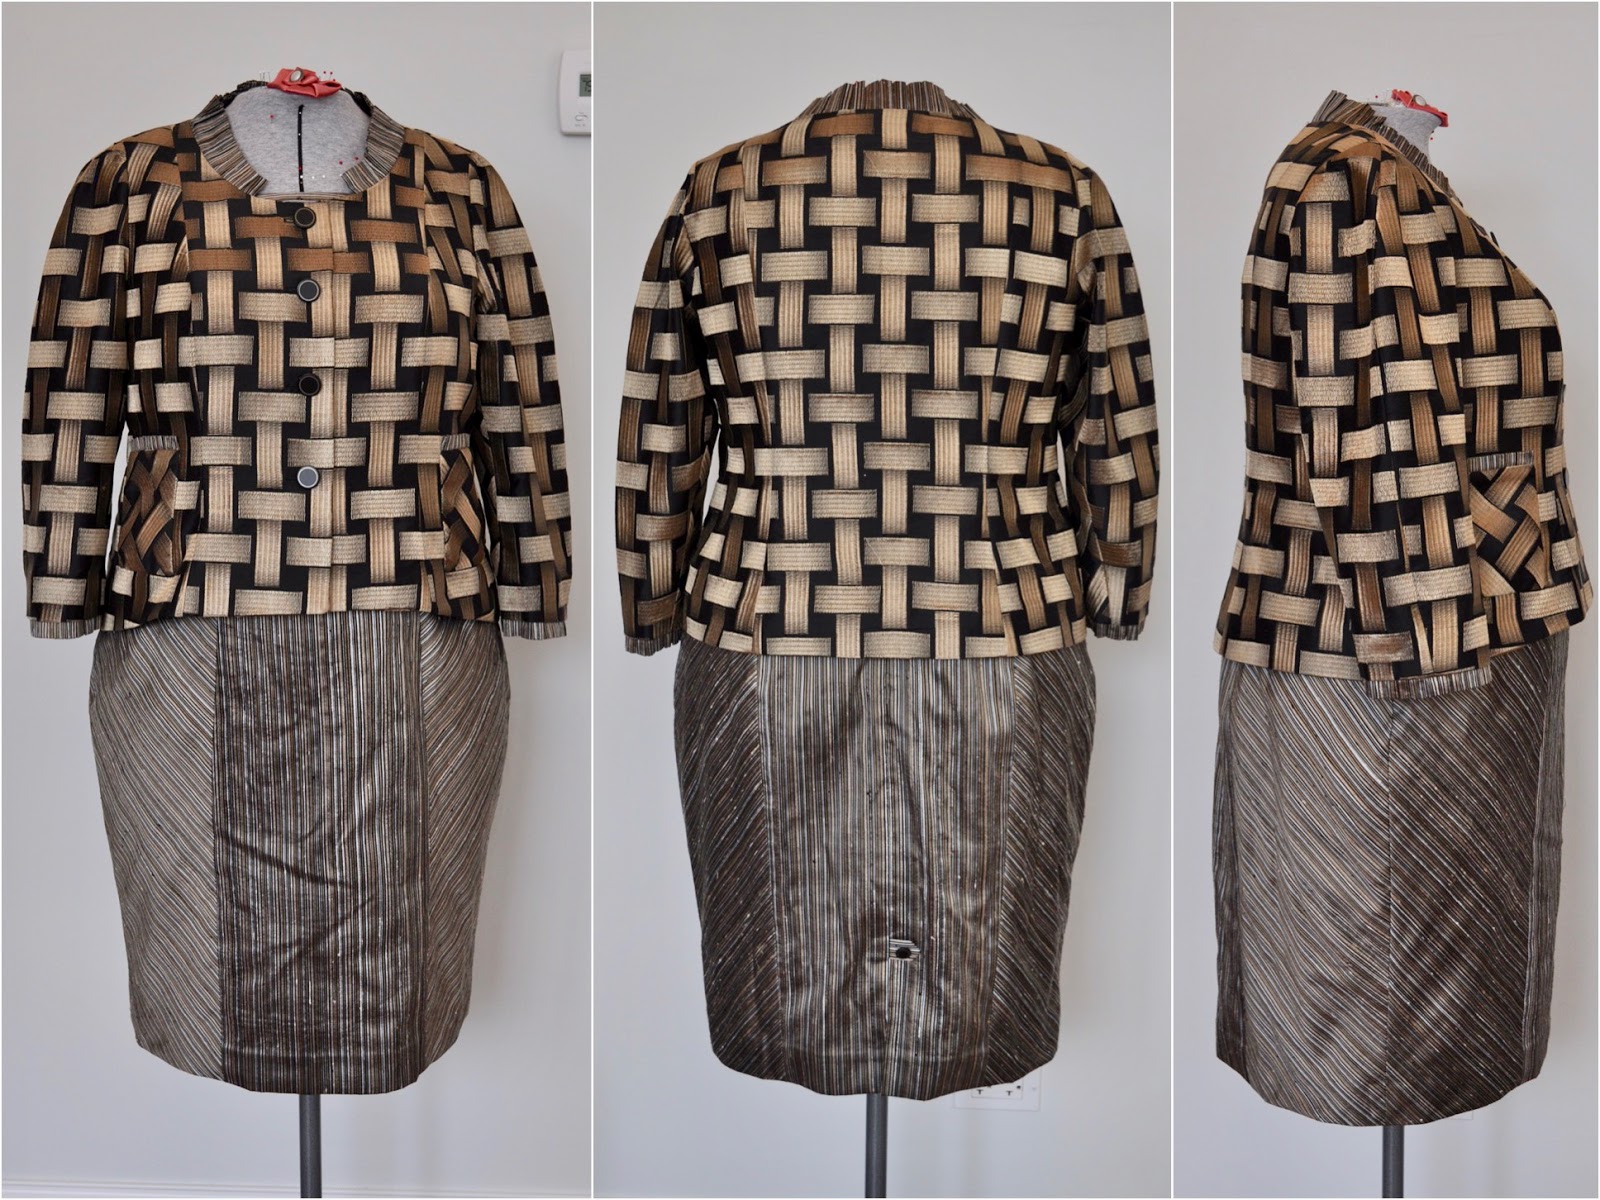
 This garment ensemble is long overdue to be blogged. It all started last spring during Design 2 intensive with Sarah Veblen. One of my exercises was to work on and develop what neutral means to me in fashion, design and sewing. It was a great time for me to explore this since I was also in great need of new work clothes.


The designs were all developed by me with some design considerations given to me by Sarah.

The Sheath Dress 
The sheath dress was one that I had been wanting to create for a long time and I had so much fun working on a master pattern that has since morphed into so many designs! For instance, I took my base master sheath dress pattern and modified it to create this metallic neutral.

I started with sketching some ideas for a dress and then added a jacket and then thought that a skirt addition would make a mini capsule perfect for work trips.

I modified the pattern by:
  • Raising the front neckline
  • Lowering the back neckline
  • Adding extended shoulder for a sort of cut on cap sleeve
  • Side fronts and side backs cut on the bias
  • The front piece was split horizontally with a curved line to take advantage of the lines and nap of the silk dupioni
  • Addition of a tab and small button to the back vent. The button matches the jacket buttons. Just a different scale.
  • Addition of a welt zipper pocket in the right side front piece

The dress fabric is a lightweight metallic striped silk dupioni, underlined with silk organza and line with ambiance lining. I purchased the silk from Fabrications shop at the ASG national meeting when it was in Indianapolis a couple years ago.


The Jacket
With the dress completed, I moved onto the jacket. The fabric for the jacket was a gift from my great friend, Wendy Grossman who blogs over at The Couture Counsellor. I knew that I wanted the jacket front shape to echo the curve of the bodice on the dress front. But in a very delicate way. In my mock up i tried a couple different placements for the curved front and I had to be careful to place it in such a way that I did not accentuate my full tummy.

With the jacket front shape adjusted, the rest of the construction was fairly simple. Except that I had to match the basket weave as perfectly as possible! I also wanted to pull in the elements of the dress in a way that the set really went with each other and not just a jacket that looked good with the dress. So, in addition to the front waist curve, I also used the dress silk dupioni fabric to create pleated details on the jacket.

I added:
  • pleated cuff treatment
  • pleated pocket treatment 
  • pleated collar/neck treatment (my favorite part) 


The main jacket pattern is made from my master princess seam jacket pattern and 3 piece sleeves with the under sleeve cut on the bias. I simply love using a 3 piece sleeve! It shapes and fits so nicely to my arms and it takes much less yardage overall when using a 3 -piece sleeve because the sleeve is in 3 pieces you can puzzle fit it into smaller areas.

For the lining used a silk remnant for the body portion, making sure to include a back pleat for ease and comfortable movement. The sleeves are lined with black ambiance lining. 


The Skirt
With the leftover basket weave fabric and ambiance lining, I made a matching skirt. Thinking that this would be a perfect skirt suit. However, I dont often wear it that way because I don't like the way the front yoke of the skirt looks when paired up with the jacket. This is a bit nit picky on my part. Instead of using darts on the skirt I choose to add in a yoke and cut it on the bias. My thought for doing it this way was that then I would not have to match the basket weave vertically between the jacket and the skirt. All I succeeded in doing was breaking up the line so that the eye is drawn right to the yoke. Not where I want peoples eyes staring at!! LOL!! From the back it looks amazing because the back yoke is covered by the jacket. 

The skirt pattern was developed from my basic a-line master skirt pattern. I transferred the darts into a yoke on the front and back.I also added in a 'secret' pocket on the inside facing. Works perfect for when I am working trade-shows and need to have a credit card/cash etc in a safe place.

A very good design learning opportunity for me. Luckily I have plenty of other tops and another jacket that goes very well with the skirt so it is not an orphan sitting in my closet! Plus I do also wear it as a skirt suit for work. It's not that bad....


 I mentioned above that I have another jacket in my closet that I made quite a few years ago that also works quite well with the sheath dress and the skirt. It is from a metallic denim/twill with a very wide stripe that worked perfectly for this garment. The pattern is one of Cynthia Guffey's - J5054. Her website is back up and running, but not sure for how long... so if you like, go buy it!

Happy Sewing!!!

Here is the princess showing off 2 new shirts and dancing in her new PJ's!! She loves coming over and picking out fabric for me to sew her new clothes :)