Showing posts with label A-line skirt. Show all posts

Friday, May 10, 2019

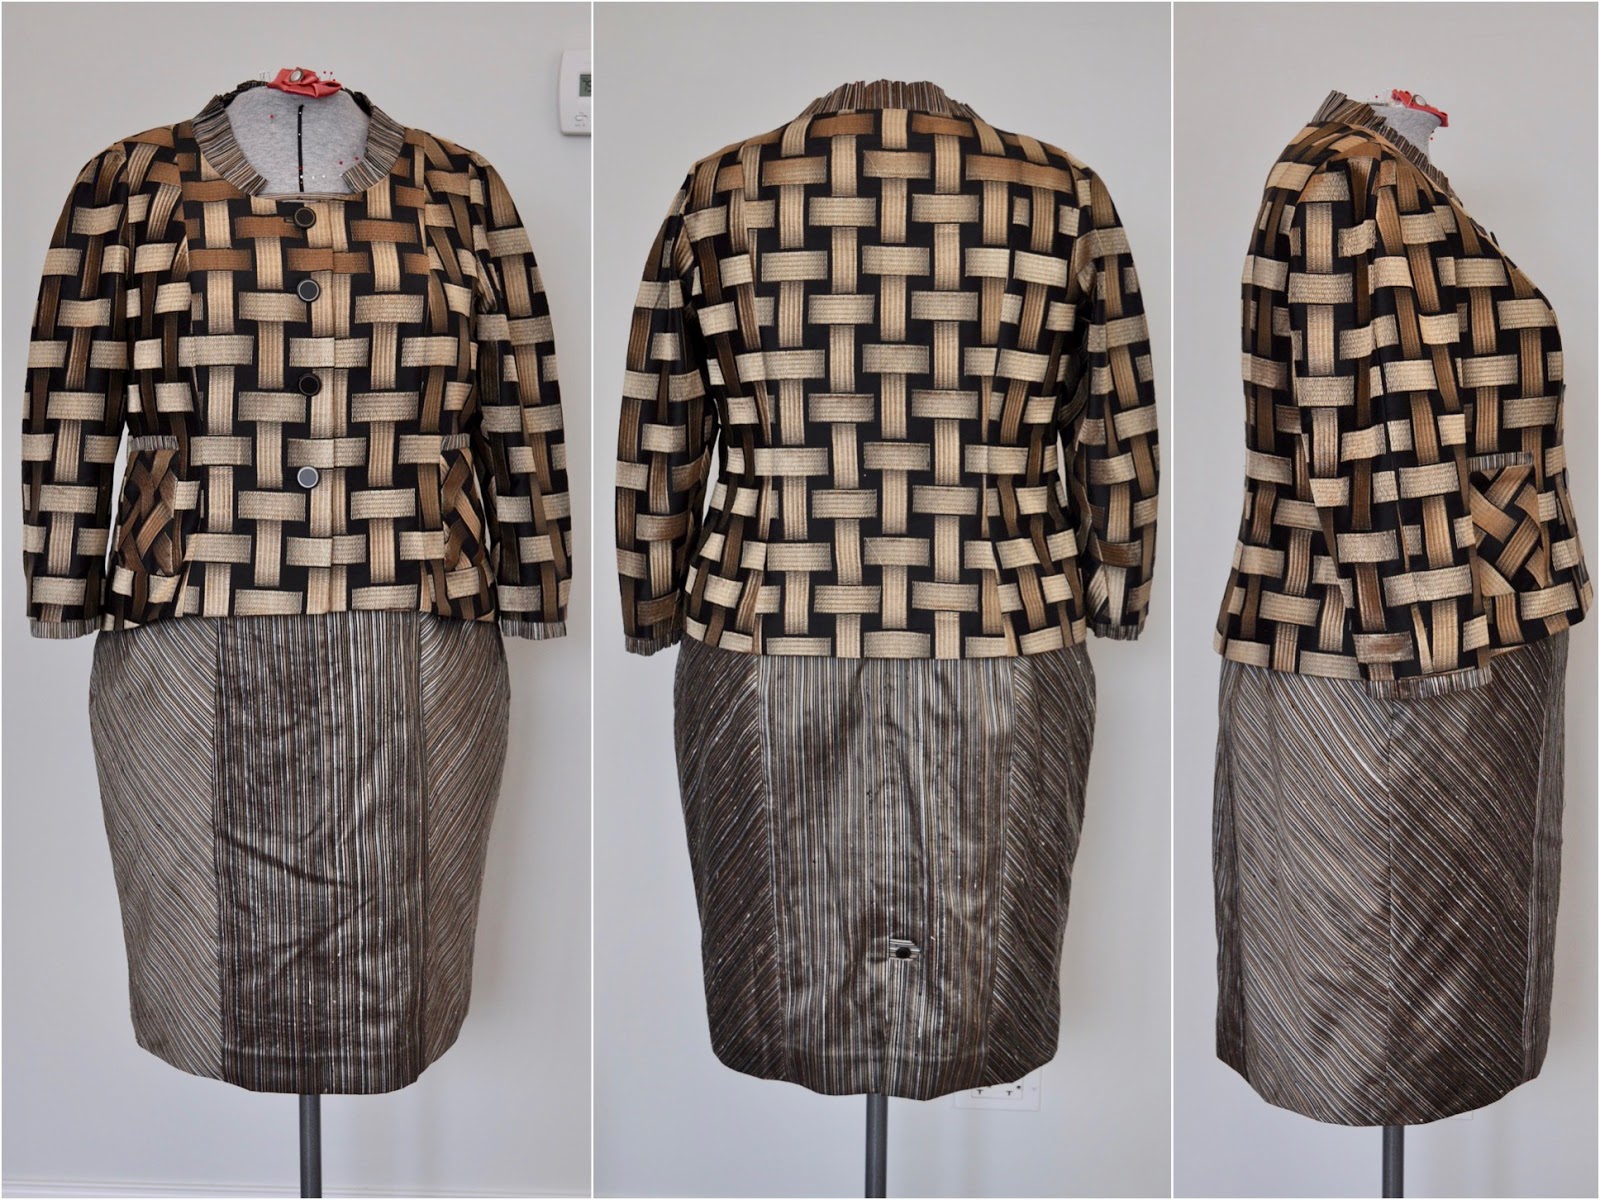
Metallic neutral sheath dress, jacket and skirt

 This garment ensemble is long overdue to be blogged. It all started last spring during Design 2 intensive with Sarah Veblen. One of my exercises was to work on and develop what neutral means to me in fashion, design and sewing. It was a great time for me to explore this since I was also in great need of new work clothes.


The designs were all developed by me with some design considerations given to me by Sarah.

The Sheath Dress 
The sheath dress was one that I had been wanting to create for a long time and I had so much fun working on a master pattern that has since morphed into so many designs! For instance, I took my base master sheath dress pattern and modified it to create this metallic neutral.

I started with sketching some ideas for a dress and then added a jacket and then thought that a skirt addition would make a mini capsule perfect for work trips.

I modified the pattern by:
  • Raising the front neckline
  • Lowering the back neckline
  • Adding extended shoulder for a sort of cut on cap sleeve
  • Side fronts and side backs cut on the bias
  • The front piece was split horizontally with a curved line to take advantage of the lines and nap of the silk dupioni
  • Addition of a tab and small button to the back vent. The button matches the jacket buttons. Just a different scale.
  • Addition of a welt zipper pocket in the right side front piece

The dress fabric is a lightweight metallic striped silk dupioni, underlined with silk organza and line with ambiance lining. I purchased the silk from Fabrications shop at the ASG national meeting when it was in Indianapolis a couple years ago.


The Jacket
With the dress completed, I moved onto the jacket. The fabric for the jacket was a gift from my great friend, Wendy Grossman who blogs over at The Couture Counsellor. I knew that I wanted the jacket front shape to echo the curve of the bodice on the dress front. But in a very delicate way. In my mock up i tried a couple different placements for the curved front and I had to be careful to place it in such a way that I did not accentuate my full tummy.

With the jacket front shape adjusted, the rest of the construction was fairly simple. Except that I had to match the basket weave as perfectly as possible! I also wanted to pull in the elements of the dress in a way that the set really went with each other and not just a jacket that looked good with the dress. So, in addition to the front waist curve, I also used the dress silk dupioni fabric to create pleated details on the jacket.

I added:
  • pleated cuff treatment
  • pleated pocket treatment 
  • pleated collar/neck treatment (my favorite part) 


The main jacket pattern is made from my master princess seam jacket pattern and 3 piece sleeves with the under sleeve cut on the bias. I simply love using a 3 piece sleeve! It shapes and fits so nicely to my arms and it takes much less yardage overall when using a 3 -piece sleeve because the sleeve is in 3 pieces you can puzzle fit it into smaller areas.

For the lining used a silk remnant for the body portion, making sure to include a back pleat for ease and comfortable movement. The sleeves are lined with black ambiance lining. 


The Skirt
With the leftover basket weave fabric and ambiance lining, I made a matching skirt. Thinking that this would be a perfect skirt suit. However, I dont often wear it that way because I don't like the way the front yoke of the skirt looks when paired up with the jacket. This is a bit nit picky on my part. Instead of using darts on the skirt I choose to add in a yoke and cut it on the bias. My thought for doing it this way was that then I would not have to match the basket weave vertically between the jacket and the skirt. All I succeeded in doing was breaking up the line so that the eye is drawn right to the yoke. Not where I want peoples eyes staring at!! LOL!! From the back it looks amazing because the back yoke is covered by the jacket. 

The skirt pattern was developed from my basic a-line master skirt pattern. I transferred the darts into a yoke on the front and back.I also added in a 'secret' pocket on the inside facing. Works perfect for when I am working trade-shows and need to have a credit card/cash etc in a safe place.

A very good design learning opportunity for me. Luckily I have plenty of other tops and another jacket that goes very well with the skirt so it is not an orphan sitting in my closet! Plus I do also wear it as a skirt suit for work. It's not that bad....


 I mentioned above that I have another jacket in my closet that I made quite a few years ago that also works quite well with the sheath dress and the skirt. It is from a metallic denim/twill with a very wide stripe that worked perfectly for this garment. The pattern is one of Cynthia Guffey's - J5054. Her website is back up and running, but not sure for how long... so if you like, go buy it!

Happy Sewing!!!

Here is the princess showing off 2 new shirts and dancing in her new PJ's!! She loves coming over and picking out fabric for me to sew her new clothes :)


Tuesday, July 12, 2016

Short Sleeve Summer Jacket and a happy self drafted skirt!

The design for this jacket was born from this lovely unique fabric that I ordered from Emma One Sock. I was only able to get my hands on 2 yards and there was no more available. In my head I had envisioned myself wearing this lovely French style jacket with a collar and long sleeves and maybe some extra left over to accent a skirt.
My final designs!

Well, 2 yards was just not enough to envision this look. So I had to come up with a different design.

What could I do? I started with doing some very focused research on Pinterest. (I don't use Pinterest that often because I find that it's a bit like going down a rabbit hole!!) I came up with several design options that could possibly work. 1- I could stay with my original length jacket and just do short sleeves and no collar at all. 2- I could do a crop jacket with sleeves with maybe enough for a collar. 3- I could do just a shorter length jacket (not cropped) with fancy short sleeves and maybe enough for a collar. Lucky for me that this fabric was almost a full 60 inches wide and since my pattern is a princess seam jacket there are more options in how to place your pattern pieces, more options for puzzling the layout.

My final decision was to make the design from my master jacket pattern by shortening the length by 2 inches so it would hit more at the high hip area. (This is the exact same master pattern that I used for my French jacket) I decided to shorten the sleeves and change them from 3-piece sleeves to 2-piece sleeves plus a design element. The last change was to change the neckline shape and possibly add a neckline. I decided up front that I would wait to decide what to do with the collar until after I had the main jacket constructed.

My design process consisted of me making up a new muslin of my master jacket pattern with the shorter length first with no sleeves. Since I have lost weight and have been exercising more my body is still slowly changing shape and I wanted to make sure  the fit was perfect. I made some slight changes to the upper side front and added in a front waist dart in the side front piece to give it more shaping.
Mock up of my master jacket in a shorter length plus 2 different sleeve options.


Next part in the design process was to develop a short sleeve 2-piece pattern. I did this by taping my 3-piece sleeve pattern together on my work table at the seam lines and redrawing it using my underarm notch as one seam and the shoulder notch as the second seam (this was an existing seam in my pattern) and picked an arbitrary length. I mocked this sleeve up and basted it into my jacket and made any necessary changes to length, width, etc..

With a good 2 piece short sleeve I then mocked up 2 more sleeve designs. One was a gathered poof at the hem and the second is a bell like shape from the bicep line down. This bell like shape was inspired from an old Vogue pattern in my pattern collection. I bought this pattern just because I liked the sleeves and here was my chance to incorporate a similar design.

With the full mock up in hand I was headed to Baltimore to take Design 1 class from Sarah Veblen. My good friend, Wendy- The Couture Counsellor, and I shared a day before the class of private time with Sarah. This was one of the muslins that I brought with me, I also brought my lovely jacket fabric, underlining choice and buttons with me. I wanted to be able to discuss the entire jacket that I had in mind not just the actual muslin.

Some top the considerations that I wanted to discuss with Sarah was thoughts in sleeve design with consideration to the fabric, construction considerations with the thought that this short sleeve jacket is meant to be worn always closed, more as a top in contrast to a traditional jacket. It was also going to be worn in the warmer portions of the year. 

The mock up of the jacket with the different sleeves was so much fun to make! With input from Sarah, I made the decision to use the gathered bell sleeve and she made some minor fitting changes to my armhole and sleeve to make the fit cleaner. 
Jacket construction in progress!

The final jacket is underlined in an imperial batiste purchased from Farmhouse Fabrics. The seams were all machine stitched and then finished with the serger. Due to the softness of the fabric I needed a good facing to support the upper side front and keep it from collapsing. (After discussion with Sarah the decision has been made to make a permanent change to my jacket constructions by always adding in an organza chest plate to that area to keep it from collapsing into that hollow area) In the case of this jacket I made a full facing that I developed by overlapping my front and side front pieces at the upper fronts and drawing a single facing. This facing was then serge finished into the armhole, worked like a charm!!
Jacket inside out on my dressform showing the underlining, facings, bias binding on hem.

For the facings and the under collar I used a small scale cotton print that coordinated with the large scale print that I used for the skirt. More on the skirt later!
Detail photo of the inside of the sleeve and showing how I attached the facings to the front armhole and back shoulder.

Once the main jacket was constructed, I worked on designing a collar using the techniques I learned in the Suzy Furer Patternmaking + Design: Collars and Closures Craftsy Class. I decided on a partial roll collar and after 3 muslins I settled on the final one. The roll in the back is higher and it comes around to the front and lays almost flat. I left a small space in the center front so that it would frame the perfect vintage yellow 1920's Czech glass buttons from my button collection. 
Top shows the final collar and my decision to have the stripe of the fabric go towards horizontal at the front. I felt this gave the collar dimension and set it apart from the front of the jacket. The bottom photos show the collar in the muslin stage and sleeve detail.

With the collar completed I moved onto the final step of making a final decision on the center front closure. I decided for using only 3 buttons with the bottom one at my center bust and then evenly spaced going up. Above and below the buttons are sewn in plastic snaps to keep the jacket closed. 
Detail photos of the three buttonholes and the clear large plastic snaps used to hold the jacket fully closed.

I am so very pleased with the final product!!

The skirt was self drafted from my master straight skirt pattern. I really honed in on my skirt shape and design from my sketching tools. First,I sketched out my jacket on my croquis to the correct proportions.
Sketch of my jacket

Next step was to sketch out several different skirt designs on separate pieces of tracing paper so that I could play around with overlaying them on the jacket to see not only what I liked most but also what would be most appropriate for the occasion that I was making it for. My ultimate decision was to make the center design an a-line skirt. I also plan on making a pencil skirt in a dark grey wool so that the ensemble can be worn as a work appropriate suit.
Sketch of 3 skirt designs. Princess line pencil, A-Line and 6 gored skirt.


 The skirt has 4 panels and all four seams are angled out in a soft curve to give some soft volume in a-line 'flip' type design. There is a full lining, 3 waist darts on each side back and 2 on each side front, an invisible center back zipper and some added elastic in the 2 inch wide waistband for stability and comfort. 
Here you can see me auditioning the fabric on the dress form and close ups of the jacket fashion fabric and the options for facing and undercollar fabrics.


The fabric for this skirt was actually from my collection of high quality quilting cottons that I purchased several years ago when the local quilting shop went out of business. I had this 2 1/2 yard piece of a larger stylized flower head print and the smaller cuts of coordinating prints to play with that I used in the jacket construction. 

The final look was perfect for my granddaughters baptism and second birthday! I also recently wore this outfit to the ASG national Conference in Indianapolis. This is a most comfortable and stylish outfit to wear! 
The final outfit and being worn at the church for Princess Victoria's baptism.