Friday, February 23, 2018

In The Sketchbook- February 2018

Welcome to In the Sketchbook, a monthly look at fashion design sketches that we are working on for ourselves. Sketching garments on a personal croquis is a great way for the individual couture enthusiast to move beyond the use of commercial patterns and into a world of personalized design! It can be intimidating at first, but with a little bit of practice it becomes something you look forward to. Join us for a look of what we have going on In the Sketchbook! Brought to you by Wendy Grossman of Couture Counsellor and Steph King from Siouxzeegirl Designs.


This month, I am playing with sleeve designs.

I drew some of my inspiration from photos that I have taken and have in an 'Inspiration' folder on my computer. Sleeves are a great place to add in detail. I have spent much time in perfecting the fit of my basic sleeve and now that I have fit down, I feel like it is time to really play with design.

Each of my sketches are done in half. Meaning I sketched one design on the right and another on the left. 


These first two are of different set in sleeve types.
On the left we have a gathered sleeve head with a button vent at the wrist and on the right we have a very traditional smooth inset 2 piece sleeve with a split vent at the wrist. 

I did not draw these from any photos, just from my head as they are 2 variations on a simple design.

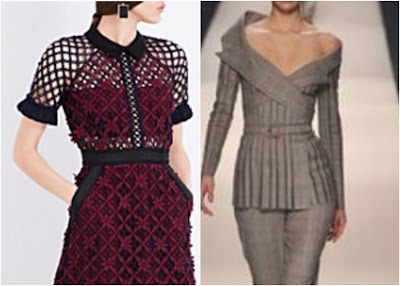
these are sleeves from the bodice of different contemporary dresses.
On the left is a raglan sleeve with trim at the short sleeve hem. The photo is with a geometric lace, I just drew it as a solid.  On the right is an off the shoulder sleeve that comes from bands across the bodice. A strange looking top, I cant tell if it is purposely asymmetric or if the left side is just falling off the models shoulder... Maybe a little of both!


Both of these sleeves were taken from paintings in museums. Both of them incorporate a large amount of lace.
On the left you have a double tiered lace flounce with the upper sleeve and bodice overlay in a sheer material, the band on the off the shoulder neckline matches the band attaching the lace flounce to the sleeve.
On the right you have a more modest design with a very structured bodice and large lace flounces around the neckline and forming the bottom half of the sleeve.


These were photos taken at the V&A in London.
On the left is a type of Juliet or Leg-of-Mutton sleeve and the right is a sort of Bishop sleeve with a lot of fabric manipulation going on
.


These are both taken from more contemporary designs as you can see in the photo below.
The left photo is an updated and clean looking version of a bishop, especially when compared to the bishop sleeve in the previous sketch/photo above. The Sleeve on the right looks well enough while the arm is straight and hanging softly by the body. I'm not sure how good it would look say while in a business meeting and taking notes on an iPad. It is interesting enough to maybe make a mock up of.


More photos from the V&A.
The left is a sort of  layered Kimono which is very, very pretty! Although I'm certain that unless you had on some super corset you could not attain that shape! On the right is a very cool play with stripes using a mild puff sleeve.


These were photos taken at the V&A as part of the Balenciaga exhibit. (they are NOT Balenciaga)
Both of these are what I would call extreme sleeves. Very cool, very runway and not practical at all!
However, they were fun to adapt to my shape using my croquis!


More from the V&A!
The design on the left really had me itching to get into the case and see what was really going on with that sleeve! From my view and the photo it looks like it is an organza that has been gathered and only attached at the sleeve head. It looks cool but I cant quite figure out what is happening in the lower part....
The sketch and photo on the right are of a cut on sleeve. I really like the look of this. I keep thinking it would be fun to develop one for myself. However, it would need to be impeccable like this one and i'm just not sure how that would look in motion. Fine as it is standing perfectly motionless on a mannequin where a curator finessed the drape and folds to be perfect! in real life would it just look like a baggy mess???


The sleeve on the left is really just made up of bodice with a cut on sleeve and then wide bands of fabric joining the front and back together. An interesting concept.
The short sleeve on the right is a trickier one. Hard to tell from the photo if it is clever pattern work with origami like folds to create the look or if it is separate pieces. Would love to get my hands on this to give it a good look over!


These last 2 are mens clothing from the l700's.
I mostly decided to sketch these because I am fascinated with where the heck the shoulder are! This silhouette is so different from what is current. the sleeve is very narrow and shaped to the arm, the sleeve is set in very far out with the cut of the upper chest being very wide. I am very curious to know if they stuffed or wore some special shoulder pads to make the shoulders so sloped. These sleeves are 2 or piece sleeves and the under sleeves are cut on the bias.the one on the left has a separate cuff sewn on that was cut on the cross grain. the on eon the Right has no discernible separate cuff. Just a vent.


My idea in using photo's to sketch from was that I would play with ideas that I would not normally gravitate to and this would help increase my sketching and rendering skills. It has and it has been fun, I've been diligently checking out sleeve designs every where I look! It has also seemed to let some of these alternative shapes seep into my imagination and have shown in up in other designs that I have been working on. 

Make sure to stop by Wendy Grossman of Couture Counsellor to see what lovely sketches and ideas she is working on. Please feel free to share your sketches and ideas with us.


Happy Sketching!


Wednesday, February 21, 2018

The Details of the Winter Coat

For those that like the details! Last post I showed the final product of my Nanette Lepore knockoff winter coat and discussed a little bit about my process and gave a high level overview. In this post I am sharing the photos I took during construction and giving a little bit more detail.

Loving my new coat!!


***Warning***  A heck of a lot of photos! 26 to be exact!!
If you only want to see the final product and the highlights of the project go to this post: 

Nannette Lepore inspired knock off! A Winter Coat


Step 1: Create a pattern. For this I used my mater darted bodice pattern. Rotated darts into horizontal lines, used the Pamela Vanderlinde Patternmaking for Jacket and Coat Design book to guide me on how and where to expand for wearing ease.
First draft of pattern- I made 4 versions before getting to final coat version.
 Step 2: Lots of muslins. I ended up making 5 muslins. I was okay with doing this because I was in full control of the design. Each step of the way I made changes and depending on how big the changes were sometimes I re-muslined after just 1 big change as in the photo below. This was muslin 2 with some big changes to move to muslin 3. I make sure that I write notes on my muslin in a sharpie so that I can clearly delineate any changes I want. IN this case some changes were for fit of the winter coat but many of them were for design elements. I make a muslin, put it on myself, make any notes, put it on my dress form and then make those changes on the muslin, transfer them to the pattern, do the pattern work and then make another muslin!
Muslin between version 2 and 3. I always get the body portion of the design nailed down and then move to the sleeves last.

Final muslin with sleeve added. 

Showing the sleeve with the zipper slit 
 Once the muslin was perfected. (and BTW I did try the muslin on with a very thick sweater. This way I could make sure that I had the room I wanted for winter in Chicago dress.

Moving on to construction: In the last post I mentioned that I ended up cutting out 80+ pieces of fabric! the Front and back main bodies each have 18 separate pieces of fabric. Each main wool fabric piece was underlines in cotton flannel. Each piece of cotton flannel was hand basted to the accompanying wool piece.
Hand basted cotton flannel attached to the wool fabric.
 After the hand basting, the piece is then treated as a single piece of fabric and the construction of the garment begins. The shoulder darts are cut and pressed open, the flannel is trimmed closer to the seam allowances to reduce bulk. in the areas where there were multiple seams meeting I made sure to leave the seam allowances free. this allowed me to trim and press in any manner that I wanted to reduce bulk.
Construction of back pieces. Underlining trimmed and measures taken to reduce bulk. The horizontal seams are top stitched for design.
After main construction, I then catch stitched down the vertical seams to the underlining only.
Close up of catch stitching of the vertical seams to the underlining.

Photos of the inside and outside of the back.
 With the back completed, I started on the front. Other than the front opening, the other change that I made was to add in-seam pockets. Due to the shaping in that lower horizontal seam I had to cut separate pocket pieces verses cutting the pockets in one piece with the lower and middle piece of main fabric. I cut a facing piece for the front and back of each pocket out of the wool and then the pocket bags were cut out of the lining fabric.I really, really wanted to make sure that the pocket opening was stabilized. I want no chance of the pocket pieces stretching out over time.To do this I used the selvage edge of silk organza plus on both side plus I also used a very narrow piece of twill tape. the pockets look great and so far there has been no gaping!! If I make these again, the only change would be to make them maybe a 1/2 inch wider.
Detail of the external pocket construction
 Once the front and backs were together, I tried it on and pinned it shut along center front to make sure that there were no changes needed before I moved on in construction.
In-progress photo in the mirror.
 At this point I completed the lining. I almost always sew the lining first or midway through. Why? because once I get towards the end of a garment, it annoys the hell out of me if I have to stop and then construct the lining, it sort of puts a stop to my good feeling of being almost done! I know, weird. It works for me and I bet everyone has there own little quirks in their sewing methods!

Look at that plaid matching!!

The biggest challenge in sewing the lining was matching the plaid! I wanted it to look like that the back and front pieces were cut out of one solid piece of fabric and not cut out of 6 separate pieces!
On the facing I was able to eliminate the back shoulder dart by taking a closed wedge across the pattern piece. This helped to reduce bulk! I used an fusible mid weight hair canvas for the facing pieces and this was a perfect amount for stabilization! I also used a modified method of adding a pocket in between the facing and the lining from the book Cool Couture by Kenneth D King. In his method he adds piping. I wanted a very sleek invisible look.
Details of lining, facings and inside pocket.
 Next up was the sleeves... each sleeve has 6 pattern pieces. After I hand basted the flannel underlining to each piece I very carefully labeled and pinned the piece name and description to every piece so I wouldn't screw them up!! I also always make sure to pin my labels to the top of the pieces so I know orientation as well.
Detail of sleeve pieces and flat construction to do the top stitching.
Once the flat pieces were constructed and top stitched I sewed the underarm sleeve and left the opening for the zipper. The sleeve was then carefully steamed and pressed.
Details of the sleeve inside and out prior to sleeve head and zipper insertion.

I used a sleeve head made of tie interfacing cut on the bias to smoothly gather the sleeve head and to provide some support and keep it from collapsing. This eliminates having to baste and gather the thick fabric and you can see how nicely shaped they are after sewing these in and a steam shaping/pressing. 
Details of sleeve head and the shaping the help provide.
 For the zipper I used the selvage edge of silk organza to add some extra stabilization, hand basted the zipper and then sewed it in on the machine using a center zipper application.

Details of the lower sleeve and zipper insertion.
 Next up... bound buttonholes. I always test out my buttonholes on a scrap sandwich of the fabric, lining, facing, interfacing. Whatever the final sandwich of fabric will be, I make sure to test on those exact same fabrics. I do this no matter what type of buttonhole it is and no matter how comfortable I am with the process.

Details of my test welt buttonhole and details of making the actual welts.
 On the coat front I used silk basting thread to trace the CF and the boundaries of the buttonholes. This makes sure that placement is exactly where I want it!.
Details of the tread basting and of the welts sewn on to the front of the coat
 On the inside I used a piece of silk organza to add some extra stabilization to the buttonholes.
Details showing the silk organza , the welts sewn on and the clipping of the fabric to make the opening from the back side.
Once the opening is made the welts are pushed through to the inside and then basted shut with diagonal stitches. Once the welts are securely sewn the basting stitches are removed and you have a beautiful bound buttonhole!
Details of the bound buttonhole process.
 With the buttonholes created, I then set in the sleeves. This needed to be done very carefully so that the horizontal seams on the bodice front and back lined up perfectly with the horizontal seams on the sleeves. To achieve this I pinned and hand basted first and then went to the machine.
Details of the sleeves set-in with the horizontal seams matching almost perfectly!
Next step was sewing in the lining. I used a partial machine/partial hand method. The center front around the neck and back down was done on the machine. The body and sleeve hems were done by hand and the inside buttonholes were hand stitched. 
Details of the inside of the facing side of the buttonholes and the hand stitching of the lining.
 Somehow I totally forgot to take pictures of the collar in progress! The inner collar was underlined in the cotton flannel and the outer collar was interfaced with a fusible to hold its shape. Somehow, where the collar meets at CF the under collar is a little lower. At first I was irritated about this and was going to take it off and re-do it but then after trying it on and pinning it closed as is and pinning it closed as if it was perfectly even, I decided that having the inside collar a little lower was better! It did not tend to rub against my lower chin. SO I actually modified the pattern piece to make this a detail rather than a mistake!!
Details of the collar and the coat front prior to the buttons and collar snap being sewn on.
I have now had this coat in my winter coat rotation for a little over 2 months now and I love it!!
If I were to make it again there are only 2 things that I would change about it. (other than design features or style lines!)

  1. I would make the inseam pockets slightly wider.
  2. I would experiment a little more on the hem finish. This was basically lined to the edge but I feel like this was a little wimpy for this coat.
Other than that I am over the moon and staying nice and warm :)


Once again a picture of my niece and I in Utrecht, Netherlands.
 Happy Sewing!!

On a walk with the Princess yesterday and we had to jump in every puddle!! Reminds me to take joy in the simple things of life!


Sunday, February 18, 2018

Nannette Lepore inspired knock off! A Winter Coat

A couple years ago I ripped out a full page add of a Nanette Lepore advertisement. I came across it again as I was going through my tons of  'stuff'' during my move last May. It struck my fancy enough to put into my very small and well curated keep pile.


I decided over the summer that I really wanted to make this coat! I dig some digging and found that this is called the Oceanic Cape. Digging around a bit more and I found that you can acquire this cape through RenttheRunway .com This was a great way for me to see additional photos and views of the garment other than just from the ripped out magazine page!

The original advertisement that I ripped out of a magazine,
probably from Vogue and from several years ago.
I quickly decided to make several changes to the design which is why I cam calling this an 'Inspired Knockoff'!


Changes made to suit my design of making this a Chicago Winter worthy coat included:
    1. change the overall length to mid thigh
    2. Add zippers to the arms so I can close them against the weather
    3. change up the pockets
    4. slightly change up the overall silhouette to fit as a winter coat
    5. keep the same original proportions of the coat in regards to the sections and the horizontal seams.

The second challenge was to find the fabric. I loved the color but was not dead set on finding this color. We all know how challenging that can be! Back in August I walked into Michael's Fabrics/A Fabric Place in Baltimore and i'll be damned that I found the most perfect fabric to make this dreamed up coat of mine! That was it I had to buy that fabric! Of course it was the most beautiful Valentino napped cashmere wool. You know the kind that comes with the really high price tag PLUS the fancy label... that I never sew into my garments, I just put them on one of my magnet boards!


Needless to say, I had to take a very big breath to purchase the fabric and only after I made multiple muslins and was super happy with the fit, shape, proportions, did I even think about cutting into the fabric. It was nerve wracking! Once I made the first cut I powered through it and had only happy hands and happy brain. I tell you, making the multiple muslins really helped to booster my courage in cutting into the fabric.


The entire coat was underlined with a cotton flannel and lined with a plaid silk duiponi (but very fine, like a cross with a silk taffeta) and these gorgeous gold buttons! Both lining and buttons were also sourced from Michael's fabrics. The Buttons were perfect and of course the perfect button was $12 a piece!! Of well, at that point I didn't even bat an eye.

For the collar I decided to use a large gold sew on snap. I felt like the button would be too heavy both in weight and in look and using the large gold snap allows for a cleaner look at my neckline when closed and when open it blends into the button look.


I had the muslin completed in early November for the Sarah Veblen workshop. She tweaked the back a little bit and then I got started on construction. I was determined to get this coat done before I left for Europe on December 12th! I felt like a machine!! Why the hell I thought it was a good idea to make a coat with 6 front pieces, 6 back pieces, 6 sleeve pieces for EACH sleeve, 2 collar pieces and separate pocket pieces and times all those by 3 for the lining, underlining and fashion fabric, never mind the interfacing pieces! Sooo.. for those that are mathematically inclined.... it was a total of 80 pieces of fabric that I had to cut out and keep track of and hand baste and line up all those damn seams... and just think of your eyes popping out of your head  AND doing this all during the holidays between Thanksgiving and December 11!!

I took hundreds of pictures during every phase from first draft of pattern, through multiple muslins, all the cutting and construction process, all the way to the finished garment you see here! Next blog post will be a photo tour of the process and construction.

I found these winter rain boots quite by accident in the perfect color to match my coat!
How fortuitous!!

It was SOOOOOOO worth it!! The coat fits like a dream and is so unbelievably comfortable and so many lovely compliments while on my trip to Europe.

Above- at Christmas market in Lieden, Netherlands
Below- walking with my niece, Roxie, in Utrecht, Netherlands
Happy Sewing!!