
I feel like Pajamas are very formal and this project went from pj’s to Pajamas in my head and I like it!
I was in real need of some new winter pajamas. I really wanted these to be warm, cozy, classy and to be wearable in front of others! Not that I am parading about in my pj’s in front of strangers. Although, I have been caught making the dash to the trash chute in my pj’s!
I originally was planning to complete this project while on a long weekend Chicago ASG retreat back in January. Unfortunately, the flu kept me tucked away at home with a box of tissues, hot tea and lots of cold medicine. Quite sure that the other attendees were happy that I kept my distance!

When deciding on this project I reviewed my pattern choices for the pj’s. Did I want to draft my own, work off of the patterns I made for the summer jammies or just use a pattern existing in my collection??? I finally decided that I wanted to keep this easy and picked a pattern that I have had in my collection for a while, Out of print Simplicity 3573. This pattern exuded all the charm and pictures of pj’s that I had swimming around in my head.
With pattern in hand I pulled the fabric that I wanted to use. A great cotton flannel plaid from Style Maker fabrics. Glancing at the pattern I realized I wanted more than just the pant and top set but the long robe as well! The internet is such an enabler... I turned to my computer and and ordered extra yardage of the fabric, enough to make the robe as well as the pants and top set. YAY Me!!! YAY Style Maker Fabrics!!!! This fabric was a dream to work with. It wash and dried beautifully with minimal shrinkage, handled lovely and pressed like a dream.
I promptly set out to measuring the flat pattern, comparing these to my master patterns, cut out the pattern and made an adjustment to the upper front bodice by lowering the CF an inch and blending in to the side seams. The very surprising thing about this pattern was that the armhole and sleeves were very close to my master pattern. So close in fact that I did not even make any adjustments to them. Such a surprise because that is an area that I feel is often the downfall to commercial patterns.And then... The Flu. The Damn Flu. Sidelined the project and relegated me to bed for a while!
 |
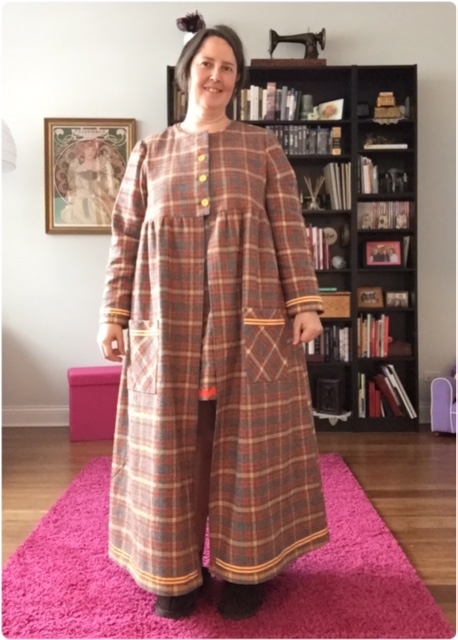
| Robe and details. Ribbon, bias pockets lined with love letters fabric. |
 |
| Robe- shown over the top and pant set. |
Fast forward a couple weeks and with all the pieces cut out, I quickly realized that it was a lot of plaid, a real lot of plaid. With a swatch of fabric in hand I headed to Soutache Button and Trim shop and purchased the most perfect trim! A vintage yellow, orange-red and millinery trim. The trim along with these beautiful yellow buttons made out of a nut, really helped to give the eye something to settle on and to just class up these pj’s and turned them into full on Pajamas! LOL!
 |
| Pants- ribbon trim around ankles, 2 inch soft elastic waist. |
While I was constructing the pants, top and robe, I kept looking at the remnant of yardage that was sitting there. It was not enough to make a long sleeved shirt and I did not want to add it to my scraps pile to have it languish for an eternity before I foisted it onto someone else or just bagged it. So, in the spur of the moment, I cut out one more garment to add to my Pajama ensemble, a sleeveless sleep shirt!! BONUS!!! I had one piece large enough to cut the front and back at mid thigh length and another smaller piece to cut the bodice front and backs from. I already had enough bias strips cut out for the bias faced neckline and armholes.
 |
| Top- Bias facing at neckline, bias elastic casing at wrists and detail of bust with buttons. |
This sleep shirt had to use different buttons and trim as I did not have enough of the yellow. This was okay! I had a piece of giant rickrack in orange just long enough and these perfect orange flower buttons that I received as a gift from a dear friend. They were perfect adornments for a fun little sleep shirt.
 |
| Long sleeveless nightshirt- trim at front hem only |
 |
| Nightshirt- bias facing at neckline and armhole. Bodice lengthened and 4th button added. |
As you look at the photos you can see how I carefully cut the plaid so that they matched across the pants, across the side seams of the lower bodices and dress portion of the sleep shirt. Somehow, I totally screwed up the matching of the side seams on the robe... WTF. Oh well, I have to give myself a break, it was after midnight on the night I had cut them out,I matched up the wrong damn stripe on the pattern when I cut them out. Oops!
 |
| Just what you want to see! First thing in the morning... bed head and all! |
I wore my brand new Pajamas the first night and ohhhhhh, l Love them! So comfy, so soft, fit is perfect and the robe is the best! Perfect for the chilly Chicago temps!
 |
| Final view of robe over nightshirt, robe opened over pajama set and closed over pajama set. |
Now... I can bag up some of the old ratty winter pj’s and toss them out!
 |
| Greetings from the Princess and I- overlooking the harbor and downtown Chicago from the Shedd Aquarium. |
No comments:
Post a Comment
comments, thoughts, idea? Please share!