Friday, January 27, 2017

In The Sketchbook- January 2017

Welcome to In the Sketchbook, a monthly look at fashion design sketches that we are working on for ourselves. Sketching garments on a personal croquis is a great way for the individual couture enthusiast to move beyond the use of commercial patterns and into a world of personalized design! It can be intimidating at first, but with a little bit of practice it becomes something you look forward to. Join us for a look of what we have going on In the Sketchbook! Brought to you by Wendy Grossman of Couture Counsellor and Steph King from Siouxzeegirl Designs.

Happy New Year!

I hope that everyone had a wonderful and safe New Years. I love the idea of a new year. It evokes feelings of freshness and creativeness that usually gets quite stuffed down and put to the side during the end of the year flurry of holidays, get togethers and family time.

I have 2 things to share with you this month.

The first is the process of taking a sketched garment and turning it into a reality. Often times this creative process can take quite a while. Sometimes the sketches that I do are speculations and what-ifs, playing with ideas in my head and getting them onto paper to see if they have possibility. Other Times I have fabric or in the case I am going to show you I have a fabric combo that I really want to use together.


In this case, I first showed this drawing back in September of 2016. Fall was coming and all of the fashion magazines seemed to be showcasing this fun, relaxed but chic looking athleisure wear. I loved the idea of adding a soft comfy hood to a knit dress and that is how I dreamed up this idea.
As the the holidays wrapped up I was chomping at the bit to get this made. It was an idea that I really wanted to try and I just kept thinking what a perfect cozy casual dress to slip into on a cold winter day! I have a full blog post coming up on how I actually got to this final product. It was a several step process. I really enjoyed the process and I took some satisfaction in making a sketch come to life. 


There are some subtle differences between the sketch and the final product. We could play the game of 'spot the 5 differences'! any takers?

Ok For the top 'front' photo you can see that there are 3 differences.
  1. I changed the neckline to a shallow V.
  2. I attached the hood right down to the V. 
  3. The length is a couple inches longer. SOme of this having to do with the give of the fabric weave.
For the 'back' view I changed 2 things.
  1. I added the blocking and inserted flat piping to give it some more interest.
  2. I changed the hood to be made of the grey weave and lined with green instead of all green. I'm glad I did! A green head would have looked funny.

The second thing that I want to share is some of my explorations of using markers and markers/pencils in my sketches. I am loving the bold use of the markers and how fun they are to draw with. Admittedly, it will take some time to master the marker. I have some that are chisel tips, brush tips and fine tips. Figuring which ones work best for different applications is fun. I wish I had more time in the day to play!!

The 2 garments below are finalized ideas for possible entries into the Spring Haute Couture Club of Chicago fashion show. Now that I have ideas finalized I need to work on patterning and muslins to get things going.


Variation of my corners dress. Using a small print of silk with a dimensional silver texture.for the detailed parts and the larger print of a cotton /lycra for the larger areas. I covered her face in this because I didn't want to show how awful it is!
Then decided that an awful face is all about the process... so you can see it below and get a good laugh! I know I did!!


This second garment is one that has been brewing for quite a while. At least since last spring when I attended Sarah Veblen's Design 1 workshop. I originally had an entirely different idea for the use of these fabrics. They were all being used together but in a very different type of garment. Although I really like the garment I originally sketched it just seemed very forced to me. This new idea has just made me fall in love with the idea!
I am very happy that I was able to sketch out my idea and in a way that really captures the garment I see in my mind.
The majority of the dress is done in a very fine pinstripe menswear wool. The deep V will have an inset of red silk georgette and the godets are going to be the neoprene laser cut lace layered over red silk chiffon.
And as for the face! This time I did not try to add any details and I like this much better!


This is a bolero type jacket that will go over the dress. the sleeves and the flared back portion (which I drew flared out, even though it will drape into lovely folds when worn) are both to echo the godets as the neoprene laser cut lace layered over the chiffon and the front panels and upper back yoke are a red/black large dot jaquard with the neoprene lace layered over it for cohesion. This will have a simple closure and no collar with the thought that the bottom of the V of the dress will be seen below the front bolero.

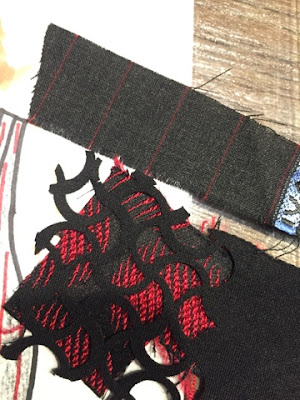
Here is a close up of the main fabrics.

I am really enjoying taking my sketching to the next level and using markers. I won't do all my sketches this way. I think of this as a second step or as a way to further develop sketches that I want to more fully explore. I also find that adding in some of the body detail is nice for my eye. 

Make sure to stop by Wendy Grossman of Couture Counsellor to see what lovely sketches and ideas she is working on. I happen to know that she has been exploring ways to do digital sketching, it is very cool!  Please feel free to share your sketches and ideas, leave either of us a comment or just link back to one of our posts.

Happy Sketching!

Tuesday, January 24, 2017

Appleton wrap dress hacks!

Just before the Christmas holidays I made 3 more Cashmerette Appleton wrap dresses. Two for myself and one for my daughter.

Since this was the first one I've made for my daughter I used the pattern as is. I let her pick a fabric from my knit collection and she choose this soft cotton/lycra animal print. Not much else to say about this! She looks great and feels comfortable so that's what counts.
Melissa showing off her animal print Appleton.


For the two dresses that I made for myself I did change up the pattern to introduce some variety to my closet.


Dress one: I changed the skirt on this one to be a full skirt. In order to achieve this I traced off my pattern and then from the waist line and below I made vertical cuts from the hem line to the waist and spread these out. I employed a basic slash and spread techniques keeping CF and CB on grain. I kept in mind the width of my fabric because I wanted to be able to cut the CB on the fold and keep CF from having to be cut single layer. This also kept me from going with a skirt that was too full. The only consideration that you need to keep in mind is the overlap portion on the front skirt. If you take that out in too far of an angle your fabric may want to fold back on itself. I know this from experience! I ended up having to change the skirt portion of the overlap just slightly. I took 2 inches off the width at the hem and angled it to nothing up at the waist area. It was just enough to keep the overlap hanging straight. I really love this slightly fuller skirt. It makes the dress a little more frilly and feminine.
Yay  for a twirly dress! Photobombed by Blue. Poor baby is so lonely after losing her 2 best friends in the space of 10 months. Now she is VERY interested in everything I am doing!

Dress two: I wanted this dress to be a party dress. Something for the holidays that was a bit more dressier than my normal Appletons. I thought about lengthening it into a maxi dress but when I held the fabric up in front of me on the mirror it just seemed to swallow me up! So I left the length alone and ended up lengthening the sleeves. I added enough so that they would be long sleeves and then an additional 8 inches so that I could ruch the bottom portion. I loved it. It gave it just enough something different and special in this party fabric. Which by the way is a burnout stretch velvet so it is sort of see through depending on the lighting. I decided against lining and wore it with a black camisole and tights. This is a winter dress so the likelihood of it ever seeing daylight is next to nil. So, I think i'm okay with it!
This stretch burnout velvet is very shiny!
Detail of the ruching on the sleeves. I think this fabric just lends itself to this detail.
Here I am in my new dress at a Christmas get together! Man, you just have to love that suit!


Since I have lost so much weight since I made the first trio of Appletons I think I may still need to add one or two more to my current wardrobe. I did end up altering one of my existing dresses. My favorite of the 3, the gray lightning dress, it lent itself to being easily altered due to the type of knit and the random pattern if the knit. The other 2 have made their way to the goodwill bin. To take in some of the fullness I decided to take it in at the center back. I literally laid the dress out, found CB, folded it on CB and then pinned it about 3 inches away and hit the serger running! I took off about 31/2 to 4 inches from CB. I serged right through the hem and right through the neck band leaving long enough tails at each end so I could bury them in the seam.

Happy Sewing!!

LOL!!!! I had to add these photos! I looked entirely pissed off... I was home alone. I wonder what I was thinking about? That Face!!

Thursday, January 19, 2017

Hudson Pants Galore!

Time for a couple of catch-up posts from the end of 2016. The holidays always seem to get ahead of me and somehow make my time just disappear into thin air!
My little family all together in our Hudson pants PJ's!

I had mentioned that one of the projects that I did was to sew up 7 pairs of True Bias Hudson Pants. They were a perfect style of lounge/PJ pants that I wanted to make up for the family that was getting together for Christmas. If all had gone as planned we would have all been wearing our wonderful checked hudson pants as we opened stocking and gifts Christmas morning!

"Better late than never" read the note that I included with the Hudson pants that were mailed AFTER Christmas to my parents!
Getting everyone to smile and look at the camera at the same time was the hardest part! Blue was so curious as to what we were doing!! 

I choose the True Bias Hudson Pants for several reasons.
  • The come in womens, mens and mini sizes. So we could all match.
  • The style was what I was looking for. Cuffs, pockets, shaped legs, something more that just a straight leg baggy PJ pant.
  • I could have them printed at a copy shop. I detest PDF patterns that have to be taped together. I won't purchase them unless they have a copy shop option.
My experience with purchasing, getting the patterns printed and sewing these pants was an overall positive one! For $18 the local UPS shop right down the block from me printed up 2 copies of the woman's, 2 copies of the men's and 1 copy of the mini's. SO for a total of $46 I had the three patterns and multiple copies. Seeing that this was for Christmas gifts for 7 people I was more than good with that price!

The harder part was picking out fabric for everyone. My first choice was some ridiculously nice knit that went for $19.99 a yard. which would have come to just about $400 with shipping. HECK NO. Not for a pattern that I have never made and not knowing how the fit was going to be and if everyone would like the styling.

The adult pants. Each couple received a different colorway and all contrast fabric was in black knit.

 I choose to go with the buffalo check knits in cotton/spandex and came in several colorways from Girl Charlee fabrics. This came to a much more reasonable price of just under $180 with shipping.There are definite differences when you pay $7.99 for a yard of fabric versus $19.99. I was worried about the quality of the knit. It was perfect for what I wanted! A lightweight cotton knit that you could wear to bed and not get hot or wear around the house and be comfy. It washed and dried beautifully.

Princess Victoria got a color all of her own! I took the photo on my work table so you can see how small these are!These may have been the most technical to put together due to the small size. But, man oh man they are ADORABLE!!
 However, the print was off grain on all the pieces. Some way more than others, I was expecting this because you just don't get the same quality at that price. However, for the pants it hardly matters at all.I made sure to cut everything with the knit on grain and just ignore any pattern matching of the print. This worked great, only if you really study the pants do you start to notice it. However, in the top that I made for myself it is quite noticeable.

Here I am modeling my Hudson pants and Jen Stern The Tee. You can really see how off grain the print is on the gray portion of the top. It is not quite as noticeable on the pants but if you look hard enough you can see it. Like one of those 'magic' posters from the 80's!
The actual patterns are drafted quite well and I had no problem in construction. I made some slight adjustments for differences in height among us and of course the difference in sizes. I also changed the waistband a little bit. SInce these were for PJ's I did not see any reason for putting in the drawstring. Especially since whenever a drawstring comes undone I find them left on my to-do pile to get them restrung! So , no drawstrings on these. I also simplified the entire putting on of the waistband because I was making 7 pairs. I cut out the elastic to the size needed. Butted the ends and zigzagged with a scrap underneath for a flat join. I then marked the quarter marks on the elastic and on the waistband. sandwiched the elastic into the folded over waistband and serged it all on at once! I then did a vertical set of stitches across the waistband at CF, CB and each side seam to hold the elastic in place so it would not turn on itself. This way worked out quite well for me. It is not the easiest way to put in an elastic waistband but it is quick and looks quite good!
Love the details in this pattern!

I really like the pocket details and made my pocket binding, waistband and cuffs in a solid black for contrast. On my own pair I will make some slight adjustments to the pattern. Add to the rise in the front and back. the elastic wants t sit at my waist and is comfortable there but when you look at the pictures you can see that this is causing the fabric to pull in the front and back. Fine for PJ's because I don't even feel it with this light cotton spandex. However if I was to make a pair for outdoor or public use or in a thicker knit I will need to tweak the fit just a bit.

This past weekend my daughter, son-in-law and granddaughter were over. I declared that Sunday morning was going to be Hudson pant PJ morning and that after breakfast we would be taking a group picture! Everyone said they are comfortable and feel good. My husband will probable wear his once a year, he just does not wear knit pants, sweat pants or anything of that kind. The rest if us will get good use.
Silly family!!

Hopefully my parents are enjoying their pants as well! They got the red buffalo check versions.

Happy Sewing!


Thursday, January 12, 2017

Starting out the year with a workshop!

In my sewing world I have started out the New Year on the right foot! I attended a friday evening trunk show and 2 half day workshops on Saturday with Mary Ray. Mary Ray has been sewing and teaching for many years and has quite a varied background. You can read more about her on her website Mary Ray Designs.

The trunk show was wonderfully inspiring and the workshops were filled to capacity. All attendees really enjoyed themselves and left with great samples and many new design ideas fueling our imaginations!

Please pop over to the Sew Chicago blog to read my detailed post about this enjoyable workshop!

Here are a couple of pictures to whet your appetite!


Me, sewing away on a Juki industrial machine.


Samples from the morning workshop above and the afternoon workshop below.

Mary Ray showing off a quilted jacket with tucks inserted on the sleeves.

Wendy and I showing off masterfully mitered corners!

Linda and I enjoying a fun day together!
Class photo from the afternoon workshop

Don't forget to head on over to to the Sew Chicago blog to read my detailed post about this enjoyable workshop!

Happy Sewing!

Sunday, January 8, 2017

Welcome 2017! Making resolutions, setting goals, voicing my intentions!

I have spent time this first week of January reviewing and reflecting upon 2016. Initially I was separating out sewing from the rest of my life. I was looking at everything in separate 'buckets'. Sewing, home life, work, health, friends and so on and I was trying to figure out how I could make changes to each of those area. However, I was getting frustrated and was having a hard time working it all out. Well, I put my thoughts aside and just went about my day and then out of nowhere it hit me! While I can make small goals and direct changes in each of these areas they really can't be separated out. All of these things make up my life and are intricately intertwined!

I decided to take a couple days and really reflect on my life as a whole and how each of these areas work together and how changes to each area really affect each other. I know... sounds like a bunch of mumbo jumbo.

First off- what to actually call this? I'm not hip on the 'New Year's Resolutions' term, sounds so cliche. Yet, isn't that what I am actually doing? What many of us do at this time of the year? So other ways to describe this could be 'setting goals' or 'voicing my intentions'. I'm going with setting goals! I like that the best for some reason. 

Moving on, I was able to pick the most important parts of my life that I want to concentrate on.
  • Physical Health
  • Mental Health
  • Family time
  • Friend time
  • Sewing andesigning
  • Work
Out of these 6 items the only one that I can really pull away and put in a separate bucket is work. Like quite a few of us I work so that I can help support my family and my sewing habit ;) I can't really change my work, I like what I do and that's that. The only way that work really affects the rest of the list is both time and clothing. Since I like to sew my own clothing this influences the items that I design and sew.

The rest of the list, physical and mental health, family and friend time and sewing and designing, are all intertwined. 
For example my goals in Mental Health include:
  1. Daily meditation- helps clear my mind and allows me better focus and well being.
  2. Daily time to read- these can be fictional novels, biographies, non-fiction, perusing designer books, etc.
Both of these goals affect all areas of my life. Stuck and frustrated with my sewing and design work the benefits of meditation are huge. The reading time also allows me time to read up on designers and get inspiration.

So here are my specific goals in each area.

Physical Health:
  1. Maintain my medications and diet and working closely with physicians. everyday
  2. Work on strengthening my body with both aerobic and strength exercises. 4 x week.

Mental Health:
  1.  Meditation- helps clear my mind and allows me better focus and well being.- daily- minimum of 10 mins
  2. Reading time- these can be fictional novels, biographies, nonfiction, perusing designer books, etc- Daily


Family Time:
  1. Time spent together with my little family: My husband and I, My daughter, Son-in-law and our granddaughter. Planned family activities Monthly. Plus plenty of non-planned time together. My family is the most important part of my life.

Friend Time:
  1. Don't neglect my friends! My pancreas issues have caused me to miss time with my friends this past year. Those activities are the ones that are sacrificed the most when I am not feeling well. My friends have been amazing and supportive and I want to make sure they know that I appreciate them. Ongoing clubs- Sew Chicago ASG Neighborhood group meetings, Book club, Haute Couture Club of Chicago. One on One time :)


Now for the super fun part!
Sewing and Designing: My goals this year are twofold. There are some very specific goals and then some more open goals that are to be reevaluated on an ongoing basis. 7 goals may seem like a lot but in reality it is not. Many of these are just re enforcements of what I have already been doing and some of these cross over into other areas like mental health and time with friends.The hands down hardest one for me to do will be the first one. YIKES!!! I love buying fabric!! 

  1. Shop exclusively from my well curated fabric collection! Only purchase fabrics that are needed such as lining materials, interfacing, etc. OR when on a special trip. For example- Sewcial weekend in February includes a trip to Habermans. In this case be VERY selective in purchases.
  2. Establish a set of master patterns. Skirts, knit tops, woven tops, jacket, knit and woven pants, knit and woven dresses and outerwear.
  3. Do my designing off of my master patterns. Including flat pattern drafting and draping
  4. Continue to grow and push myself to become better with both designing and construction via mentorship with Sarah Veblen. Goal is to do 2- Four month mentorship sessions this year.
  5. Work on my sketching to help to use this to better solidify my sewing plans. Ongoing process, try for 2-3 good sketching sessions per week.
  6. Take inventory of my entire wardrobe to find the 'holes' and fill them. This process takes a couple hours. I have to take all my clothes out, try them on, see what fits, what I still like and then move forward. Try to have this done by end of January.
  7. Continue blogging and documenting my journey.  

I plan to 'check in' on myself and how I am doing with my goals every quarter. I don't plan on being judgemental to myself just to see how things are moving along!

Happy Sewing!!


Thursday, January 5, 2017

Farewell 2016!

I always love the holidays! Lots of time with family and friends, pretty Christmas lights and decorations, time off from work, a bunch of birthdays, my Son-in-law, my husband, one of my brothers and mine and if lucky, we get the first snowfalls of the year. I enjoy buying and making gifts for my family and friends and I always look forward to see what goodies I will get. :)

My sister, Jennifer and I in front of the
 Art Institute of Chicago.
Myself, My sister, Jennifer, and my daughter, Melissa. 


 I won't bore you with all the nitty gritty details of my holidays but, I do want to share with you the sewing related gifts that I received. 

Designer books: (I've linked to amazon on each of the book titles)

This book is amazingly cool! I was unable to get to  NYC to see the exhibit so the book was a welcome gift and addition to my library. They did a wonderful job with the photography as well as with some very cool printed illustrated pages. SOme of these illustration are silver printed and some are printed on silver pages. My copy also included a separate booklet of interviews from some of the designers.


This is a wistfully wonderful book. Dior does some of the most feminine and beautiful designs. It really shows how some of the works of Dior relate to the impressionist movement. Photos of beautiful artworks from the impressionists era are compared alongside amazing Dior dresses. A great book for both an art and fashion lover! 


This is one giant book! This book has over 500 pages and is 12x12. I have always had a fascination with Issey Miyake's creations. The way he has bravely gone to places that other designers don't dare and that he has been successful for so many years really makes him and his work interesting to me. His work is not my personal taste but it is always interesting and sometimes makes me wonder and want to ask why. Maybe someday I'll venture into trying out some of his designs.

I also received several pieces of fabric. Happy dance! 

My sister, Jennifer, braved the fabric store and found me this beautiful length of a taupe mesh with this delicate sequined design. It is light, airy and sublime! I am envisioning a lovely over tunic or dress/skirt layer for this fabric.


My wonderful friend, Wendy of Couture Counsellor gifted me these lovely lengths if fabric that she had printed from spoonflower. They are based off of  The Woman In Gold painting done by Gustav Klimt. The painting is beautiful and the story of it is even more beautiful. I can't wait to see what my imagination comes up with for this pair of fabrics.
Wendy and I at the Field Museum for my Birthday.
I did some sewing for the holidays. Not as much as I wanted but my health issues were still being worked out, lots of rest time and time finding the best mix of medications was needed for me. 

I made my granddaughter, Princess Victoria, a holiday dress to wear for Christmas. This is a BUrda Kids pattern. It was my first time using a Burda pattern and It came out great! She was happy to wear her pretty and comfortable new dress.


I also had grand plans of making PJ's for everyone for Christmas morning... then I though I'll just make the PJ bottoms and buytops... and then it went to just making the PJ bottoms. I almost had them done... so close, I just needed a couple more hours before we were to get in the care and make our 12 hour journey to my mom and dad's place. Buggers! Well, those darn PJ bottom are all done now :) Better late than never. I will just have to photoshop a picture together of all 7 of us in our respective Hudson pants PJ bottoms. I can say that this pattern by True Bias is very well drafted, excellent directions and a modern updated styling.
Princess Victoria was the first to get her new PJ pants, the Mini Hudson Pants.
They are quite adorable and she loves the pockets!!

Each couple has a specific color. My daughter and son-in-law have the grey check knit. My parents have the red check knit and my husband and I have the purple check knit. All of them have black knit for the waistband, ankle cuffs and pocket detail.
I left out the drawstring. I figure for PJ pants it wasn't needed.


I did also manage to squeeze in 3 new Appleton dresses. 2 for me and 1 for my daughter. We all needed some new clothes for the holidays :) More on those at a latter date!

I'd like to say that 2016 was good for me... it was not one of my better years. However, I'm here, I'm kicking and I have the most amazing friends and family. So very much that I am thankful for and appreciative of. Here's to making the best out of 2017!