Sunday, December 28, 2014

A Christmas visit to Idaho and Simplicity 0571

In my last post I showed progress on my new coat! Well , I am quite happy to report that I was able to get that coat finished just in time for our Christmas trip to Idaho!!! We had a flight on Friday December 16th in the evening and that morning I was sewing on the buttons and doing the final hand stitcng of the sleeve linings! 

The entire reason for the coat was that we were having family photos outside and the colors were grey, blue and yellow. Here is a preview of the Idaho family photos! I think we are quite a nice looking bunch :) 

We had a Christmas Day storm which gave us about 8 inches of snow and made for a beautiful picture. The rest of the photos will be ready in a couple of weeks, can't wait to see them.

Here are some more photos of me in the coat and having some fun in the snow!

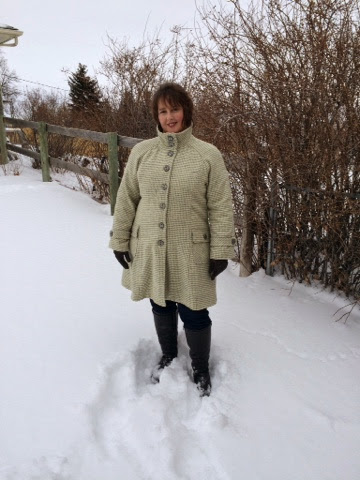
The collar is nice and versatile. It can be worn open or can be worn buttoned up against the weather and wind and in this case... Snow!

I love the silhouette and the back fit of this coat, it really defines my waist.

As you can see in these last 2 photos.... The coat sure does move well and I was having some fun in the snow!!!! 

Such a silly time!
I hope everyone had a wonderful holiday :) 

I gave several me made Christmas gifts this year and had wanted to take pictures of the recipients with their gifts but was just so enjoying the spirit of the season and just enjoying the family time that I just forgot!! And I am OK with that :) All the gifts I gave were very well appreciated and I can't ask for more than that.

I also got a very nice sewing gift this year in the form of quilting fabric. I enjoyed that immensely. :)

Next up.... My birthday and then New Years. I'm still hoping to get a couple things finished before New Years!!!

Tuesday, December 16, 2014

A new coat in progress! Simplicity 0571

My sewing studio is in a total disarray! 

I have Christmas gifts piled up on my embroidery machine table. Some are wrapped, some are in boxes to be sent off and some are waiting to be brought out to Idaho for Christmas. 
Our little family is waiting until after Christmas to celebrate and open our gifts to each other. We are traveling out to Idaho to see my husbands family. They have not yet met the baby! 

I also have various garments in stages of construction!
1- pants muslin cut out and waiting to be basted to test for fit.
1- jacket which has just been waiting for a large snap to be sewn on! This has been lingering for weeks!!!
1- knit cowl top that goes under the jacket that is just waiting for hems to be done!
2- skirts are cut out and waiting to be constructed! 
4- infinity scarfs are cutout and waiting to be zipped up.

The good thing is I completed all the handmade gifts that were on my list!! YAY :)

YIKES!!!!!!
And on top of that all I am in the middle of making a new coat!

You may wonder why oh why would you start a new coat in the middle of all of THAT?!?!?

Well, I have a really good reason. When we go out to Idaho we at having family photos done. The color theme is yellow, grey and blue. So all 16 of us need to be wearing yellows, greys and blues AND the photos are going to be done outside! So...... To my sewing room I went! 

The pattern Simplicity 0571 has been in my stash for a couple years. The cotton Flannel for the interlining was in my stash. The yellow and grey checked wool was a remnant end of the line cut from Fabricmart. The fabric is a little light for a coat, more of a jacket/skirt weight. But the contents were labeled 'wool'. So, I threw the entire length in the washer on hot with high agitation and the dryer 3 times hoping that it would felt up a bit. Well.... The fabric became so soft and lovely and only felted a very minimal amount. Hmmmm.... Puzzling. I cut off a bit and did a burn test. Not 100% wool! I should know better to do the burn test first!!

Not to be deterred, I pulled out my stash of cotton flannel and underlined the entire coat. This gave it a nicer weight and added warmth. I also used the flannel to sew together as a muslin. I only had to make some slight changes. I made most of my. Changes on the flat pattern before I even cut out the flannel.

As I was contemplating what to use for the lining, searching through my fabric stash, and possibly thinking I would have to make a trip to JoAnn's (boo) the doorbell rang and YAY!!! The postman arrived with my latest box from Fabricmart full of my Black Friday deals :) Low and behold there was a perfect lining fabric within. One that makes me smile and happy!

This is one giant project! I spent 2 hours last Thursday evening cutting out the GAZZILION pieces. Each main piece had to be cut out 3 times! Fashion fabric, flannel interlining and lining and some pieces even had a fusible interfacing as well!  Another hour to sew up the muslin to double check fit. Only hadd to adjust seam allowance in a couple of spots. :) then carefully unsew the muslin and press it flat.
The blue stitches are the hand basting in the the seam allowance and if you look carefully you can see the off white thread catch stitches.


I then spent another 2 1/2 hours hand basting all the flannel to the fashion fabric. Included both 2 piece sleeves, the back, side backs, side fronts, fronts and collar. That's a lot of hand basting! Thank goodness for NETFLIX!

Then this past Sunday I spent 8 or 9  hours constructing! This included catch stitching the seam allowances of every vertical seam to the flannel. Time consuming but very worth it!

Monday morning I wake up early and spent another 2 hours constructing the lining (actually most of the lining.... Still need to t in the sleeves) for the seam allowances on the lining I first pressed flat as sewn, pinked the seams, and then pressed open. The fabric is a poly- Charmeuse and the edges just like to fray like crazy. Which drives me nuts! Pinking is nice quick way to clean up those seam allowances and they won't be seen anyway. 

What's next??? I need to stop at Joann's to get a 1/2 inch raglan shoulder pad and 12 buttons. I scoured my vintage button collection and just could not come up with 12 buttons in a good color to match. So, hopefully on my way home from the airport tonight I can stop at the store to pick up shoulder pads and buttons. 

I MUST get this coat done no later than tomorrow night! I have a day trip to Philiadelphia on Thursday and we leave for Christmas vacation on Friday!! Talk about cutting it close! Although if worst comes to worst I can slip stich the lining in while in Idaho :)

Now what to do about that list up above???
I have an ambitious plan to get a couple of those things done before the end of the year. At least the hems on the top and snap on the jacket :) 

The rest will have to wait for 2015!

Our Christmas tree is up and beautiful! and Princess Victoria is starting to get on the move! So darn cute :)
Here she is doing the back scoot off her play mat and headed towards the tree!


Tuesday, December 2, 2014

November 2014 wrap-up and Susan Khalje seminar

Well, somehow November just flew by!!!

In my last post I mentioned that I had a linen jacket that was just awaiting final touches.... Well it is still on my dress form awaiting those final touches. I'm not sure why I haven't gotten it done! I literally only have to cover a big snap and sew it on and then I can move it out of my sewing room and to my clothes closet. I think maybe I am possibly waiting to get the accompanying garments constructed. I have a knit slight cowl top cut out and 2 skirts that will mix and match also cut out and all waiting to be sewn. None of these will take much time, it just needs to be done!

It certainly did not help that in the middle of November I came down with a nasty case of srep throat. :( i believe this is only the 3rd time in my life I have had strep throat and will be quite happy if I never get it again! And to make matters worse I had whatever virus of the month that was going around. The hazards of being on a plane several times a week. 

I took the week of Thanksgiving off from work and enjoyed a little staycation :) I spent lots of time with my Grandaughter ( she just makes my heart sing!) and I spent time in my sewing room making Christmas gifts. I really try to incorporate sewn gifts into my gift giving at the holidays. I feel it really shows how much I love my family and friends. So my week of Thanksgiving staycation was spent sewing gifts, playing with little V, and getting Christmas decorations organized. Thanks to my hubby the tree is up and lit :) now I need to decorate.

Sneak peak of gifts sewn. I also have several that I am just not even giving a sneak peak of! Some sewing related gifts and fun infinity scarves. Of which I keep having to make double since I fall in love with them and don't want to gift them!!! LOL!

The jeans that I finished earlier this month are my FAVORITE pair yet! The skinnier leg is quite nice. They only change I will make next time is to use a slightly larger seam allowance, these would be perfect if they were just a smooch smaller. 

The other very exciting sewing related happenings this month was that I got to spend the day downtown Chicago with Susan Khalje and Rhonda Buss. It was an amazing day. We worked on couture hand sewing practice of inserting zippers by hand using pick/prick/baby back stitch, reviewed bar tacks and jump tacks, covering hooks and sewing covered snaps. The middle of the day was spent with muslin fittings. I brought a muslin of a pair of dress pants that I was just needing a little bit of help in tweaking the crotch fit. I WISH that I had not been so sick the weekend before with strep be issue I really wanted to have some jacket and a dress muslin constructed as well. But, it was not to be. I did take in as much info as my brain could fit in watching Susan and Rhonda making fit changes in the muslins. Certainly very fascinating! Especially the amount of changes that needed to be done at the sleeve head. I will definitely not be afraid to try playing around with these changes.

Susan also brought with her a suitcase full of sample garments! Wonderful to be able to get some hands on couture garments and give them a good inspection. In several of them Susan had done a partial release of the linings so that we could really get a good look at the infrastructure. So cool!! And so informative! She also had some lace guipere garments that we reviewed extensively, I've seen these in some of her threads articles so it was even better to get an upclose first hand look and to touch!


In the later afternoon we switched gears for a bit from couture to non-couture but equally fascinating garments created by Rhonda. She has been playing with rectangles and thinking out of the box to create very interesting, unique and very wearable designs. I am intrigues by several of her designs and plan on trying them out. She posts great tutorials and ideas on her blog.

One of the great things about this day was that Susan brought a variety of supplies and couture trims from Channel and YSL with her from her recent trip to Paris. Of course I had to purchase some! Next on my wish list is to take one of Susan's week long couture sewing classes. Oh the things I could learn!

Enjoy this latest pic of 5 month old Victria! She is just a super happy baby :)


Sunday, November 16, 2014

No sewing for me. Strep Throat

All my lovely sewing plans for this weekend went out the window. Last week as I was traveling through western PA and NY, I started developing a sore throat. My first thought was buggers... Another virus. :( 

Well, as it turns out I have a nasty case of  Strep Throat. Ugh! The dead giveaway was the overwhelming feeling of fire in the back of my throat and the fact that cold meds did not a thing to make me feel better. 

Saturday morning I tried having my hubby call my doctors office to get me an appointment. Turns out my doctors office no longer has Saturday hours. Double buggers. Now what? I sure did not want to go to the emergency room. Then I remembered all the TV commercials for CVS minute clinic! Thre was one 10 mins from my house, I got there and in 10 mins was seeing a nurse practitioner told her my concerns of strep. She took my vitals, swabbed my throat and 10 mins later there was a positive result and I had a prescription for penicillin. 

Was actually quite an easy experience especially when feeling crappy. 

Now I am sitting in my Jammie's with a hot cup of tea trying to relax. 

Thursday, November 13, 2014

New jeans! Working on fitting that ass! Silhouettes Lana Jeans

I've completed another item off of my fall/winter sewing plans. This time a basic pair of blue jeans. I was sorely in need of these!!! My last pair of basic blue jeans wore out about 6 weeks ago. My jeans always wear out in the upper thigh area. I only ever have 1 or 2 basic pairs of jeans at one time and they get a lot of use! I think that since I finally have a pretty good jeans sloper I may have to make a couple more. 

Right now for causal wear I have these blue denim jeans, the red denim jeans and the eggplant courdoroy jeans. 

These blue jeans are a slimmer fit and a little longer in length, allowing for that slight shrinkage in length over time and washes. I have learned that even with one or two prewashes that the fabric still shrinks up in length. My eggplant courdoroy pants have done this and now I have to wear them with a cuff turned up to purposely make them look like short ankle length. OR else I look like a total dweeby looking nerd with my high waters on!!!
I love my red jeans but they have no Lycra content and after one wearing they stretch out or maybe more like the weave just relaxes a bit. They are more of a full relaxed fit Jean. They are also a straight cut Jean with no tapering to the ankle.  So Super comfy! Although my hubby says they look baggy. 

These latest pair are a bit more of a fitted Jean with a tapered leg. I would by no means call them a 'skinny' Jean. 

I still struggle a bit with the wrinkle of extra fabric at the back of the thigh. Or at least I was until I did 2 things!
First up.... I observed a lot of women in jeans, even some guys too. Some I am always in an airport there are a lot of people and this makes for great people watching. I even took some photos for my own refrence. Not to really be shared. I noticed several things. The only truly well fitting jeans with NO wrinkle on the back of the legs were in woman that have a small ass and who are generally smaller all over. On all of the women who had bigger asses or who were plus sized you had the extra back thigh fabric unless they were wearing jeggings or stuffed into a pair of jeans several sizes to small. Those were not pleasant images either! 
The second thing I did was to go to a store and try on several styles and sizes of jeans. I found the same thing as I observed on other woman. I could minimize the amount of wrinkles but due to the size of my ass I just could not eliminate all the wrinkles unless I went with a jegging or just something so tight there was no way I would wear it ever in public or even in private! 

All of this observing and trying on got me to thinking of the pattern and to how jeans physically function in relation to my body. Well. With a big ass more fabric is needed to wrap around the junk in the trunk.

2 woman the exact same height with the exact same leg length and waist to floor length and even the same waist measurement can have differing amounts of fabric needed just due to the size of the hips. That extra fabric needed to cover that extra area has to pool somewhere at least a bit upon standing. Therefore causing some of the back leg wrinkles. 

Now, there are some fitting tricks that can be done to minimize these wrinkles. Like pinching out the excess from under the butt and translating that to the flat pattern by slashing from inseam to outer seam and overlapping. Then you have to make sure to add some length back to the lower inner leg and re-true the grain line so your pants don't get all twisty. This works for some of the issues.
I have also made adjustments in the crotch length to allow a little more room which may or may not allow more fabric to take up space in the pelvic area therefore reducing some extra wrinkles. Not sure this helps much on jeans since they are considered a fitted piece of clothing.

The only technique that I have not tried is to literally just remove an amount of fabric that I have pinched out from the pattern and then keep my hip and knee points the same and ease the front length to the back (or stretch the back length to fit the front!) this is on my list. I am just afraid of having my side seams look funky. 

Once you move into trousers and dress pants it is much easier to get rid of those back leg wrinkles because the garment is not as fitted so the fabric can skim over the body more and hang nicely. Jeans don't do that! Jeans on most woman are tight and more conformed to the body. 

So with all of that said I am actually quite happy with this pair of jeans. Back thigh wrinkles and all!! I am even tempted to try making a pair of skinny jeans that fit more closely and to be worn only with longer tunics. In the mean time I have some black courdoroy that I may try making into a boot cut Jean.
Here are some of the details... Fun pocket bags made form leftover superhero cotton.

So.... My question to all of you that make jeans and have a generous ass,  How do you accommodate for the junk in the trunk?? 

Today is my nieces 1st birthday!! Happy Birthday to Roxie :) she lives in the Netherlands and I miss her so much!!! Im so glad she loves her turtles :) 


Thursday, November 6, 2014

October 2014 wrap-up

It's Thursday night and I'm sitting on my couch watching Project Runway Allstars and blogging! Usually I'm watching PR in my sewing studio. Thursday nights is my sewing night!!! But.... Tonight I am just feeling so tired, actually exhausted. I hear the bed calling my name.

Oh well, better to listen to it than try to force myself to sew and totally screw something up! That would be a big bummer so the lights are off in the sewing studio tonight. I have 3 items cut out and ready to be sewn. Jeans and 2 skirts and I have one jacket to put the finishing touches on. 

A good time to review my October makes!

I made a zillion little turtles.... LOVE THEM!

I made myself a new little sewing sack for traveling with supplies. This an in the hoop project from Anita Goodesign all done on the embroidery machine.


I also made several zipper sacks for Christmas gifts! But... You only get to see the back! I don't want to spoil the surprise.

Of course a HUGE amount of my sewing time in October was devoted to Halloween costumes!


I also started a new linen jacket. However, it is still awaiting the finishing touches. This will be completed this Sunday.

And that's all I've got to say tonight...this brain of mine is tired. 

But let me leave you with an adorable shot of little V :) She just makes my heart sing!

Friday, October 31, 2014

Maleficent and Prince Philip: Happy Halloween Costumes!

This year my husband I had two Halloween parties to attend. One of them was at our dance studio and the other at our next door neighbor. We ended up going as Maleficent and Prince Phillip.


I decided early on that I really wanted to be Maleficent for the festivities :) normally my husband and I usually throw a big Halloween party but for some reason this year I just was not feeling all the 'work' this year. I know... A big bah humbug for Halloween!

However, I could not pass up the opportunity to whip up a couple costumes!! 

Remember those feathers I bought in San Franscio? Well, they have been put to good use!

My costume was no quick project!! However, it was fun to make and I even learned a new technique. 

I used McCall's 6818 as the base pattern for the Coat Dress. The pattern states that this is a coat and cape pattern. I made some adjustments to make the coat into a coat dress. Most of the adjust,nets were in the bodice. I raised the v neck up 2 1/2 inches so I would not have to wear a camisole under. I also lengthened the entire bodice by almost 2 inches at the front tapering to an inch at the back so that the waist seam actually sat at my waist. I also closed up the back slit by a couple of inches. The original pattern has it open in the back going almost all the way up. Since I was not exactly sure what I was going to wear as an under layer I decided to close that slit up so that it only opened to my lower thigh. This also kept the illusion of a gown better! 
I cut 2 collars and made them slightly bigger and interfaced them with some leftover stiff paper type interacting from bag making. These made them stand straight up and I was able to shape the edges with a steam iron, came out very cool! 

The last thing I did, which was a brand new technique for me, was the addition of 3" wide horsehair braid to the hem. It took a bit of extra time but Was SOOOOO worth it! It made it feel so much more like a gown without having to wear petticoats or fluff underneath. 

Fabric for this project all came from fabricmart. The black with black glitter flocked swirls was from a super sale for 1.99$ yard!!! Score! I bought 10 yards. I originally intended to also make a cape out of it but that would have just been sooooo much costume! The cape is actually all cut out and with that I used 8 of the 10 yards on this costume! 
The lining accent is a royal purple taffeta also from fabricmart. I used almost 5 yards on this project. The taffeta was perfect because it had a nice heavier weight to give this dress some heft to it.


For underneath I finally decided that I wanted to make a pair of leggings. I had McCall's 6173 leggings pattern in my stash so I decided to give it a try. I used fabric I picked up from JoAnn's a black shiny Lycra from the dance/swimwear area. These worked out great! 

Ohhhh... So shiny! Maybe I can pair them with a long fancy tunic for a New Years outfit.....

The last part of my outfit is the horns, oh those horns! I originally ordered a pair of horns from an etsy shop back in the middle of September. Hmmmm, etsy site said 30 days for delivery of horns by my estimate they should have been in my hands by the latest October 20th.... That did not happen :( such a bummer. The horns showed up after my parties. On the bright side the etsy dealer gave me a full refund and I returned the box unopened. 

Did I let this set beach deter me???? NO WAY!!! I got back my 36$ from the etsy dealer and purchased a wide headband  and a roll of aluminum foil for under 5$! Deal in my book and I think my horns came out quite well. The horns are made of aluminum foil, shaped, covered in partners tape, gorilla taped to the headband and then sprayed with black spray paint! A little help form my son in law in getting the final shape correct and magic! An awesome pair of horns that were light and stayed put with Bobbie pins all night long!
My daughter was a champ and did my makeup for me! Thank goodness for Google and makeup tutorials :) we had fun and I think this was the first time I ever wore fake eyelashes. It sure was fun!

Next up is those feathers. That feather trim from Britex worked out like a dream. It was such a nice quality! I had no problems with feathers falling out or the trim coming apart :) to attach the feathers I sewed small snaps on the trim and the matching end on the dress. The feathers are removable.

This was such a great project! And one that will be packed away carefully for future Halloweens :) 

 Now my husband went as Prince Phillip. He wore a pair of brown pants and a black button up shirt underneath.

The cape was from another McCalls pattern from my stash. It was for a long cape that I shortened and it originally had gatheres (it was from a woman's pattern) so I changed them to pleats to make a more manly look. 
The fabric for the cape was also from fabricmart. It is a soft canvas. So very soft and actually quite cuddly! I'm glad I overestimated and ordered too much. The color was described as Tomato red. It should have been described as un-ripe tomatoe red!!!! It was actually pinky looking. Fit dye to the rescue and I dyed the length needed for this project a true scarlet red! 
The tan tunic was self drafted by me :) yippee! So easy to do!!! Just one long length with a neck cut out and sewn up the side seams with holes left opened for the arms. Before I sewed up the side seams I finished the armholes and neckline and added the tone on tone embroidery. The embroidery was my husbands idea! And I'm so glad I added it because it looks great. I used embroidery designs from Anita Goodesign and Urban Threads.
Hehehe! Disregard the boobs on my dress form ;) 

The hat was the last thing on the list. As I was contemplating what to make I was searching google for ideas and I stumbled upon a great tutorial from craftystaci.com! I ove free tutorials for these type of things!!! I didn't have to re-invent the wheel :) she even includes a free downloadable PDF pattern for her hat.  I made a few slight changes to the construction because I needed to interface this very soft canvas to make it work. The feather I picked up from a new Hobby Lobby that has just opened near us.


I hope every one has a Happy Halloween!!!

Tuesday, October 28, 2014

Turtles, turtles everywhere! And lots of shells too :)

This is actually the third time I am trying to post this darn blog post! Sometimes technology and I just don't get along.... Sigh....

Anyway.... With four little girls in my life from my darling Grandaughter, Victoria, and her best friend, Sophia, to my very good friends just turned 1 year old, Kaelyn, to my cutest niece ever living in the Netherlands, Roxie, I have tons of opportunity to sew some very fun stuff! 
Victoria, Kaelyn, Sophia and Roxie (top left going clockwise) they are all so beautiful!!

When my daughter was pregnant I purchased a soft toy book, Flip Dolls & Other Toys that zip, stack,hide, grab & go by Laura Wilson. It is a great book full of soft toys that 'do' something. There are so many cute things to make!! One that really caught my eye was 'Peekaboo Turtle' "your little turtle comes out of her she'll to say hello! Make a few extra shells for your turtle -- even reptiles need options."  Now, with a description like that how could I not make a slew of these little turtles for the little ladies in my life. 

So after thinking about it a bit, I figured I would make 3 turtles and 6 shells for each little one. <<Sigh>> what was I actually thinking???? I claim temporary insanity!! 

The templates in the book are quite nice and easily laid out all with needing enlarged by 200%. The directions are written quite clearly with only one major issue that I have found.... I can't seam to find ANYWHERE in the book that states what seam allowance to use!! I just went with an assumed 1/4inch but only after wasting a lot of time looking for the information. Other than that I really like this book filled with fun little projects!

On to the turtles... This meant that I committed to making 12 turtles and 24 shells. I spent an afternoon going through my stash picking out fabrics for the wee turtles and the shells. I used all stash fabrics and batting pieces for all of them!  I then spent an ETERNITY cutting out all these wonderfully detailed turtles and marking 4 darts on each of the 48 top shell pieces. See.... Insanity started setting in after several hours....

I then spent quite a few hours over several days getting those little buggers all sewed together. Sewing with such tiny precision required lots of concentration and patience and of course a quarter inch foot! I breathed a HUGE sigh of relief after the 12 turtle emerged from under my sewing machine!! 

Until.... I realized they all needed to be clipped, trimmed, turned inside out, stuffed and slip stitched shut.... That part actually required some fortification of good scotch. 

Well, as of today, the first set of turtles (pictured here) went out the door to Kaelyn's first birthday party! The last 9 turtles are in various phases of final finishing. 

Here is the greatest part of all.... I LOVE these little turtles!!! I hope all the little ladies enjoy them as well :) see??? Aren't they the cutest little things????

October has been a nice month! My brother, Gene, and his significant other, Jackie' we're in Chicago to run the Chicago Marathon. We went and spent a beautiful afternoon with them the day before. They both ran great and Jackie qualified for Boston! Maybe we have to start planning a road trip to cheer her on at the Boston Marathon! 

The weather has been beautiful here! And, of course, my fall allergies have been in full swing. :( my siuses hate me....