Thursday, July 29, 2010

Saving scraps...

I love my fabric and used to save every last itsy bitsy teeny tiny scrap! Only problem was that I was only sporadically using my scraps and becoming overrun with crates and bags of scraps.

I don't have the biggest of sewing rooms and have every inch carefully packed with my treasures! So sometime early 2009 I decided to de-scrap my stash and devise a more productive way of saving scraps. I was sitting in my sewing room, seemingly staring into space, pondering what to do with my scraps.

My answer was hanging right in front of me! About 10+ years ago I attended a hands on Watercolor Quilt class at an expo. The small wall hanging was comprised of 2 inch squares of fabric. Not just quilting cottons but all types of fabrics. 

The inspiration for my scrap saving system!

Since I sew anything from clothes, to handbags, to equine creations and quilts I have all types of fabric scraps. I decided that from that point on all my scraps would be cut down to 2" squares and anything that did not fit this bill gets thrown out. (Well 95% of the other scraps get thrown out... sometimes I just cannot part with some things!)

I sewed up a drawstring sack that hangs from a hook on my wall and now after every project or two I cut the scraps up into 2" squares and deposit them into the sack.  Someday, when I have enough squares I plan on making one awesome queen size charm quilt for my bed. Until then I have a nice orderly way of saving my scraps and keeping my sewing room neater without bins full of wasted material scraps!
 From a pile of scraps (above) 
to a pile of squares (below)


The only rule I have is to keep the scraps on my cutting table until they are cut up, this way I am not tempted to tuck them away until later. Cause I know they would just then accumulate into one giant scrap heap!

Sunday, July 25, 2010

Baby Bibs completed and a Wonderful gift!

The baby bibs are completed, I did 2 separate sessions in the sewing room yesterday. Some time in the morning and then again before dinner. They turned out quite cute and I gave the first set of 4 tied with ribbon to a gift card to one of the mothers-to-be at her baby shower today. She loved the colors and the fact that they are reversible. :)

 Baby Bibs: all done, edge stitched and snaps applied.

 Bibs tied up with ribbon to the card.


I received a wonderful gift from my daughter and her boyfriend when they returned from their NYC trip.

She knows I love fashion and love sewing and can spend hours at the costume areas in any museum. There are 2 current co-exhibits at the MET in NYC (American Woman: Fashioning a National Identity) and The Brooklyn Museum (American High Style). This book, High Style, is the accompanying comprehensive publication to the collections. It is absolutely wonderful! Made a superb gift, the photos are amazing, the details are amazing, the history behind the fashion is great and some of those dresses are so beautiful that one could just weep! It truly is the next best thing to actually going and seeing the collections yourself.

If you are in the NYC area the 2 exhibits are only until mid august so catch one or both if you can! If you cant and are into High Style and couture fashion then I would highly recommend this book!

 I have been dreaming of all the wonderful creations that I can create in my sewing room with inspiration from this book!

Friday, July 23, 2010

Baby Bibs galore

I have been working on baby bibs in the sewing room. (Not for me!)

A good friend of mine is having her baby shower this Sunday, she is expecting her first and it's a boy. I wanted to make something to go along with the gift card I had Melissa pick up for me. Another friend of ours is going to pick me up Sunday to take me to the shower. It will be nice to get out and spend some time with the girls!

The other set of bibs is for another new baby on the way, my co-workers twin sister is pregnant with her first and I wanted to give them a little gift to welcome the new baby.


Piles of bibs... 
finished ones on the left, unfinished on the right. 
(almost finished, I still need to set the snaps)
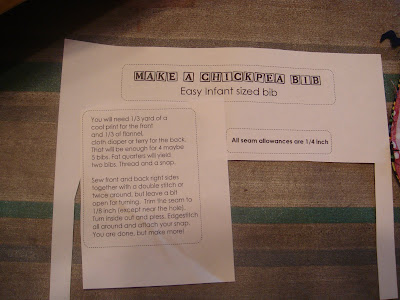
I used 8 different fat quarters, on several of them I sewed rick-rack from my stash on the front. 


The pattern was a free download I got off the internet. I altered the directions to use interfacing.


I used a woven fusible interfacing for one half of the bib and the other half I only interfaced the area of the snaps.
I did not fully interface both halves because I felt it would make the bibs too stiff.


Normally, this bib project would have been a quick one spending just a couple hours in the sewing room from start to finish. However... with crutches and using one leg and a limited time frame per sewing room visit... it has taken me a but longer to get them done. Oh well, :) at least I am back in the sewing room again!!

 The knitting continues and this time I am making a striped scarf. I am having fun with it and it will end up in a lucky Christmas package.

Thursday, July 22, 2010

An Artist in my house

Actually... there are more than just one! SO maybe I should say the 
'featured' artist in the house.
My daughters boyfriend, Dorian, has been staying with us this summer. (Mostly to help me out while I am recovering but I suspect that it is just a good excuse for them to not be apart!)

He recently spent some time painting. Both of these were gifts that they wanted to give while going on vacation to NYC this week.

Dorian in deep concentration

 My dining room turned into a temporary art studio.

 Lighthouse painting, acrylics, a birthday present for Melissa's grandmother. (not the best picture, a little angled, but you get the idea!)

 A thank you gift for Melissa's Uncle Willie, my brother, for letting them crash at his apartment in NYC for the week.
This is from a photo taken on Assateague Island, MD. In it is Melissa with her Uncle Willie and a wild pony. 

It was very thoughtful of him to paint for my family. The nice thing is my family will truly appreciate them, after all there are quite a few artists that have come down the line!

Tuesday, July 20, 2010

Finished the second Amy Butler Handbag

I finished the second Amy Butler purse today, this one is for me! I have found that I can last about and hour to an hour and half max in the sewing room before I need to get the leg up and put some ice on the knee. This was all the time I needed to get the purse finished. Although, I will have to wait a bit to use it since it is not quite conducive to crutches!

 Sewing with my healing leg. I still am not aloud to place any weight on the leg but got the OK to use the sewing machine.

I did remember to bring my camera into the sewing room so I could document the last steps in finishing this project. (only took me 4 months to complete!!) 


The lining over the outside of the bag.

An opening left in the lining bottom to turn the bag right side out. Needed to be almost the entire length of the bottom since this bag has so much structure.

Pulled the bag right side out through the opening in the lining.

edgestiched the opening closed. I thought about doing this by hand as I would have with a garment. But with so many layers (6) to go through this option was the best and seeing that it is the inside bottom of the purse it is not likely to be noticed by anyone!

Holes for the handle insertion were left unstitched. I pressed them under by a half inch then inserted the handles.

Close up of handles pinned in place.

Prior to stitching the handles in place and edgestitching along the entire top of the purse I use pliers to squish down any bulky areas. This really helps to make the sewing machine run smoother over these areas. 

The final product!!

And of course I needed to make a tissue holder to match. Tissues are a staple in my purses... allergies!

So in a final review of this Amy Butler pattern and fabrics... I LOVE it. There is also a larger tote version that I plan on making for my daughter. It was fun to make this in Amy Butler's signature fabrics. The patterns and colors are bright and happy and of very good quality. I could also see myself making this purse in more traditional fabrics.

There are a lot of pieces, and the cutting and prep work is long and tedious. However, well worth the work! The final product is beautiful. I just need to decide on whether or not to spray it with scotch guard. Any thoughts on the scotch guarding?


Monday, July 19, 2010

I made it into the sewing room!

 And HAPPY BIRTHDAY to my MOM!


Saturday I ventured into my sewing room! I had an Amy Butler purse to finish for my mom's birthday gift and it was leaving with my daughter on a 7am flight to NYC on Sunday morning.


In retrospect, I may have over done it a bit on Saturday... Sunday was exhausting and no fun. With this in mind, when I ventured back into the sewing room this morning I gave myself a time limit and stuck to it. I set my ipod on a playlist of 15 songs and once it was done then so was I. 


I think that was a much wiser move on my part.


Back to Saturday... I played on a few scraps to get the feel of sewing with my broken, now healing, leg. It took a few minutes to get the feel but then I was off and sewing. The hardest part is that my quadriceps muscle on my right leg is still not functioning very well. So I had to really concentrate on controlling the pedal. Probably good therapy as long as I keep it in limited doses!


One of the purses is done and from the phone call I get from my Mom yesterday, she LOVED it! Yay!


The finished purse 
and a matching tissue holder to go in it.


Wednesday, July 14, 2010

some new antique buttons to add to my collection

While I was in Delaware on vacation I had the opportunity to explore a couple antique shops... and as I am always on the look out for interesting old buttons...


 Green/gray plastic flowers


Rhinestone and plastic, very classy!


Very pretty green, the color swirls in the plastic and they look like very yummy hard candies!

 A pack of old Holly Hobby buttons! A real blast from the past and brought back lots of memories.

Monday, July 12, 2010

Knitting project #2 completed

I am affectionately calling this my 'vacation' scarf. 


I had plenty of time on the 2 day drive to and from Chicago to Lower 'Slower' Delaware to work on my knitting projects. 

I have finished this second lavender scarf and even had time to start on another one! I am having fun playing around with the yarns that I have been given. Not having any yarn experience. I am continually surprised by the different characteristics. 
 My mom modeling the scarf in 90 degree weather!!

I am making the most of this opportunity to play with knitting, still have not made up my mind as to whether or not I will just play for now or if I will keep up with the knitting after I am healed and back to normal life... we shall just have to see what happens!

In the meantime, I think that I am mobile enough to try a venture into the sewing room and finish up with the Amy Butler handbags that have been patiently waiting to be finished. :)