Showing posts with label Amy Butler. Show all posts

Tuesday, July 20, 2010

Finished the second Amy Butler Handbag

I finished the second Amy Butler purse today, this one is for me! I have found that I can last about and hour to an hour and half max in the sewing room before I need to get the leg up and put some ice on the knee. This was all the time I needed to get the purse finished. Although, I will have to wait a bit to use it since it is not quite conducive to crutches!

 Sewing with my healing leg. I still am not aloud to place any weight on the leg but got the OK to use the sewing machine.

I did remember to bring my camera into the sewing room so I could document the last steps in finishing this project. (only took me 4 months to complete!!) 


The lining over the outside of the bag.

An opening left in the lining bottom to turn the bag right side out. Needed to be almost the entire length of the bottom since this bag has so much structure.

Pulled the bag right side out through the opening in the lining.

edgestiched the opening closed. I thought about doing this by hand as I would have with a garment. But with so many layers (6) to go through this option was the best and seeing that it is the inside bottom of the purse it is not likely to be noticed by anyone!

Holes for the handle insertion were left unstitched. I pressed them under by a half inch then inserted the handles.

Close up of handles pinned in place.

Prior to stitching the handles in place and edgestitching along the entire top of the purse I use pliers to squish down any bulky areas. This really helps to make the sewing machine run smoother over these areas. 

The final product!!

And of course I needed to make a tissue holder to match. Tissues are a staple in my purses... allergies!

So in a final review of this Amy Butler pattern and fabrics... I LOVE it. There is also a larger tote version that I plan on making for my daughter. It was fun to make this in Amy Butler's signature fabrics. The patterns and colors are bright and happy and of very good quality. I could also see myself making this purse in more traditional fabrics.

There are a lot of pieces, and the cutting and prep work is long and tedious. However, well worth the work! The final product is beautiful. I just need to decide on whether or not to spray it with scotch guard. Any thoughts on the scotch guarding?


Monday, July 19, 2010

I made it into the sewing room!

 And HAPPY BIRTHDAY to my MOM!


Saturday I ventured into my sewing room! I had an Amy Butler purse to finish for my mom's birthday gift and it was leaving with my daughter on a 7am flight to NYC on Sunday morning.


In retrospect, I may have over done it a bit on Saturday... Sunday was exhausting and no fun. With this in mind, when I ventured back into the sewing room this morning I gave myself a time limit and stuck to it. I set my ipod on a playlist of 15 songs and once it was done then so was I. 


I think that was a much wiser move on my part.


Back to Saturday... I played on a few scraps to get the feel of sewing with my broken, now healing, leg. It took a few minutes to get the feel but then I was off and sewing. The hardest part is that my quadriceps muscle on my right leg is still not functioning very well. So I had to really concentrate on controlling the pedal. Probably good therapy as long as I keep it in limited doses!


One of the purses is done and from the phone call I get from my Mom yesterday, she LOVED it! Yay!


The finished purse 
and a matching tissue holder to go in it.


Sunday, May 2, 2010

Sweet Harmony: Exterior is finished!

I had a couple of hours this afternoon to work on the handbags. (we had very bad thunder storms last night and this morning so too soggy to work in the garden)

I finished up the exterior of the handbags... now I just have the linings to do!

Attaching the sides to the front and back main panels.
Sewing the sides and bottom on took a little manhandling to get the stiffened and interfaced fabric all together.

Using a zipper foot to attach the bottom panel with the peltex

All together and inside out


Right side out :) front/back view


Side view

Saturday, May 1, 2010

Sweet Harmony Progress

I have started the sewing of the Sweet Harmony Handbags.
I am doing the bulk of the sewing on my older Necchi mechanical machine. I think that it is a bit more heavy duty to go through all the layers of this project. I have it threaded with an all purpose white thread.

My computerized machine I am using for any of the colored topstiching and alternating between the spring green and berry red colors for the 2 bags as needed.

The pictures below show step by step progress. enjoy!

Above: Green pocket front with bias wrapped cording in the lining fabric
Below: Pink pocket front with bias wrapped cording in lining fabric


Above and below: Green main exterior panel with cell phone/gum pocket detail


Above and Below: Pink exterior panel with cell phone/gum pocket


Above: Green exterior panels with pockets attached
Below: cell phone detail in exterior pocket


Above: Pink exterior panels with pocket attached
Below: exterior panel with cell phone detail


Enticed away from the sewing room by a wonderful bowl of fresh fruit and berries!

Thursday, April 29, 2010

Sweet Harmony

This is the latest project on my sewing room table. AmyButler's Sweet Harmony Handbag and Tote pattern along with some Amy Butler fabrics that I bought at the sewing expo last fall. I bought fabric for 2 so I figure I may as well make 2 from the start. The only problem with making 2 is that there are a gazillion pieces! No, I am not kidding you. Between the exterior fabric, lining fabric, fusible fleece, fusible stabilizer and the peltex... I probably spent a total of 5 hours cutting in 3 different sessions.

All of the pattern pieces!
All the fabric, except for the striped one on the right, are from Amy Butlers collections.
Today (since I am home sick with a nasty spring virus) I decided to do all the fusing. I spent 2.5 hours at the ironing board. Every piece had at the minimum a layer of Pellon decor bond interfacing. All off the exterior pieces first had a layer of fusible fleece and then the Pellon decor bond over it.

large pile of Pellon decor bond and fusible interfacing and the curling stiff stuff on top is the peltex.

The bottom piece was the best. From out side in, it has: fashion fabric- Fusible fleece- Pellon decor bond- 2 layers of Peltex- Pellon deco bond. Everything layered and fused into a big ole sandwich. Sure will make for a stable bottom!
The pattern instructions are written quite thoroughly however it would be better to have more illustrations. I found myself having to read and re-read the instructions several times over to make sure I had it correct. Where as a simple addition of an illustration would have made things a bit faster.


The bottom pieces. on the far right is the initial sandwich of fashion fabric, fusible fleece and decor bond being added to that is the middle 2 layers of peltex, sewn together, and then held in place by the Pellon decor bond on the left. (the shiny part is the fusible stuff)
Below: is the entire thing all sandwiched together!


I am not sure that I want to attempt any sewing construction while I am taking the cold meds... I have that nice foggy head cold medication feeling going on! Although... how often do I just get time in the house :) Guess I will just have to wait and see how I feel.

Monday, April 26, 2010

Finshed shirt! and what I have been up to...

The weather in Chicagoland has been quite nice for a while... This is both a good thing and a bad thing. Very good for my horse habit and very, very good for the yard work but bad, very, very bad for the sewing room.


Since I was unable to do anything last year in the yard due to my ankle injury, this year I feel like I have 10x the amount to do. EVERYTHING in the yard is either overgrown and out of control or overtaken by weeds or just looking rather disastrously. Easter weekend my hubby and I picked up this rather large load of landscaping stones from the yard center. Yikes... I think the pickup was loaded to capacity.


I have been hard at work in the yard. Re-doing, cleaning up, moving plants around, trimming, taking out dead stuff, and reclaiming other areas. Also been working on getting the veggie garden ready for planting. All my spare time has been out in the yard. whew... making me tired and leaving little time for the sewing room.


Pick-up loaded with about 2000lbs of landscaping materials...


Flower bed: before... somewhere.


Flower bed: after. ahhhh.... there it is! Just one of 6 beds getting re-done.


Finally... this weekend was full of inclement weather... YAY! Sewing room time :) Never have I been so happy to hear the thunderclouds rumbling away. I was having withdrawals from the sewing room.


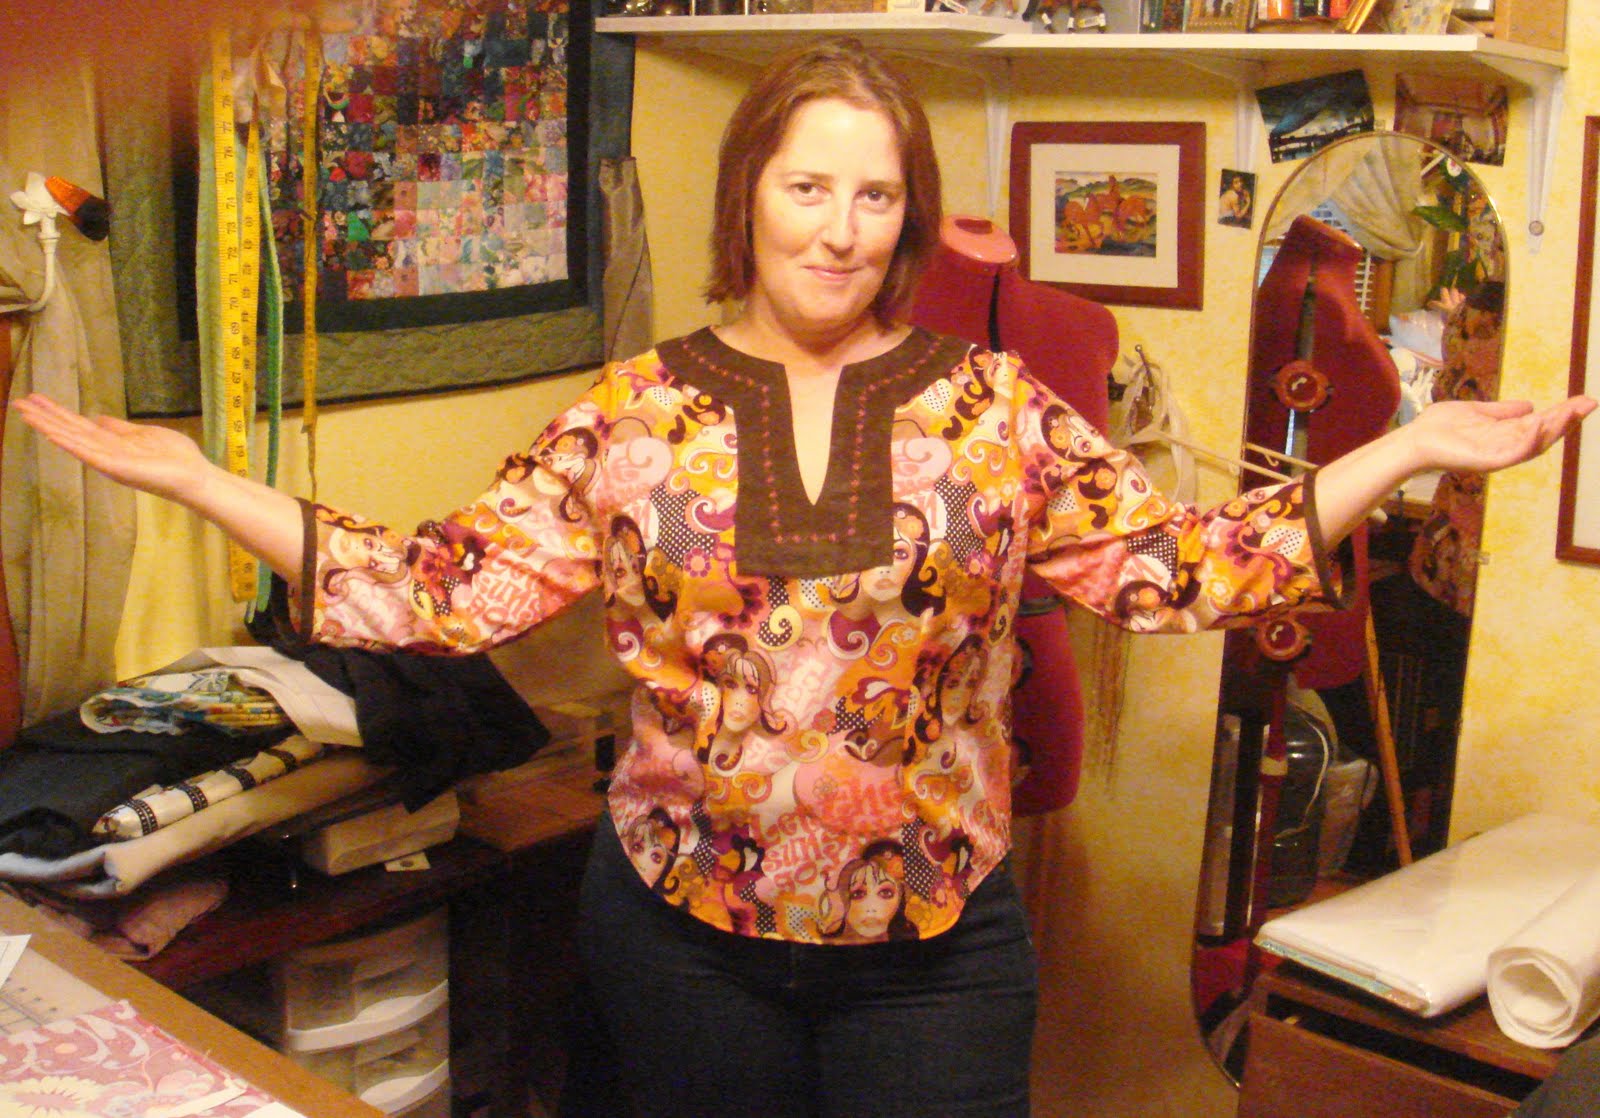
I finished up my 60's inspired shirt. I did have to re-cut the sleeves, the original sleeves were too tight for my chubby arms. I had already altered the pattern for the sleeve length but the circumference was a little snug. Since I had plenty of fabric and the shirt was destined as a summer shirt I really did not want snugness. I did a slash and spread of the sleeve pattern. slashed from the hem to the sleeve cap and spread it out an inch at the bottom tapering up to nothing at the sleeve cap line. I then re drew the hem and straightened the seam lines. Cut them out basted them in and fit was perfect. (glad I had the extra fabric and I guess I should have made a muslin...)


I decided to a bind finish on the sleeves to pick up the brown at the neckline.


I am very happy with the finished project! :)


Front and sleeve binding detail


Front view on me. the front darts keep it fitted but comfortable.


Blurry back picture...

but you can see the how nice the curved back hem looks about the tush.


Another front view :)


Next on the project list.... I have jumped on the Amy Butler band wagon, I need a new purse, had purchased the pattern and fabric last fall at the sewing expo and figured it would make a perfect spring project.

Friday, November 13, 2009

A great friday afternoon

I spent a wonderful Friday afternoon with my girlfriend going to the Chicago: Sewing and Quilt Expo. It was doubly nice because 1. I have had a super shitty week (sick, sick, sick and then exploding hot water heater, ugh) and 2. I have always gone to this Expo solo. It was really nice to have a friend to go with.

She is a newbie in the quilting world and really just enjoyed looking at everything and of course making some purchases. We did not take any classes or seminars, just did the expo floor and perused the quilt and clothing displays. Always makes for some great inspiration.

I, of course, bought some fabric and a pattern and a single sewing notion (knit bias tape). Did I need a pattern or any fabric, nope. But after my said week, I felt I was deserving of it.

Knit fashion fabric from SewkeysE
I have a couple patterns from her and have bought fabric from her in the past and it has always been very nice quality.
Fabric number 1: silky rib fabric(2yds @ 60") that I could see made into a tunic style shirt.

Fabric number 2: a beautiful fabric with a gorgeous hand, 50%silk, 45% cotton and 5% spandex,
fell in love! I bought 3 yards @ 45"
I will be inspired!

And last but not least... I had to get into the Amy Butler craze! I could no longer resist :)
I bought the new Sweet Harmony bag pattern and 4 yards of Amy Butler fabric.
hmmmm.... maybe some Christmas gifts...