Showing posts with label winter coat. Show all posts

Friday, August 21, 2020

It's Done!! Issey Miyake Coat Vogue 1227

Coat project for 2020 is in the books and done before summer is even over!  I finished my Issey Miyake Coat!!! Let me tell you that I am in LOVE and ready to take on another cold Chicago winter! Please see this blog post for construction details.

Pattern: Vintage Issey Miyake Vogue 1227 from 1993


Fit Changes: Due to the extreme oversize nature of the coat I decided to make a full muslin, including collar and pocket flaps to see what would work. I ended up making a size Small. Just for reference I normally make a large or extra-large depending on the pattern company.  Other than using a different size I did not change anything else in regards to fitting.


Design Changes: I think you can see from the photos that I made one big change and that was to make the coat color blocked. To do this I used my muslin, a mirror, a black sharpie and a measuring stick. In order to get the line to look straight while the coat is on the actual design line or seam is not straight.  You can really see the difference when the coat is on versus when it is flat or when I have my arms up.  To me, this is one of the coolest parts about sewing and manipulating fabric and patterns in 3-dimensions! Figuring out how to make something translate from flat paper pattern into a gorgeous 3- dimensional garment and having it work out perfectly.

The color in this photo is a little off. Photo below is more accurate!


I also decided to add top stitching. I played around with this on a sample first to get the exact look I wanted. On all Horizontal seams there a 3 rows of top stitching of the appropriate matching color. All Vertical seams are top stitched with a single line in the matching color. The hems, collar and pocket flaps were also top stitched with 3 rows of top stitching.

Pockets: In addition to the 2 front welt pockets with flaps, I also added a large internal pocket on the under lap front facing. The seam line for the color blocking seemed like the perfect place to add a zipper pocket. I intentionally added it to the underside, knowing that it would be a little harder to access which means 2 things. 1 items are safer and more secure and 2 by it being on the under lap side nothing that I put in it will show through to the front. With this volume I just want the outside as sleek as possible.


Other Design Features: This coat has underarm gussets which in my opinion are CRUCIAL to the design being functional. With the oversized drop shoulders the only way you can move and function to say calla Taxi or wave to a friend on the street is to have these underarm gussets.


Fabric: The outer fabric is a double faced cashmere or cashmere blend. It is a true double cloth meaning that it can be gently pulled apart and you can see the tiny threads holding the 2 sides together. This was purchased online at Gorgeous fabrics at least 3 years ago… maybe more. The lining fabric is a Nanatte Lapore silk that I quilted onto a thinsulate interlining. I purchased the silk from Fabrications while at the ASG National Conference in Indianapolis.

The color in this photo is a little off. Photo below is more accurate!


I also used heavy duty rib knit to make internal cuffs on the sleeves. I purchased several different pink and yellow rib knits for cuffs from an Etsy site that shipped from China. I got quite lucky in that one of them matched my pink quite nicely!!


Interfacing: After doing several tests of interfacing types I settled on a fusible weft that I fused the entire fronts, front facings, collar and collar stands (both sides) and I used 5-inch-wide bias cut strips of the weft to fuse to the hemline and sleeve cuff area. 

Notions/Buttons/Zippers: The pattern called for the use of only 2 buttons on the collar stand and after some design consideration I decided that I wanted more than just those 2. I would want several more for Chicago winter. I decided to go with large flat snaps that I purchased in Hong Kong. Of course, I needed to make them match!! I used Sharpie Oil Paint pens to make them the color that I wanted. The original color of the snaps was a light yellow. Using flat snaps keeps from having an imprint though to the front side.


Seam construction and seam finishes: All seams were done on the regular sewing machine using my Digital Dual feed foot for most of it. For the external seams they were all top stitched. I did not finish any seams internally since this is a fully lined garment. I used one of my Siouxzeegirl Designs labels on this coat along with a ribbon hanging loop.


Hem Finishes: Hems were catch stitched in place by hand then top stitched for decorative effect. The lining was then hand stitched in place over the raw hem edge.


I am SUPER HAPPY with this coat!!!! Issey Miyake is a designer that I really admire and I had so much fun recreating one of his patterns. Giving it an updated touch with the colors and the color blocking made it feel like me while keeping with is design. This coat just makes me smile and warms my heart… just tickles me pink!


What is your favorite Coat pattern?

Happy Sewing!!

I had the Princess for over for a 'sleepover' this past weekend! We had so much fun together. Eating sushi, making faces at each other and picnicking in the Grant Park Gardens. It was just a lovely weekend!


Friday, July 31, 2020

Issey Miyake Coat Vogue 1227 construction update

I have been slowly, very slowly working on my Issey Miyake Coat project, Vogue 1227.

As a reminder this is an American Sewing Guild – Chicago Chapter- Sew Chicago Neighborhood Group fashion show challenge project. Every year the Chicago Chapter does a Fashion Show in October and the chapter encourages each neighborhood group to participate in a group challenge.


In Sew Chicago we do our best to come up with a challenge idea at the beginning of the year and try to build a little bit of excitement around it for the year. This year we challenge ourselves to making a coat or jacket.  Due to the Covid19 pandemic the annual fashion show is going to be virtual and the deadline for the submissions is September 1st, a bummer for sure as we all like to get together and show off our me-made garments! It is all for the best though and I am glad that we are still moving forward with a virtual show!

September is rapidly approaching so I am going to try to finish up the coat within the next week.

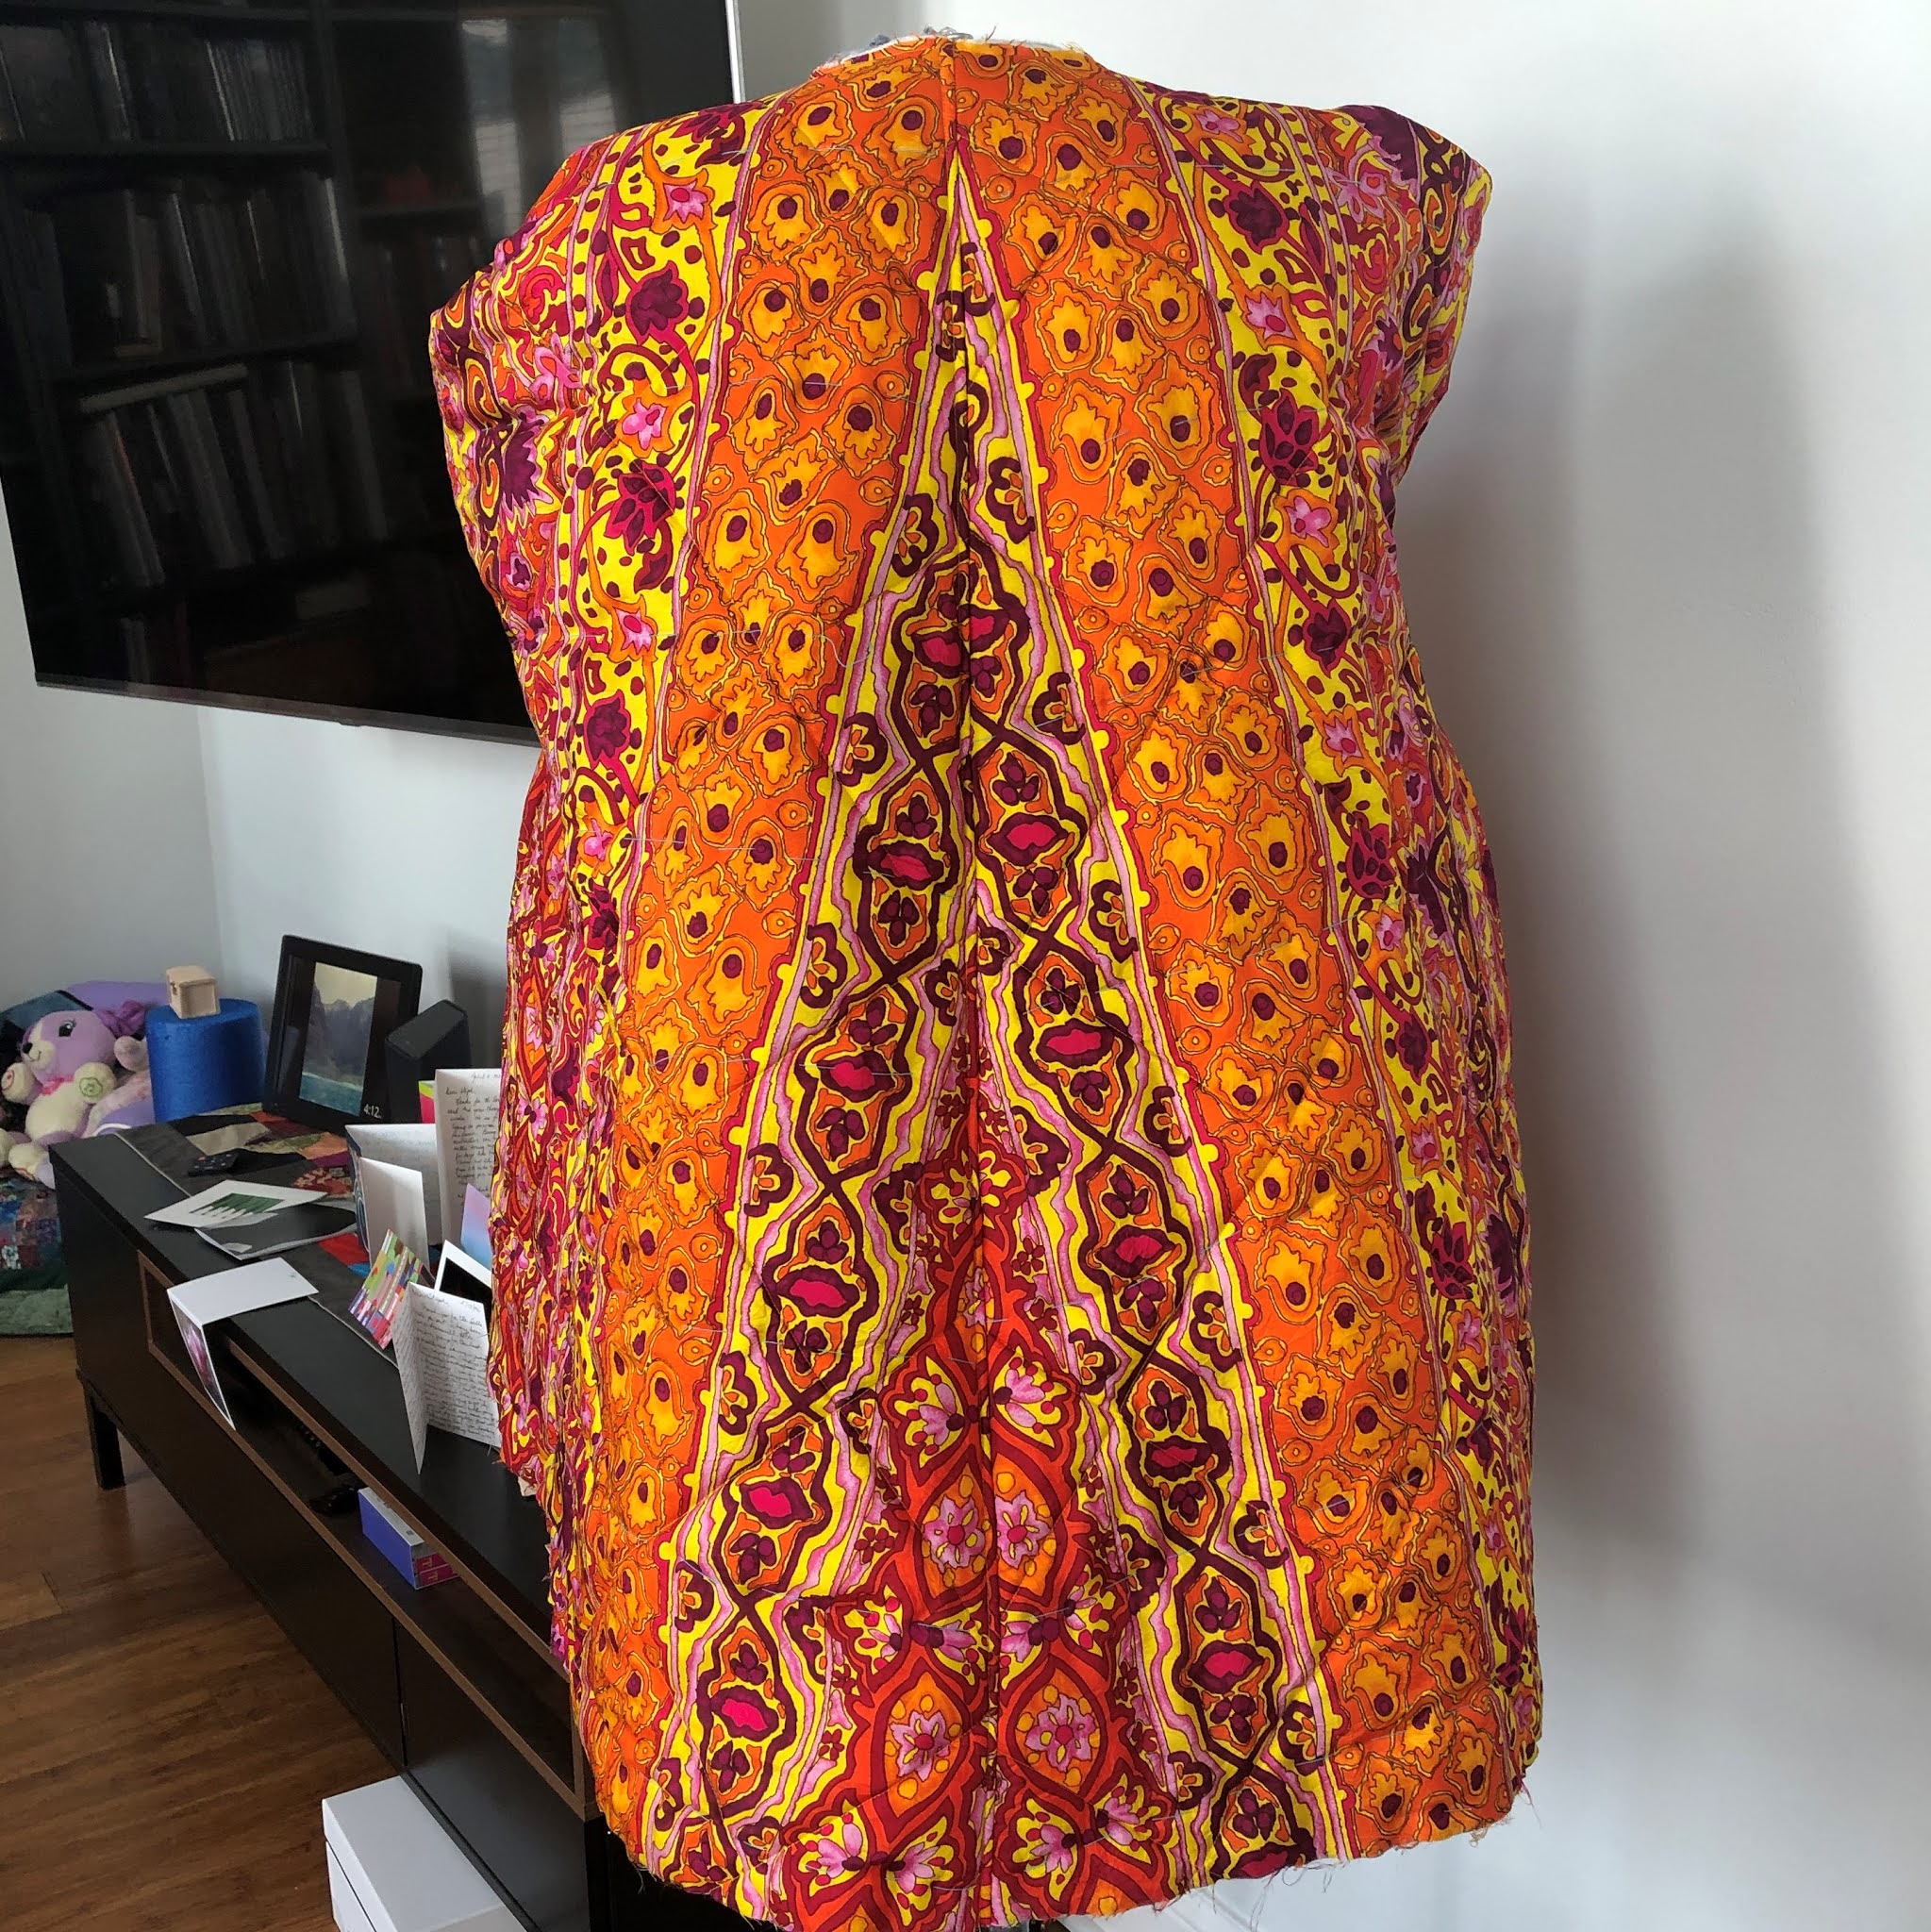
The Lining is completed with the Thinsulate interlining quilted to the silk and has been hanging on the back of my sewing room door for a couple of months waiting for the rest of the coat to be constructed.


This was quite a process but fun to do! Because there are ‘stripes’ in the lining print I decided to do diamond quilting following the Thinsulate manufactures guideline for spacing of quilted lines versus just following the pre-quilted lines on the Thinsulate. I cut the silk and Thinsulate larger than the pattern pieces, with the stripes of the silk following the grainline markings and then hand basted them together with basting thread.


After the machine quilting was done, I cut the quilted pieces to the pattern size and then constructed them and trimmed back the Thinsulate from all the seams using my duck bill scissors.

I also took advantage of the color blocking on the front facing to insert a zipper and a large internal pocket. I love me some good pockets!!

Some people may be wondering why I did the lining first. Well, I like to have the lining constructed first so that once the outer garment construction is complete I can move right into the finishing work. It’s a psychological thing on my part! I also like to get as many of the small parts together before the major construction as well. In the case of this coat the pockets, flaps, collar parts, etc. It streamlines the construction for me.


I made a full test version of the welt pocket with pocket flap and full pocket bags. Partly because since this was a new process for me and I wanted to test it out with the thickness of the fabric and make sure I had the process down pat before I started. I have decided to put the pockets in before I join the color blocked sections of the front of the coat together.

After I put the sleeves and back of the coat together in sections I felt slightly underwhelmed. I really like the color blocking but I felt like it just needed a little more something. So, I decided to make a test with multiple row of top stitching for the horizontal seams to kid of highlight the color blocking.


I am super happy with it so far! To make the lines parallel and even I used the laser function on my sewing machine. The fabric was too think to use the edge-stitching foot/stitch in the ditch foot, the guiding blade kept getting caught up on the thick wool and causing the stitches to be uneven. Using the laser with the digital feed foot worked perfectly. I have only used the laser when sewing in darts so it is nice to have another use for it.


The back stay has been inserted and all hem areas has been interfaced with fusible bias cut weft with the edges cut with pinking shears. The fronts have been fully interfaced with weft fusible as well as the collar and collar stand pieces both upper and under pieces.


Once the pockets, welts and flaps are in the rest of the outer shell should be easy. I have practiced the diamond gusset in the underarm with the muslin and it will just take some time to do all the topstitching.

Then the only other part that I have not yet quite figured out is how I am going to add in the rib knit internal cuff to keep the wind from blowing up the sleeves. In Chicago winters that is really needed! I have researched some ideas and I have added some length to the lining sleeves to have the room to make it work if needed, they can always be trimmed backed if I don’t need the extra length.

There have been some other things on my sewing table that I finished this week… But will have to wait a little bit before I can blog them since one is a gift!  have also been working my way through this bunch of masks, about another 60 or so. Some are for family and friends, some for me and some are for donation.This pandemic clearly is not slowing down anytime soon and I am glad that I can help some people in a small way. I think everyone has the right to feel safe and to do their part in keeping everyone else safe as well.

Happy sewing and stay safe!!  #sewcialdistancing

This week I had the pleasure of spending an afternoon and evening with the princess and her trusty little dog!


Friday, December 20, 2019

Winter coat 2019 and a new dress!

Living in Chicago  means I am never without a reason to make a new coat! This years coat is navy speckled wool underlined in silk organza and lined with kasha winter lining. This makes it a good winter coat but not one for a deep freeze. This quote was originally intended to come to Paris with me to wear on the colder days but I did not finish it in time and I did not want to rush the finishings. I finished it over Thanksgiving weekend.
Front and Back views of me in the coat

This is my own self drafted coat pattern and is a variation of the coat that I made last year. I slimmed the silhouette slightly and redrafted the collar and narrowed the lower sleeves. Overall the sleeves are big enough to accommodate layers of a sweater or even a French style jacket or a blazer.  
The inside pockets are a scrumptious splurge! They are made from a remnant of vicuña that I received a couple years ago. I had a small piece about 9 inches wide and just enough to cut for the inside pockets. They are positioned between the lining and facing and big enough to easily hold my cell phone and CTA card. I positioned them so that I could get my hand into the pocket while the coat is buttoned closed. In order to keep the breast pockets  from bunching up I attached a length of grosgrain ribbon from the bottom outside edge of the pocket to the side seam to hold them in place.
Oh dear.. a reverse Napoleon pose! LOL! Inner pockets on both sides and grosgrain ribbon to hold pocket bag in place.

The hem’s are interfaced with a strip of light weight bias faced canvas to hold its shape. There are 4 buttons and they are all that I had! So even thought I could have used 5, I had to make do with 4. The buttonholes were a different matter. Three of them are bound buttonholes made with faux leather lips and the 4th buttonhole, the second from the top, is an inseam buttonhole.  The corresponding buttonholes on the facing pieces were done as ‘Spanish snap’ buttonholes with 2x3 bias pieces of silk organza. These are then stitched on the top of the facing in the shape of a long flattened football or like a loaf of French bread. The hole is then cut open and the organza pushed through and snapped into place. The organza then forms the lips and this is then hand stitched to the back of the buttonholes with small invisible fell stitches. 
Bias horse hair canvas in hem. It sits in the hem and then I catch stitch the hem to it. Holds everything in place and gives the hem a nice shape on this winter coat.

Top are the Spanish snap button holes on the facing and the bottom shows the bound buttonhole plus the buttoned look with both inseam buttonhole and bound buttonhole.

I had a lot of fun creating this collar! It was a shape that I have been wanting to play with. A little bit retro. I knew that I really wanted the collar to hold the shape so instead of messing with a bunch of different interfacings I used a piece of men’s under collar that was already stitched to hair canvas and ready to be used. Thank you NYC tailoring shops! I figured the worst that could happen would be that I hated it and then would have to re-do it. I actually love it! The collar holds it’s shape quite smartly and when the coat is unbuttoned it still looks very good to me. Perfect for this quite simple rolled collar with a fantastic shape to it.
Collar views with the undercollar being cut out for men's pad stitched under collar navy felt.
I put my label on the lower facing across a seamed area that I had to piece together. I also added a strip of the faux leather that I used for the bound buttonholes as a hanging loop.

The outer pockets almost didn't happen! That was until I put the coat on and after looking in the mirror decided a winter coat with no external pockets whatsoever was just wrong. LOL! The problem was that I wanted a bigger pocket and a fun flap and I just did not have the fabric left to make that happen. So going to the extremely small pile of scraps left over I was able to eek out these 2 patch pockets. Basically I found the largest dimensions that I could with the fabric on grain and that was my pocket. I lined them with scraps of the fabric left over from the dress. So while I would have preferred slightly bigger patch pockets, these will have to do! Of course in hindsight I could have made a wonderful set of single welt pockets...
No pockets versus pockets! Pockets win every time!!

This was the incredibly small pile of scraps that I had to cut the pockets out of!

All in all I am quite happy with this new coat. It is warm enough for cold Chicago and for going from car or Uber into a building or for walking around as long as it is not too cold. Once it gets down into the 20’s and below walking around changes over to the down parka!!
Baby, it's cold outside!!

The dress that I am wearing in these pictures is from one of my own TNT patterns that I developed with the help of Sarah Veblen. I have made this pattern several times now over the past 4 years and I love the shape and design of it. This time I made it with 2  rayon/polyester woven plisse fabrics that are the same design in 2 different scales. I ordered these a while back from EmmaOneSock. It took me a while to decide exactly how to use them and I am very happy with the outcome! I must say that this was almost a giant fail!!! I have 2 copies of the pattern... One for wovens  and one for stretch wovens. I clearly did not label them very clearly and I made this with the one for stretch. Imagine my surprise when I went to try it on and could barely get the back zip up, let alone breath!!! Luckily enough I use 5/8 inch seam allowances and had not trimmed them down. So I was able to let the seam allowances out along the upper back portion of the zipper. Once I did this it fit perfect! Whew!! That was a close call! And a good reminder for me to always clearly label all of my patterns.
New 'corner' dress! I love this silhouette!!

It even has a nice twirl factor!

I took this dress to Paris and wore it several times. It is really quite comfortable, looks nice and I always get lovely compliments when wearing it. It always make me feel good when I get an unsolicited compliment when wearing a garment that I made and even more so when it is by a complete stranger. 

Christmas is almost upon us and some of my family is coming in to spend Christmas week. I spent all day rearranging my apartment and moving much of my sewing room aside to make way for visitors! I am very excited for this! My mom and dad are coming and they are staying with me. They have not yet seen my home since I moved downtown Chicago in spring of 2017. And my sister is coming too!! Very excited. She is coming first so I will have a couple days with her and then my parents. I am very much looking forward to having them here to celebrate Christmas! 
Princess V and I had a sleepover and decorated gingerbread houses to get ready for the Holidays!!
I really love spending time with her- makes my heart so happy!!


Happy Sewing and Happy Christmas time and Happy Holidays to all!