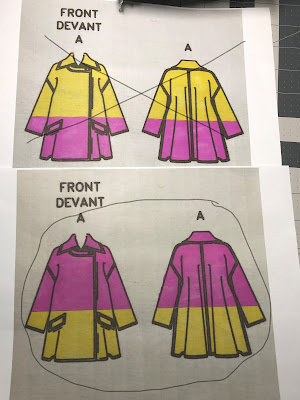
I have been slowly, very slowly working on my Issey Miyake
Coat project, Vogue 1227.
As a reminder this is an American Sewing Guild – Chicago Chapter- Sew Chicago Neighborhood Group fashion show challenge project. Every year the Chicago Chapter does a Fashion Show in October and the chapter encourages each neighborhood group to participate in a group challenge.
In Sew Chicago we do our best to come up with a challenge idea at the beginning of the year and try to build a little bit of excitement around it for the year. This year we challenge ourselves to making a coat or jacket. Due to the Covid19 pandemic the annual fashion show is going to be virtual and the deadline for the submissions is September 1st, a bummer for sure as we all like to get together and show off our me-made garments! It is all for the best though and I am glad that we are still moving forward with a virtual show!
September is rapidly approaching so I am going to try to finish up the coat within the next week.
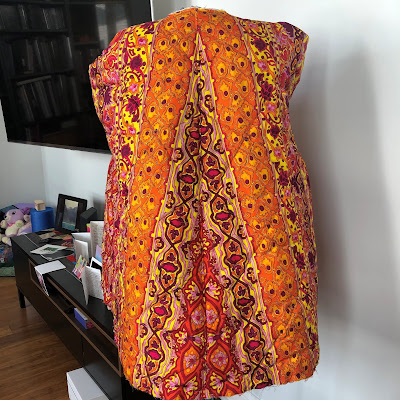
The Lining is completed with the Thinsulate interlining quilted to the silk and has been hanging on the back of my sewing room door for a couple of months waiting for the rest of the coat to be constructed.
This was quite a process but fun to do! Because there are ‘stripes’ in the lining print I decided to do diamond quilting following the Thinsulate manufactures guideline for spacing of quilted lines versus just following the pre-quilted lines on the Thinsulate. I cut the silk and Thinsulate larger than the pattern pieces, with the stripes of the silk following the grainline markings and then hand basted them together with basting thread.
After the machine quilting was done, I cut the quilted pieces to the pattern size and then constructed them and trimmed back the Thinsulate from all the seams using my duck bill scissors.
I also took advantage of the color blocking on the front facing to insert a zipper and a large internal pocket. I love me some good pockets!!
Some people may be wondering why I did the lining first. Well, I like to have the lining constructed first so that once the outer garment construction is complete I can move right into the finishing work. It’s a psychological thing on my part! I also like to get as many of the small parts together before the major construction as well. In the case of this coat the pockets, flaps, collar parts, etc. It streamlines the construction for me.
I made a full test version of the welt pocket with pocket flap and full pocket bags. Partly because since this was a new process for me and I wanted to test it out with the thickness of the fabric and make sure I had the process down pat before I started. I have decided to put the pockets in before I join the color blocked sections of the front of the coat together.
After I put the sleeves and back of the coat together in sections I felt slightly underwhelmed. I really like the color blocking but I felt like it just needed a little more something. So, I decided to make a test with multiple row of top stitching for the horizontal seams to kid of highlight the color blocking.
I am super happy with it so far! To make the lines parallel and even I used the laser function on my sewing machine. The fabric was too think to use the edge-stitching foot/stitch in the ditch foot, the guiding blade kept getting caught up on the thick wool and causing the stitches to be uneven. Using the laser with the digital feed foot worked perfectly. I have only used the laser when sewing in darts so it is nice to have another use for it.
The back stay has been inserted and all hem areas has been interfaced with fusible bias cut weft with the edges cut with pinking shears. The fronts have been fully interfaced with weft fusible as well as the collar and collar stand pieces both upper and under pieces.
Once the pockets, welts and flaps are in the rest of the outer shell should be easy. I have practiced the diamond gusset in the underarm with the muslin and it will just take some time to do all the topstitching.
Then the only other part that I have not yet quite figured out is how I am going to add in the rib knit internal cuff to keep the wind from blowing up the sleeves. In Chicago winters that is really needed! I have researched some ideas and I have added some length to the lining sleeves to have the room to make it work if needed, they can always be trimmed backed if I don’t need the extra length.
There have been some other things on my sewing table that I
finished this week… But will have to wait a little bit before I can blog them
since one is a gift! have also been working
my way through this bunch of masks, about another 60 or so. Some are for family
and friends, some for me and some are for donation.This pandemic clearly is not slowing down anytime soon and I am glad that I can help some people in a small way. I think everyone has the right to feel safe and to do their part in keeping everyone else safe as well.
Happy sewing and stay safe!! #sewcialdistancing
This week I had the pleasure of spending an afternoon and evening with the princess and her trusty little dog!


Thank you for showing how you handled the Thinsulate. I have some in my stash but have been unsure how to work with it. And the top stitching is the perfect touch!
ReplyDeleteYou are welcome! Its not hard to use just a bit of extra work!And you need to be careful of the iron temp. It will melt if iron is too hot.
DeleteThis is going to be such a cute coat! I want to name it the lemonade coat!
ReplyDeleteThanks Natasha! I love that name!!!
DeleteThat topstitching is perfect. I learned how to make welt pockets on another Miyake a million years ago, and the amount of traditional tailoring detail that goes into Vogue patterns is definitely on display. Even if I am offered another technique, I used this one, it has yet to fail me.
ReplyDeleteThanks for sharing this. It's aspirational.