Friday, September 11, 2020

A Birthday Suki Robe! or two...

 My mom had her birthday over the summer and I wanted to make her something nice! So I looked through my patterns and decided on a summer robe. Everyone needs a nice robe J and I know that my mom has a winter robe and thought it would be lovely to have a nice summer robe to relax in on a lazy Summer Sunday morning.

  
HAPPY BIRTHDAY MOM!!


I have been wanting to make the Suki Robe for a long time. In fact, I was so excited about this pattern that I mistakenly purchased it twice! Oops! When I went through my fabric collection to pick out a fabric to make for her I settled on the 2 combinations that you see here. The floral print and the tiger print. Both lovely fabrics with very different feels to the fabric and very different, but fun, vibes. Decision paralysis hit! For the life of me I could not decide which one to make for my mom. So, I did what any good sewist would do and made them BOTH!! I figured that I really wanted one and liked both combinations equally so one for me and one for mom! The decision could be made later as to who got which one. Luckily I could make the same size for both since there is not a huge amount of difference between us and it is after all just a robe, very forgiving in the fit department.


As I was making them I literally would go back and forth with which one would be for mom. In the end I waited until they were both completed and then had a video chat with my sister and asked her opinion. I REALLY just needed someone to make a decision! She said floral for mom!! After seeing mom in the floral robe it is a perfect fit for her.


Pattern: Suki Robe by Helen’s Closet- View B knee length. Description of pattern from website: The Suki Robe is a luxurious and comfortable robe, perfect for everyday use. It wraps around the body for a flattering waist fit and flares out over the hips. The sleeves offer a classic look while still being a practical shape and length for getting ready in the morning. Inner and outer ties keep this robe closed so you can move around freely. The outer ties are anchored to the back of the robe so you will never lose them and inseam pockets ensure your phone is always at hand. Two lengths are provided and you have the option of contrasting front bands, sleeve bands, and ties. The Suki Robe will surely be your new favorite lounge-wear!


This is a PDF only pattern. I really do NOT enjoy printing out sheets of paper and taping them together so I use an online printing service called PDFPlotting.com They do a nice job and have fairly quick turnaround and very reasonable prices.

Fit Changes: No fit changes except to grade between sizes for larger hip.

Design Changes: Almost None! For a change I made these almost exactly as designed by Helen from Helen’s closet. The only thing I did was to make the main ties longer. I added 6 inches to each tie. I also added a label and hanging ribbon.


Fabric: Robe 1: My Mom’s robe- Digital floral print lightweight linen with solid linen accents. Digital print linen from Marcy Tilton and solid accents from Blackbird fabrics.

            Robe 2: My robe- Tiger print rayon challis with solid linen accents. Tiger print rayon challis from WorkroomSocial and solid accents from Blackbird fabrics.

Interfacing: scraps for the corner insertion on the front band.

Notions/Buttons/Zippers: none!

Seam construction and seam finishes: All seams done on a regular sewing machine with a 3 thread overlock serger finishing. The construction directions are quite nice and I had them accessible on my iPad. For both the sleeve bands and the front bands she includes 2 construction methods, a beginner method – exposed seams and a more advanced method- all seams enclosed. I thought this was a very nice touch and would certainly enable new sewists to expand on their techniques.

For all of the edge stitching and topstitching I used an edge stitching foot on my machine to keep things lined up perfectly!
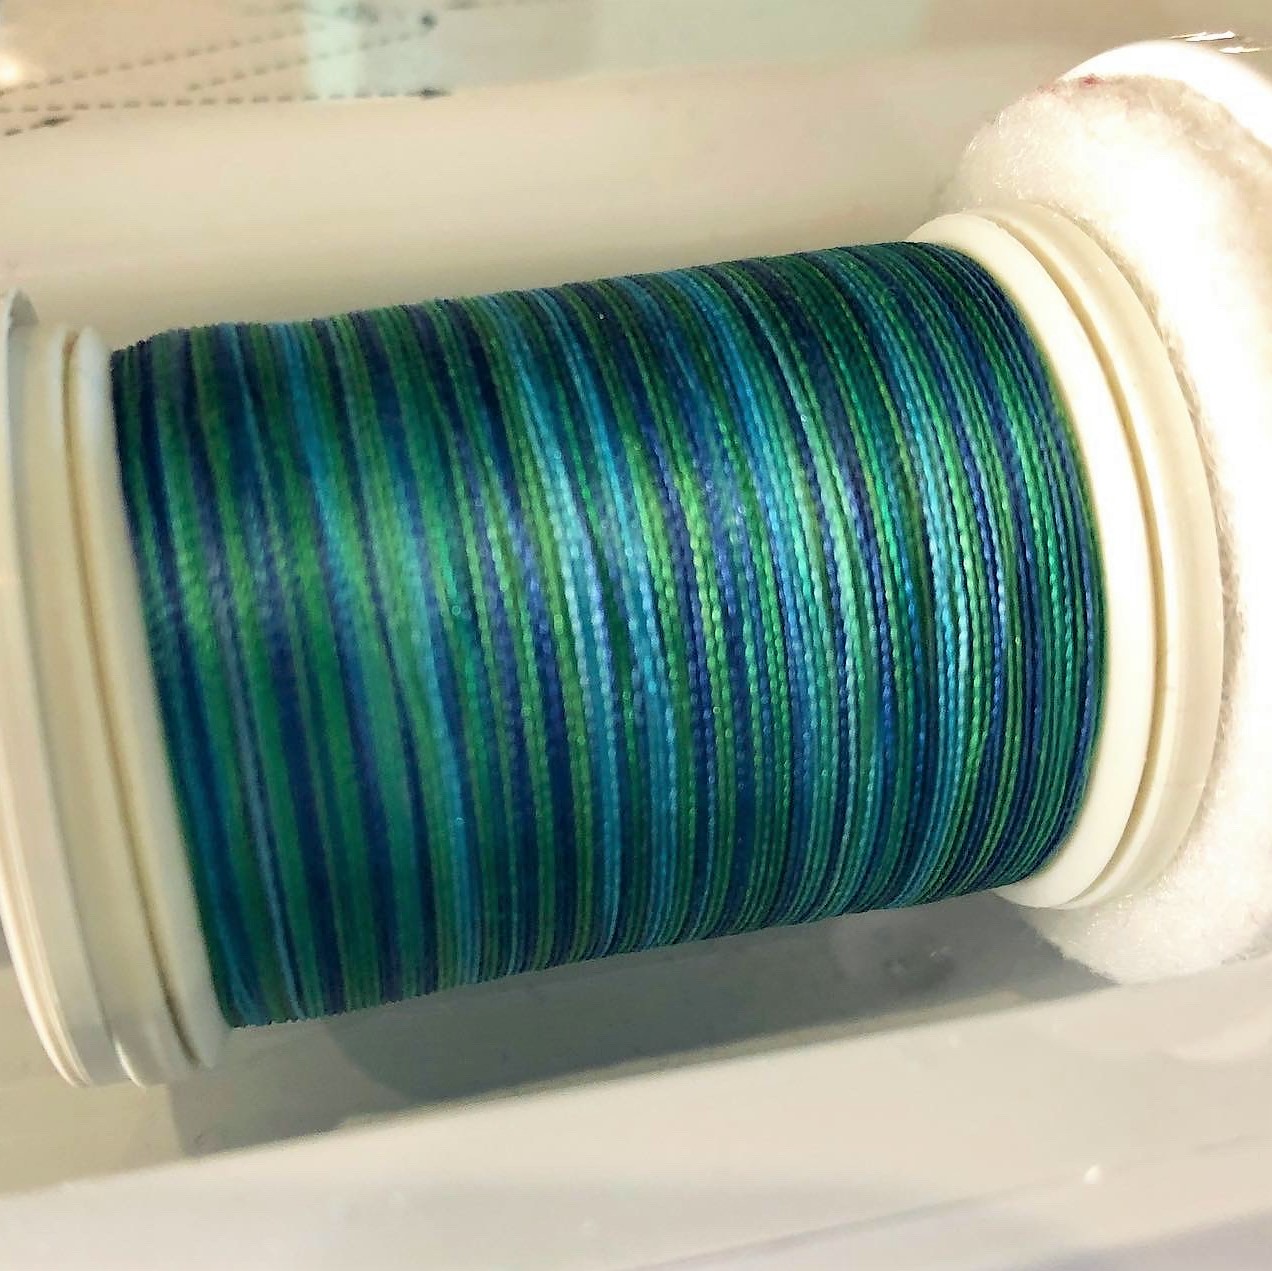


Robe 1 notes- I did have some fun with all of the topstitching on Robe 1. I used a Sulky 12wt Blendables Long staple cotton thread for a nice effect and for the inner ties I used the serger belt loop binder to create the ties.


For the main ties I added an interior back portion to stabilize them better. The main fabric is quite lightweight and I was afraid that over time they would rip at the back where they are attached. Certainly not a design flaw- just a consideration to take into account with the lightweight fabric.

On the inside I added a piece of the straps and edge stitched it down for re-enforcement.On the outside all you see is the rectangle of stitching that matches up to the  straps.

Robe 2 notes- Matching topstitching as I didn’t have anything special on hand to use! The inner ties were made the old fashioned way of sewing and turning the tubes. The rayon was way too soft for feeding through the belt loop maker on the serger and I didn’t want to futz with starching the pieces.


Hem Finishes: Sleeves are finished with a band and the lower hem is a simple double turned and topstitched.


Additional Notes: This was a fun project! I will totally make more of these Suki robes. They are very comfortable and feel quite lovely when worn. I like having the inner tie as I can sit out on the balcony and have coffee in the nice weather and not worry about any wardrobe malfunctions.


If I didn’t already have 2 winter robes I would be making myself another one! I know of some people on my Christmas list that would enjoy a robe as a gift. We shall see if I can make that happen.

Happy Sewing!!

The Princess really enjoyed exploring some of the art done after Chicago George Floyd riots at the RC Shops close to my home. Many shops that have had to put up plywood to protect the glass at shops have taken the opportunity to invite artists to paint them. Much nicer than just plain plywood! Her favorite was this one with the beautiful floral hair!

Also... a sneak peak of what I am currently working on :) Stay tuned for more information.


Friday, August 21, 2020

It's Done!! Issey Miyake Coat Vogue 1227

Coat project for 2020 is in the books and done before summer is even over!  I finished my Issey Miyake Coat!!! Let me tell you that I am in LOVE and ready to take on another cold Chicago winter! Please see this blog post for construction details.

Pattern: Vintage Issey Miyake Vogue 1227 from 1993


Fit Changes: Due to the extreme oversize nature of the coat I decided to make a full muslin, including collar and pocket flaps to see what would work. I ended up making a size Small. Just for reference I normally make a large or extra-large depending on the pattern company.  Other than using a different size I did not change anything else in regards to fitting.


Design Changes: I think you can see from the photos that I made one big change and that was to make the coat color blocked. To do this I used my muslin, a mirror, a black sharpie and a measuring stick. In order to get the line to look straight while the coat is on the actual design line or seam is not straight.  You can really see the difference when the coat is on versus when it is flat or when I have my arms up.  To me, this is one of the coolest parts about sewing and manipulating fabric and patterns in 3-dimensions! Figuring out how to make something translate from flat paper pattern into a gorgeous 3- dimensional garment and having it work out perfectly.

The color in this photo is a little off. Photo below is more accurate!


I also decided to add top stitching. I played around with this on a sample first to get the exact look I wanted. On all Horizontal seams there a 3 rows of top stitching of the appropriate matching color. All Vertical seams are top stitched with a single line in the matching color. The hems, collar and pocket flaps were also top stitched with 3 rows of top stitching.

Pockets: In addition to the 2 front welt pockets with flaps, I also added a large internal pocket on the under lap front facing. The seam line for the color blocking seemed like the perfect place to add a zipper pocket. I intentionally added it to the underside, knowing that it would be a little harder to access which means 2 things. 1 items are safer and more secure and 2 by it being on the under lap side nothing that I put in it will show through to the front. With this volume I just want the outside as sleek as possible.


Other Design Features: This coat has underarm gussets which in my opinion are CRUCIAL to the design being functional. With the oversized drop shoulders the only way you can move and function to say calla Taxi or wave to a friend on the street is to have these underarm gussets.


Fabric: The outer fabric is a double faced cashmere or cashmere blend. It is a true double cloth meaning that it can be gently pulled apart and you can see the tiny threads holding the 2 sides together. This was purchased online at Gorgeous fabrics at least 3 years ago… maybe more. The lining fabric is a Nanatte Lapore silk that I quilted onto a thinsulate interlining. I purchased the silk from Fabrications while at the ASG National Conference in Indianapolis.

The color in this photo is a little off. Photo below is more accurate!


I also used heavy duty rib knit to make internal cuffs on the sleeves. I purchased several different pink and yellow rib knits for cuffs from an Etsy site that shipped from China. I got quite lucky in that one of them matched my pink quite nicely!!


Interfacing: After doing several tests of interfacing types I settled on a fusible weft that I fused the entire fronts, front facings, collar and collar stands (both sides) and I used 5-inch-wide bias cut strips of the weft to fuse to the hemline and sleeve cuff area. 

Notions/Buttons/Zippers: The pattern called for the use of only 2 buttons on the collar stand and after some design consideration I decided that I wanted more than just those 2. I would want several more for Chicago winter. I decided to go with large flat snaps that I purchased in Hong Kong. Of course, I needed to make them match!! I used Sharpie Oil Paint pens to make them the color that I wanted. The original color of the snaps was a light yellow. Using flat snaps keeps from having an imprint though to the front side.


Seam construction and seam finishes: All seams were done on the regular sewing machine using my Digital Dual feed foot for most of it. For the external seams they were all top stitched. I did not finish any seams internally since this is a fully lined garment. I used one of my Siouxzeegirl Designs labels on this coat along with a ribbon hanging loop.


Hem Finishes: Hems were catch stitched in place by hand then top stitched for decorative effect. The lining was then hand stitched in place over the raw hem edge.


I am SUPER HAPPY with this coat!!!! Issey Miyake is a designer that I really admire and I had so much fun recreating one of his patterns. Giving it an updated touch with the colors and the color blocking made it feel like me while keeping with is design. This coat just makes me smile and warms my heart… just tickles me pink!


What is your favorite Coat pattern?

Happy Sewing!!

I had the Princess for over for a 'sleepover' this past weekend! We had so much fun together. Eating sushi, making faces at each other and picnicking in the Grant Park Gardens. It was just a lovely weekend!


Friday, August 14, 2020

ZOOMing through the pandemic and other online sewing fun!

As this pandemic continues to go on and on with no end in the near future, I thought it would be nice to share some of the sewing, design and fashion related things that have been keeping me going!


The biggest contributor to my staying sane throughout this great period of Sewcial Distancing has been Sarah Veblen and her twice weekly Live Video classes via zoom. Sarah started giving these in early April and has continued them ongoing. Every Tuesday and Thursday I look forward to these live zoom classes. Many of us in the classes have gotten to know each other and it sure brings a smile to my face to see them every week. SO far, I have participated in 30 of them. The great thing is that they are recorded and if you have registered for the class you get a private link to the recording. 


The photos below were taken during a class about collar design.


Sarah has done a variety of classes that range from common fitting issues to pattern work and design concepts. The format is very nice and done as part lecture and part group discussion and Q&A. I ALWAYS learn something new from these classes! I encourage you to try them out- you can find more information at  https://www.sarahveblen.com/online-classes-1

I also took a hands on 4 hour Zoom workshop with Gail Yellen on using my Coverstitch machine.. This workshop was a lot of fun and Gail was very good about sending the upfront instructions so that participants were ready to go! Gail has a 2 camera system set up and switches from seeing her or her presentation and then switches to a camera directly pointed on her machine bed so we can see exactly what is being done. Quite nifty!

The photos below show the set-up I had at my home and samples that I made in the class.


I have also been enjoying my collection of books during these months and have added 3 new ones to my sewing and design library. All 3 of these are designer books but also all have some actual technical information and pattern schematics in them. I love to see what the pattern pieces of interesting garments look like! The technical aspects of flat pattern making and draping are fascinating to me. 

I highly recommend the Charles James and Madeleine Vionnet books. The Halston is more about the designer but also a very nice addition to my library.


Madeleine Vionnet


Charles James - The Couture Secrets of Shapes


Halston - An American Original


Podcasts have also been a constant companion! I highly respect these wonderful women who take the time to make these great podcasts. These 9 podcasts are all about sewing, fashion, fashion history, design and sustainability. They are mostly made and produced by women, they deserve our support!

If you like podcasts or are interested in learning more about them I recommend these ones.


Sewing: Sewing information and interviews 

Love to Sew and (monthly Patreon Bonus episodes)


Stitch Please (Periodic Patreon bonus episodes)


Sew & Tell


Sewing with Threads


Clothes Making Mavens (these are fun but don’t drop regularly)


Fashion History:

Dressed - The History of Fashion


Sustainable Fashion:

Wardrobe Crisis with Clare Press


Conscious Chatter with Kestrel Jenkins


The last place and a somewhat newer space for me to use is You Tube. My biggest issue with YouTube has always been wading through all the content and finding high quality good content. It has been fun to take some time to explore and find these resources, some have been around for a while and some are new to pandemic times.


My favorite You Tube channels for sewing, fashion and design are:

The National Arts Club

Gail Yellen

The Sewing Workshop

Zoe Hong

Bernadette Banner

J Stern Designs

Plano Texas ASG

Fashion For Good


I’d love to hear back from you on what things have been helping you to survive the pandemic!


It will be a wonderful day when we can all get together again in classes, retreats, workshops, textile tours and more! Until then stay safe, practice sewcial distancing and wear a mask!


Happy Sewing!!

FaceTime kisses from the Princess :)