Tuesday, June 26, 2018

Sometimes you just need instant gratification!

There really is nothing closer to instant gratification in garment sewing than sewing up some summer tees!


I love the ease and the fit of Jen Stern The Tee pattern. Yes, it has a couple more pieces than a traditional Tee shirt but the fit is amazing and it is super easy to sew assembly line style plus I can sew it all on my serger.
I have a previous blog post about all the different necklines in this post from 2016.
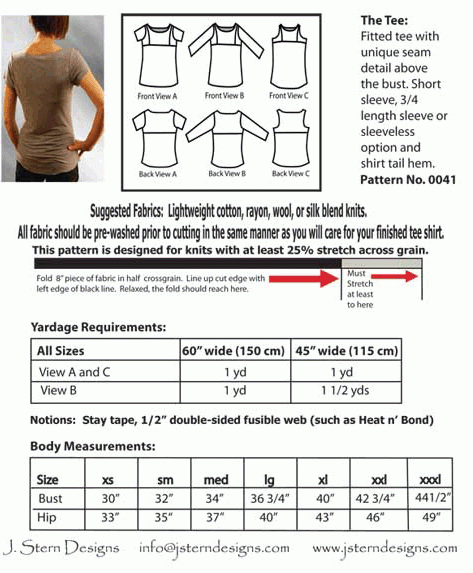


I made several variations by modifying the neckline. Some of these variations are in the Beyond the Boatneck workbook from Jen Stern and some are of my own making.

One change in construction that I now do on all of my tees from this pattern is to make the center upper front piece with a facing. I find that this gives a nicer edge and the quality of the tee holds up better in the long run. Jen does give directions for a full facing but I just like to do the very front piece and then treat is as a single piece in the rest of the construction. This means that the back neckline is a simple turn and coverstitch  or topstictch and the front has the facing.

These first 2 Tee's, the multi-color butterfly featherweight cotton and the red cotton jersey one from the last post both have the original neckline.
This has the original boatneck neckline. You can see below how the CF piece is faced and then treated as one piece.


This purple bamboo knit has a soft V neck that is very flattering and comfortable in the hot summer weather and is a perfect companion to the summery A-line stretch cotton skirt I made earlier this spring.

 Here is another variation in the multi-color butterfly featherweight cotton. This time I completely eliminated the center front piece to make a tank top! I did re-shape the side front pieces to be a more flattering fit on me. I curved them in a little bit and widened them at the top so they easily cover my bra straps.

The tank top version of the Tee. I still used a partial facing technique, this time just on the side front pieces. You can see this in the photo below.


This last Tee did take a little longer to make just because it is a lovely silk knit with a stretch lace overlay that is part of a work wardrobe collection I am in the middle of making.
The neck line on this is a drape neck that I drafted myself and have used in the past. I used only the lace for the draped neck part and self faced it to give it some weight to correctly drape. The sleeves are modified into a wing sleeve and that is single layer lace with raw edges. The lace and the silk knit were treated as one for the side fronts and upper back and at the upper front and back seams. For the lower body the lace and silk knit is kept separate so that they can swish independently.
silk knit tee with gold stretch lace overlay

Close up of the details. top photo shows the faced lace draped neck portion, bottom left shows the un-hemmed sleeve shape and the bottom right shows how both layers treated as one for the beck neckline.
The photo below shows how I kept the body portion of the lace and silk knit separate.


One of the reasons that I really love this pattern is that I was able to modify it so that the lower front is a little bit on the swingy side while keeping the shoulder and bust area fitted nicely.. This really means that I can grab this shirt and always feel comfortable even on days that my pancreas is misbehaving and causing me to have a bloated abdomen. On the bad days it can increase my measurement by almost 2 inches!

Do you have a favorite or TNT tee shirt pattern?

Happy Sewing!!

The princess turned 4 this weekend! We celebrated with a beach party :)
I cant believe my grand-baby is getting so big!


Wednesday, June 20, 2018

Red, white and blue patriotic garment sewing challenge with mixed fibers

I am co-leader of the local ASG neighborhood group Sew Chicago. My good friend Wendy, you know her from Couture Counsellor blog, and I take turns putting on the monthly programs.
May was my turn and it was about combing different prints, multiple fabrics and different fabric types into a single garment.

There are plenty of examples in my closet that I brought along to show. However, I wanted something new and summery and thought with the patriotic summer holidays it would be fun to challenge myself to make up something in USA colors that did not look like I was wrapped in a giant flag AND with different fabric types.

With my challenge parameters firmly in hand I raided the fabric closet and came up with a couple selections and then headed to JoAnn's during a big sale to add some additional selections.


I used patterns that I am familiar with and that I have more or less made before so that I could focus on the mixing of fabrics.

The skirt was first. I used my a-line skirt pattern, drew in a yoke and rotated the darts into it and made the yoke out of a heavier ponte-ish blue knit and the bottom out of a stretch denim print. I had to modify a little bit and take in the side seams after the first fitting. I could still snug it up a little bit. All in all a great start to the outfit.
...such an awkward photo to show off the knit yoke.

The second and more involved part of the project is the jacket.
This is made with the Blue ponte-ish knit for the sleeves and part of the body. The printed denim for another part of the body and the third fabric for the outer part of the body is this very weird cosplay fabric that is like a stretch rubber or maybe a stretch faux leather. this is the red part.


 To come up with the design I put an already made up jacket from the same pattern on the dress form and used design tape to design where I wanted the lines to be. I then transferred these to a copy of the pattern and made sure all the design lines matched across the seam lines.

Here you can really see how the rubbery fabric collapses and causes weird drag lines at the top of the piece. Prior to the lining it was much worse!


The original intent of this jacket was to be unlined bit I really needed a supporting layer for the red rubbery cosplay fabric. This was really meant to be used as a skin tight layer and not in the way I have used it. It sort of collapsed on itself.

I made 2 internal pockets. 1 a zippered cash/transit card pocket and the other a slip in style for my iPhone.

I took a remnant piece of white stretch denim that I have been holding on to forever and made a lining of the body only. Since I now had a lining I took advantage of this to add in some pockets to make it more usable. It is lined to the edge and then topstitched around the perimeter and also along each of the seams. This helped to control the rubbery fabric and keep the seams held down neatly. This fabric did take a cool iron setting but it really didn't do much for control.


The last garment in this outfit is the red knit top. This is a nice cotton/lycra jersey from my fabric collection. I made from a modified Jen Stern The Tee pattern. Unfortunately, I did not get the tee done in time for the program so in most of the pictures I am in one of my few RTW pieces in my closet, a white cotton knit button up shirt and winter tights because the day I was wearing it to the program it was like 50 degrees and windy out!


The final outfit with the red tee!
This outfit met my self challenge of red, white and blue plus the mixing of fibers! The jacket ended up being a little heavier than I expected due to having to add the denim lining. It will certainly work for cool evenings by the lake.

Have you set yourself any sewing challenges lately?


Happy Sewing!!
I'll leave you with a shot of the princess making pancakes for mothers day breakfast!

Tuesday, June 5, 2018

Catching up! Sewing for others

Somehow the last month has passed in a blink of an eye! Life has been crazy busy with work and family and just needing some time to maintain a healthy me. Sewing has been happening! however, not as much as I would like and I have not been as good about capturing the in-progress details.

Earlier this year I did some sewing for family members. My siblings had been randomly droping hints about me sewing them something. It is hard to make clothing for them since none of live anywhere near each other!
My older sister, Jennifer, is in Mississippi.
My older brother, Gene, and his wife, Jackie, are in New Jersey
My younger brother Willie, and his wife, Lide, are in the Netherlands.

So, its not like I can just pop in and take measurements or do a quick fitting!

Long story short, 2 of them causally mentioned needing aprons over the past year so I decided to make them all aprons for their respective birthdays!

The ladies aprons are modified Gathered-to-Fit apron by Indygo Junction. I think I picked this up at a pattern exchange at some point. Its a nice pattern. My modifications were to fully line it and basically stitch a channel for the ties. It is very cute, easy to make and no fitting required. I also made an apron for Melissa out of the retro pool scene. I just forgot to take a picture!

My awesome sister, Jennifer, sporting her new apron!

Details of my sisters apron. Fabric out of my collection.

Details of my S-I-L Lide's apron. She's an archaeologist so these cool skulls were very appropriate!
Both fabrics from The Quilters Trunk.


This was is for my S-I-L, Jackie, in New Jersey. This great retro print and the lining were both from Fishman's Fabrics and have been in my collection for quite a few years. SO glad I found the perfect use for it!


 The guys aprons are from Simplicity 1512, an out of print pattern that I have had for quite a while. However a quick google search shows that you can easily find copies of it. The only modification that I have made to this is again to line it. I just feel that a single layer of fabric is not beefy enough to support the large pockets and if you happen to splash 'stuff' on you then a single layer may not give you the best protection!
Not the best view of my little brother in his apron. I loves that his apron matched his jammies!

My older brother, Gene, showing off his apron! Both of my brothers really like to grill and BBQ and I was able to use my seldom used embroidery machine to add some fun personalization to their grilling aprons.


Now... here is something to make you chuckle... I made all of those aprons all in one go and the only person that still does NOT have an apron is ME! How ironic is that??

Happy Sewing! More to catch up on soon!