Showing posts with label The Tee. Show all posts

Tuesday, June 26, 2018

Sometimes you just need instant gratification!

There really is nothing closer to instant gratification in garment sewing than sewing up some summer tees!


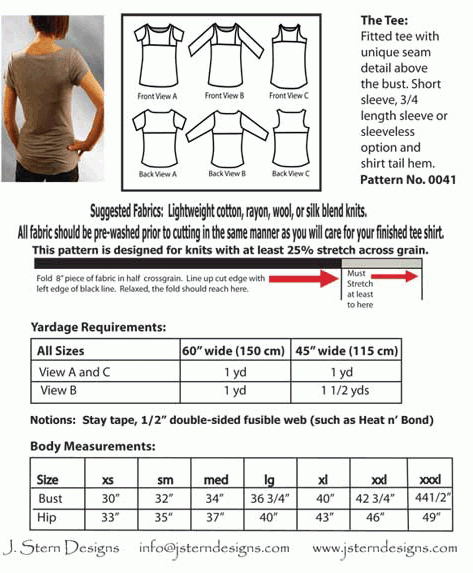
I love the ease and the fit of Jen Stern The Tee pattern. Yes, it has a couple more pieces than a traditional Tee shirt but the fit is amazing and it is super easy to sew assembly line style plus I can sew it all on my serger.
I have a previous blog post about all the different necklines in this post from 2016.


I made several variations by modifying the neckline. Some of these variations are in the Beyond the Boatneck workbook from Jen Stern and some are of my own making.

One change in construction that I now do on all of my tees from this pattern is to make the center upper front piece with a facing. I find that this gives a nicer edge and the quality of the tee holds up better in the long run. Jen does give directions for a full facing but I just like to do the very front piece and then treat is as a single piece in the rest of the construction. This means that the back neckline is a simple turn and coverstitch  or topstictch and the front has the facing.

These first 2 Tee's, the multi-color butterfly featherweight cotton and the red cotton jersey one from the last post both have the original neckline.
This has the original boatneck neckline. You can see below how the CF piece is faced and then treated as one piece.


This purple bamboo knit has a soft V neck that is very flattering and comfortable in the hot summer weather and is a perfect companion to the summery A-line stretch cotton skirt I made earlier this spring.

 Here is another variation in the multi-color butterfly featherweight cotton. This time I completely eliminated the center front piece to make a tank top! I did re-shape the side front pieces to be a more flattering fit on me. I curved them in a little bit and widened them at the top so they easily cover my bra straps.

The tank top version of the Tee. I still used a partial facing technique, this time just on the side front pieces. You can see this in the photo below.


This last Tee did take a little longer to make just because it is a lovely silk knit with a stretch lace overlay that is part of a work wardrobe collection I am in the middle of making.
The neck line on this is a drape neck that I drafted myself and have used in the past. I used only the lace for the draped neck part and self faced it to give it some weight to correctly drape. The sleeves are modified into a wing sleeve and that is single layer lace with raw edges. The lace and the silk knit were treated as one for the side fronts and upper back and at the upper front and back seams. For the lower body the lace and silk knit is kept separate so that they can swish independently.
silk knit tee with gold stretch lace overlay

Close up of the details. top photo shows the faced lace draped neck portion, bottom left shows the un-hemmed sleeve shape and the bottom right shows how both layers treated as one for the beck neckline.
The photo below shows how I kept the body portion of the lace and silk knit separate.


One of the reasons that I really love this pattern is that I was able to modify it so that the lower front is a little bit on the swingy side while keeping the shoulder and bust area fitted nicely.. This really means that I can grab this shirt and always feel comfortable even on days that my pancreas is misbehaving and causing me to have a bloated abdomen. On the bad days it can increase my measurement by almost 2 inches!

Do you have a favorite or TNT tee shirt pattern?

Happy Sewing!!

The princess turned 4 this weekend! We celebrated with a beach party :)
I cant believe my grand-baby is getting so big!


Friday, December 8, 2017

A tale of 2 tee's! Islander Easy V and Cashmerette Concord

Late this past summer I played around with 2 different tee shirt designs. I have my all time favorite tee shirt pattern, which is my highly modified Jen Stern Designs- The Tee. I love this tee I have endless variations that I can make and it fits and looks great. The only downside is that it has a bunch of pieces to it. (which is why it fits so well!)

I was and continue to be on the quest to find and fit a Tee that is a super breeze to put together and has only 3 pattern pieces; front, back and sleeves.
Modified Easy V on left and Modified Concord on the right.
This fabric is very thin and clingy.
The back of the modified V is just not good. lots of drag lines.

Enter in 2 new patterns:
1. Islanders Sewing Systems- Easy V express. This has an interesting neckline AND my main reason for using it was that we had a summer challenge (which sort of fizzled out) for the Haute Couture Club of Chicago to make the Easy V express. I'm always up for a challenge and the pattern was for sale at the HCCC June banquet. I always try to be a good group participant so I decided to play along.
Close up of the neckline of the Easy V.
Has a pleat that starts in back neckline and comes around to the front.

2. Cashmerette- Concord T-Shirt I purchased this pattern when it first came out. Mainly because I really wanted to be supportive of this Indie pattern company who designs for woman with curves! I liked the options for different lengths, sleeves and necklines.
Easy V on left Concord on right

Round 1: bad, so bad. So bad that I didn't even take pictures...
Let me start off by saying that I took my measurements and cut the corresponding size per the patterns charts and made my first mock-ups and they were both just awful. (Hence why I draft my own patterns from my master patterns.) The Easy V was way too big and boxy and the Concord strangely enough was too tight around the middle and weird across the upper chest.

Round 2: better but not perfect.
For the Easy V, I took my master knit pattern and grafted the neckline of the Easy V to it. Basically this meant it had a bust dart slightly different armhole and was narrower across the upper chest/shoulders. I basically kept the same back (due to the neckline construction) and just modified the back armhole slightly.
For the Concord, I basically just took my master sloper and used the neckline shape. SO a bust dart was added and armhole slightly changed. Plus I used my back master.

Modified Easy V on left and Modified Concord on right
Both now have a bust dart.
Round 3: hasn't happened yet! My plan was to add the 2 tees to my closet rotation and decide over time which I liked and which I dont. Then, pick one and make some final tweaks.
Somehow August has turned to December and I am now just thinking about this again. I just did not have enough interest at the time to push forward with it!

My final thoughts....

  • this knit fabric, while cute, is just too thin for my likes and would be best suited for a very loose fitting garment or underneath layering pieces. (I've had it for years in my collection and glad I have finally used it)
  • I like the scoop neck version with this fabric layered with a linen summer vest.
  • There are no perfect patterns
  • I have become a fitting snob
  • I doubt I will ever make the Easy V again. I just dont like the way the neckline looks on me.
  • I need to just go back to my master and play with necklines that I like.
  • I really like the scoop neckline that I took off the Concord.
Happy Sewing and Happy Holiday Season to All!

Celebrated my Son-in-Laws birthday with a lovely lunch
 and a performance of the Chicago Symphony Orchestra playing
 Harry Potter and the Sorcerer's Stone. What a treat!!
Can't wait until the Princess is old enough to participate :)


Friday, September 9, 2016

Neckline Extravaganza!! J Stern Designs-The Tee


Neckline shirt project. 
Goal: take a well fitting base knit shirt and play with the necklines to create a variety of Tee shirts for summer and fall. All shirts use the same pattern pieces for the upper and lower back and lower front. What was changed was neckline pieces and variety of sleeves.Sleeve decision based purely on my decision of summer or fall/winter wardrobe.  Click on any photo to see it larger.
Shirt: Jen Stern Tee pattern # 0041
You can purchase the Tee pattern and neckline workbook at www.jsterndesigns.com

Shirt #1: Original boatneck neckline. This is a polyester ITY knit. I constructed this shirt back in early July before going to JSTern neckline workshop.

The JStern Tee with the original neckline and changes to the front and back lower pieces as seen below. These are the main pieces that are used on every shirt.
For the look I wanted on a basic Tee I needed to shorten the bodice by 2 inches and I also wanted a more swingy look. To Achieve this I used a slash and spread method.


Shirt #2 and #3: two variations on 'V' necklines. I choose to make these soft V's instead of a sharp neckline. The top shirt is made with neckline facings and the fabric is a remnant I had from a project several years ago. This is a very thin, see thru tissue knit. Perfect for hot summer days! The bottom shirt neckline was bound with a knit binding over the lace. The lace was is an Anna Sui over printed stretch lace purchased from Britex. I used an underlayer of the light blue cotton/rayon knit (shown below in high crossover neckline shirt). The back top, sleeves and upper front are all the single layer of the lace. 


The 2 versions of the V neckline versus the original boatneck pattern piece. Theses 2 V necklines were developed in a neckline workshop with Jen Stern and are included in her Tee workbook.

Shirt #4: High Crossover neckline made with separate facings. This is one of my favorite necklines although the color of the shirt is kind of blah on me. This is a more stable, very smooth, cotton/rayon knit.

High crossover pattern piece versus the original neckline. This was also developed in Jen Stern's neckline workshop and is included in her workbook.
Shirt #5: Draped neckline version 1. During the workshop my brain started ticking away with ideas and between Wendy and I we thought what about a draped neckline? 
This first draped neckline is cut with separate facings. The fabric is a soft rayon knit. I played with the direction of the print. The bottom, main pieces of the shirt are cut with the print going horizontal. and the sleeve, upper back and upper front pieces are cut on the vertical. Makes for a fun design! I won't say what online site I purchased this from... It was so off grain and I was just lucky to have had purchased 3 yards. It took all 3 yards for me to get enough on grain print to make this top! 

For this neckline I slashed and spread vertically and decided that I would make this with a facing so the main pattern piece is cut on the fold. This is my own pattern development. 
Shirt #6: draped neckline version 2. with a foldover free facing that I cut as a single layer on the bias. This is made of a thicker very soft modal knit and is a re-fashion from a dress that I no longer wore. This fabric was bought several years ago from JoAnn's and is the nicest fabric I have ever purchased from JoAnn's! It has been washed and dried at least a dozen times and the fabric was like new. I have never found it again at JoAnn's!
You can see this is developed from the first draped neckline(outline in pencil on left). I just raised the front and drew it so that the neckline would just foldover and come from the seamline at the shoulder. I also decided to cut this on the bias to play with that draping property.  I really like this one as well! Below you can see the full pattern piece.

Shirt #7: draped neckline version 3. This is also a foldover free facing design. This is made from a stiffer 100% cotton knit and has less stretch and drape than the rest of the shirts. This is a super fun fox print from Girl Charlie fabrics. This draped neckline has the largest drape. I toyed with the idea of cutting it on the bias but I didn't want the print interrupted that way. So I cut it on the cross grain. Due to the stiffer fabric you can see in the photo all the way on right that this causes a more dimensional neckline.
This neckline again was created with a slash and spread method although I used a vertical slash and spread method. Next time I use this i will cut it as a single layer on bias. 

You may be thinking what ever possessed you to make so many versions of the same shirt? Well... A couple pats backed I told you that I have been unwell. On one night, very late at night, unable to sleep and on pain medication, I decided that I really hated the regular old t-shirts in my dresser draw and that I needed to make new ones. Tee shirts that are fun, interesting and that fit well. Not being able to sleep I went down to my sewing studio and pulled a bunch of fabrics and started cutting.
Several days later and I had a bunch of new shirts! Constructed 98% on my serger all with the same thread color. I really approached this project with a lets see what happens! attitude with nothing to lose since most of these fabrics were remnants from other projects. This project also served to kick start my sanity from this nasty illness I am dealing with.


6 new necklines!
wait.. what? another shirt?
Well this is version: EPIC FAIL!
In the Jen STern Tee workbook she has directions for a couple wider necklines that are just too wide for me! Of course I had to document this silliness and of course my hubby really liked this one!! LOL!! I guess i'm just not one for the off the shoulder look.
What was interesting about this shirt was the dual sleeve. It didn't really work with this fabric combo but has potential for something in the future.
Flutter sleeve pattern that I developed on top. Just slashed and spread the original short sleeve so I would have a flutter sleeve.

Happy Sewing!!

Here are some fun outtakes of Princess Victoria. She was helping with the photo shoot!

Trying on grandma's new shirt!