Showing posts with label Cashmerette. Show all posts

Friday, September 18, 2020

New Workout wear- Jalie Pika Bra/top and Cashmerette Saybrook Tank

Last year I decided that I really needed to up my game in the workout gear arena. This came about as I was upping my fitness for my trip to Paris. As some of my readers may know I have a medical condition, Chronic Pancreatitis, that when it decides to flair up it can knock me down and out for a long time. Literally taking my strength and endurance back to step one.


So, as I was upping my strength and endurance I really noticed that I had a need for more workout specific clothing. I did what any good sewist would do and started ‘collecting’ workout/exercise fabrics, patterns and books. I now have enough workout fabrics to sew myself a FULL wardrobe of exercise gear! LOL!!I know I am not alone in doing this….

I started off by identifying the types of exercise that I like to do or aspired to do.

Walking with a small amount of jogging thrown in from time to time, long walks/hikes. casual bike riding (meaning using Divvy Bike in Chicago and not owning my own performance bike) Strength training/functional training with dumbells, medicine balls and bands plus some yoga and active stretching. None of these really require any specialty clothing items and I am not doing any sustained high impact activities.

Next step was to get some inspiration. It’s great to have Instagram, Pinterest and Google Images for this part. SO much fun to go down the inspiration rabbit hole J

I then identified what items I wanted to make.

Sports Bras – tops – leggings (both full length and long shorts)

Considerations for my comfort was mostly around the fact that I don’t necessarily like my tush showing while exercising. Most times it is fine but living in a major city means that people will see me while outside and some guys are just crude… So, I decided that I wanted either tops that covered my tush, or an attached skirt or leggings that are patterned and fit well. I also wanted to make sure I had a pocket on my leg for my phone. This was a must for me.

For this blog post I am going to focus on the tops and the bra. Next blog will be for the bottoms.

Patterns:Sports bra/ bra top Jalie Pika #3679 Tank top: Saybrook tank by Cashmerette .

Fit Changes: The only changes that I made to the Pika was to shorten the Center Front length by 1 inch blending to nothing at the side seams.

Wearable muslin

Final version with shortened front

For the Cashmerette Saybrook tank I did make a swayback adjustment but did not add a center back seam so it was just a small one and I decided it was fine to have some extra fabric back there for my workout clothes.


Design Changes: None

Fabric: I used a variety of fabrics from different sources. Some were from my collection and other sources were: Fashion Fabrics Club, Blackbird Fabrics, Discovery Fabrics and J Stern Designs.

For the Pika Sports bra specifically I used the Power Mesh from Discovery Fabrics for the lining and it works perfect!! I specifically purchased the Power Mesh sampler pack to try it out. The main fabric of the sports bra were done with lycra stretch that I used for the bottoms. The straps were done with a variety of activewear fabrics to match the rest of the outfits.


Close up of the power mesh lining

The fabric for the tank tops was from a variety of sources and weights to try things out that I liked. All of them have stretch with lycra in them. The patterned fabric was from my collection and originally came from the Textile Warehouse in Chicago. The other 2 fabrics were from Fashion Fabrics Club.

  
3 version of Saybrook tank             


Close up of the reverse 3-thread coverstitch

Interfacing: none needed

Notions/Buttons/Zippers: Only notions needed for the Bra and Bra top was elastic. I used ¼ inch and 3/8 inch clear elastic and ¾ inch non-roll elastic. For applying the clear elastic to the Pika bra neckline and armholes I used a trick that I saw on the Fehrtrade blog about using the elastic foot on the serger with no tension. This really stremalines the process and cuts down on the time! it serges the pieces of fabric together AND applies the elastic at the same time! A big WIN in my book!

Elastic foot set up on my serger


View as you are sewing - the large circle in front is where the elastic goes in and the smaller circle in the back you can see the 4 thread overlocker stitches attaching the clear elastic and the fabric and self lining all together in one step.


Final product all in one! Even there is a slight gathering from the elastic once the top is on that completely goes away and is not noticeable.

Seam construction and seam finishes: I had some fun playing around with different techniques both on the sewing machine and the serger. I read 2 different books which I recommend as a good place to start. Sew Your Own Activewear by Melissa Fehr and Sewing Activewear by Johanna Lundstrom. I also watched a bunch of Gail Yellen’s Gail Patrice Design YouTube Serger and Coverstitch Tip Clips. (these are awesome!)

My first pass at the wearable muslins were done following directions on the patterns which were a combination of both sewing machine and serger/coverstitch. The subsequent versions were done all on the serger and coverstitch with some changes in construction order to facilitate the fact that I have a convertible machine that does both serger and coverstitch.

Hem Finishes: I also took this opportunity to play with these to find what I liked and did not like. I used both front and back coverstitch as finishes and I did some zig zag as well.

Thoughts on Pika bra and top. This is a perfect sports bra for me! I really like it and it gives me plenty of support and is quite comfortable. The top with integrated bra is fun as well and I don’t usually like an integrated bra but this one works for me. The main purple fabric is very lightweight and drapey and will be good for warm weather workouts!


Thoughts on the Saybrook Tank. I was a tester for this top and from the beginning I had thoughts on using it for activewear. I made several different versions, the high neck and high back both with and without the front knot as well as the V-neck with scoop back which is my favorite version. The fit is quite good and I will make more of these.


It is really fun to have a bunch of new workout gear!! Makes working out just a tad bit more fun.


Happy Sewing!!

This picture of the princess is just so beautiful! that smile and that hair... She fills my heart with joy. I Loved that she asked me to help her with bath time. She cant quite manage getting all the shampoo out of her hair by herself yet!


Friday, February 14, 2020

Playing with the Cashmerette Tobin Sweater pattern

With the cold winter days I really decided that I needed some additional updated winter wear. The couple of sweaters, sweater dresses and long sleeve tops that I have were really starting to show their age and look a little ratty. With the success of the first Tobin sweater that I made in November, I decided to make a couple more.

I decided to make 3 additional Tobins.

1. A cowl neck high low hem in a light weight scuba knit in a yellow leaf print from Haberman fabrics.

2. A long midi-length dress, color blocked split funnel neck with added color blocking at hem, in seam pockets and hand applique's. This done in a combination of floral printed ponte knit and a plaid double knit. The print is from an Amsterdam market (Blogged about here) and the plaid is from somewhere... where that is, I cant remember. 

3. A shorter color blocked split funnel neck version using a double sided Japanese cotton ‘Sloth’ knit from Miss Matatabi’s fabrics.


 The cowl neck top is done with a lovely light weight crepe texture scuba knit that I purchased at Haberman fabrics in Michigan. It was so lovely to work with! Cut, sewed and even pressed well for a scuba. I have worn this for travel on my work trip this week and the top is very comfortable and not hot or sweaty at all. Plus it has the added benefit of not wrinkling. The cowl on this top has a very nice shape and is a double piece cut and sewed and turned, which I feel gives it a nice weight and drape. The cut of the cowl with an added slightly U shape gives a little more drape to the front without extra bulk. Nicely designed. Also no wardrobe malfunctions when you bend over or reach up with your arms! Yay for good coverage!


I finished all of the Tobins's hems with a narrow coverstitch. I finally feel like I can place the coversticth really close to my intended target! This example is spot on. I still sometimes get a little wobble at start and stop especially when that coincides with a seam. However, all in all I think it looks darn good!!


The dress version was fun to pattern hack! I placed see through pattern paper on my large gridded cutting surface and placed the main back body piece under. I traced this and then extended the center back to the length I wanted. I got this measurement by measuring my CB from nap of neck to floor. Placing the tap measure under my heal and when I got to the nap of my neck I stepped down and fixed the tap measure. I then carefully picked it up at that point and subtracted about 4 inches. This measurement I then transferred from the neck at CB on the pattern paper to the hem. Because I had made this top already I knew that I had plenty of hip room. So to draft the side seam, I used a yard stick to draw a line from the widest portion of the hip to the same length of the CB wile angling out by 1 inch to have a slight a-line. I then decided that I wanted the back hem to match the curve of the high low top and matched that curve using my fashion ruler. Then I did the same procedure on the front. After I had the length and shape correct I then decided where I wanted the color blocking at the hem to be and cut the pattern and added seam allowance on both pieces.  I also drafted in seam pockets. Somehow, I royally screwed up the placement of these!! Oops! I had drafted them too low by several inches. I would have needed monkey arms to use this. This was a little bit of a pain having to unpick the serging and moving them up 2 inches. They are still slightly low but I didn’t have enough to re-cut them and this was as far up as I could move them while still feeling the shape of the side seam matched closed enough.

I really like the color blocking on the dress. However when I had it hanging waiting to be hemmed I kept thinking that it needed something.... SO I kept it hanging while I worked on construction a dress for the Princess and my last Tobin sweater. At some point it dawned on me that it needed something to break up the stark color blocking lines. Both the plaid and the print are softer looking to my eye and the hard line of the color blocking seemed a little jarring to the soft feel of the fabrics. So I payed around with cutting out several of the flower motifs front the small leftover pieces that I had and I placed and pinned them in a couple places. Carefully putting the dress back on I used my mirror to refine the placement of the motifs. I then sewed them on by hand. There are 3 appliqués - one on left front shoulder, one on right upper back  and the last on the lower right side near the hem. I think these add just the right touch to soften the lines and add some lovely interest and fun.


The last top was the ‘Sloth’ top. Oh my this fabric is so soft and comfy and when I wear it I don’t want to take it off! This top is done specifically according to the pattern with just a change in the length. I shortened it 2 inches. To figure out the correct length to shorten, I put it on and lifted my arms and marked the spot where it touched the waist of my jeans. From this point I added a hem allowance and cut off the rest.

To me this top is most like a traditional sweatshirt and I really love it!


I had enough fabric left over to make something else. Since I really don’t need 2 sloth garments I decided to try out a new dress pattern for the Princess. Again, it was quite fun to play with the double sided fabric! She clearly likes her new dress as evidenced by the big smiles!!


Happy Sewing!!

Friday, January 10, 2020

Athleisure Wear- Cashmerette Tobin Sweater and True Bias Hudson Pants

My last garment sewing project for myself in 2019 was this Athleisure wear outfit. This was supposed to be my 'travel' outfit for the Paris trip that did not get done in time.

My new camera uses the phone as a remote, and it is not the easiest to take pics and not show the phone...

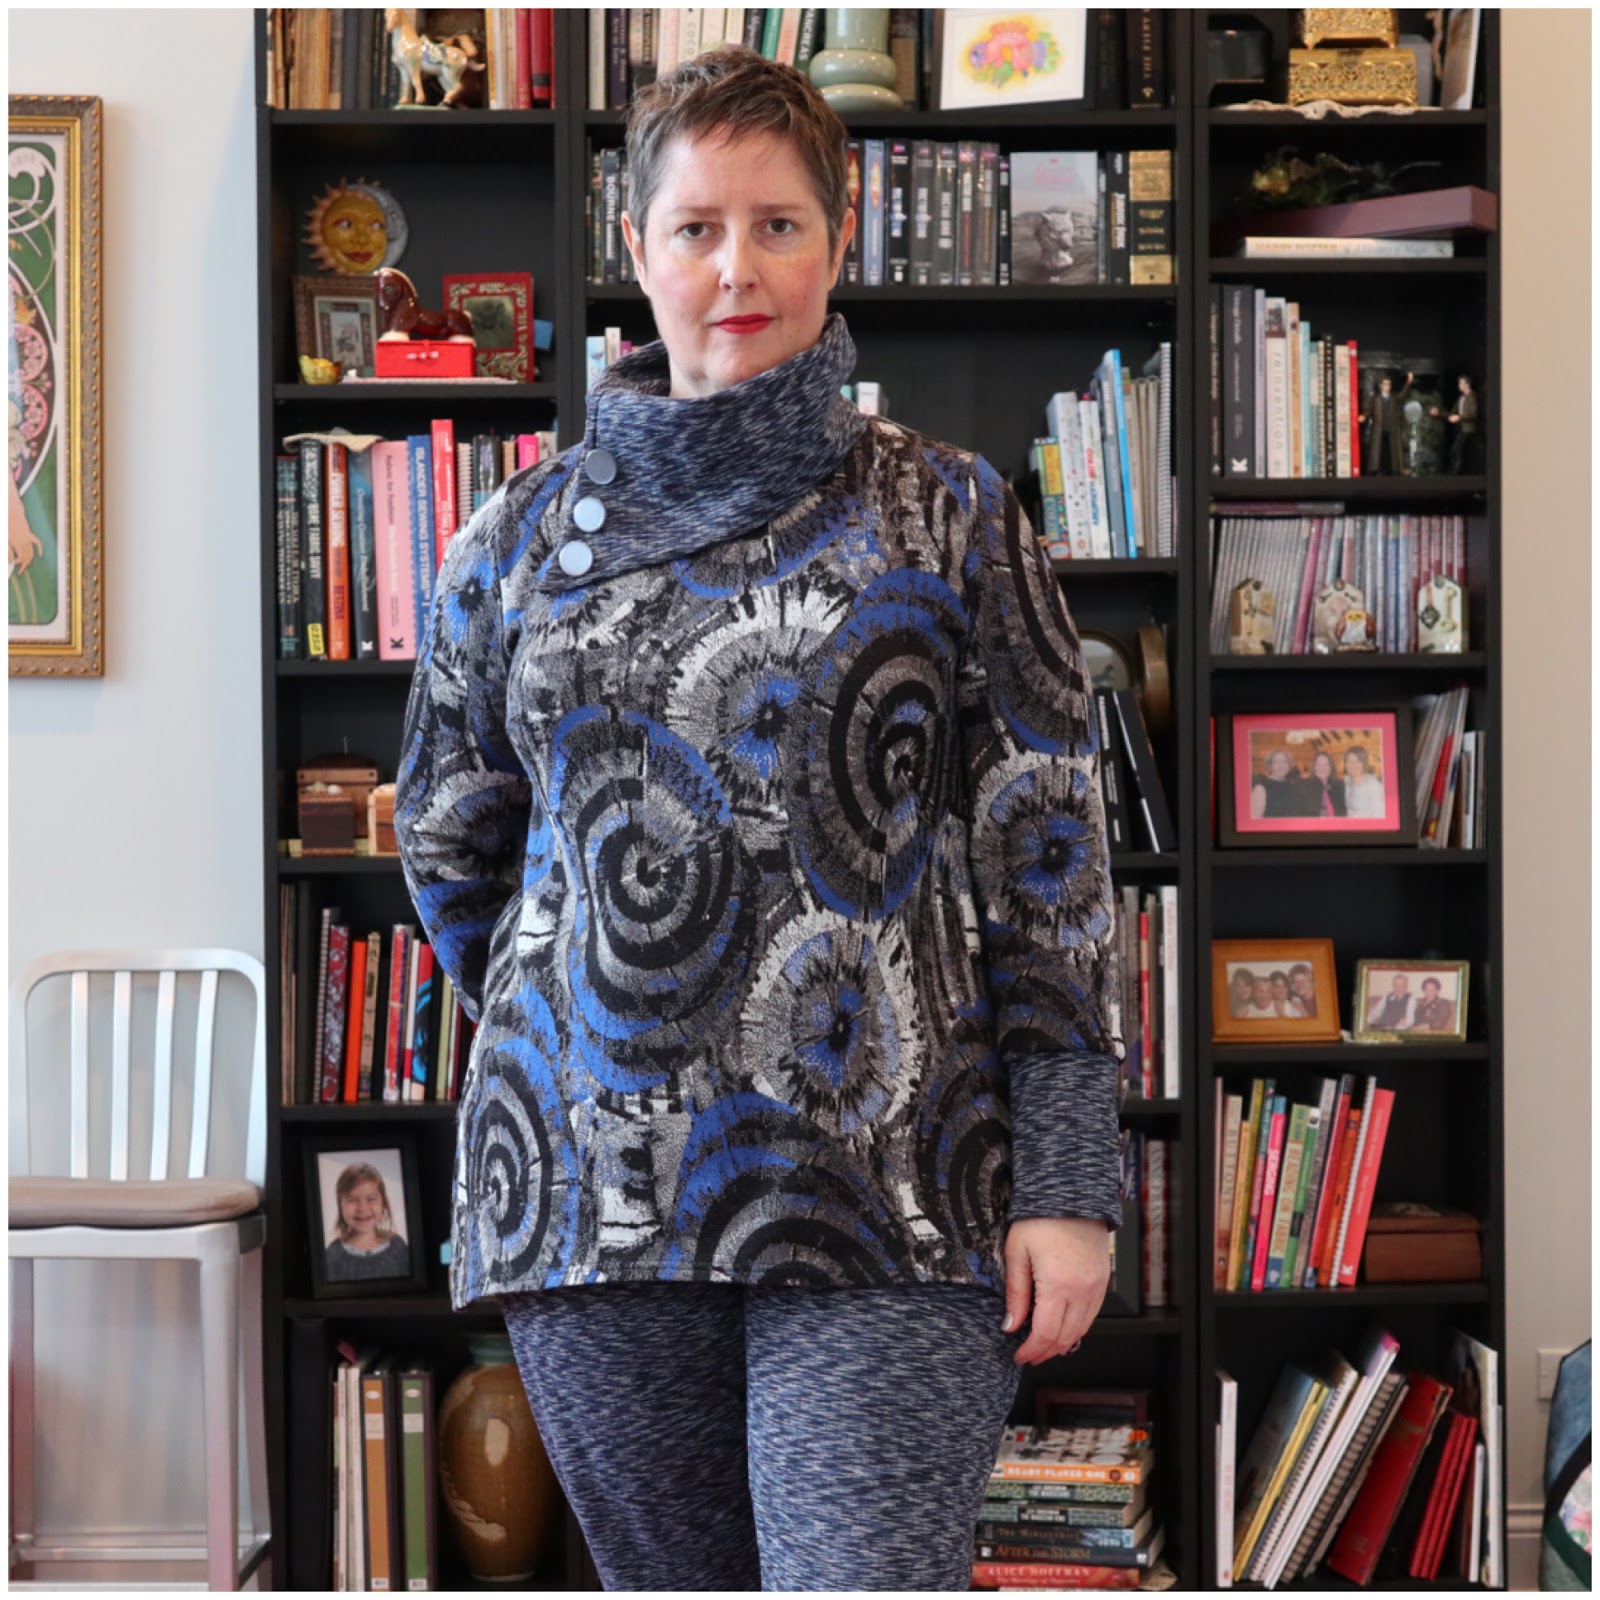
The blue/grey/black/silver swirly sweater knit fabric for the top was from my collection from several years ago that I think was from EmmaOneSock and the pants fabric and the fabric for the cowl and the shirt cuffs was from Fishman's Fabrics that I purchased this past spring.


The top is a new to me Cashmerette Tobin Sweater I traced off my sizes based off the measurement chart, using a size 16 on top and grading to a 20 at the hips. After this I overlaid my TNT knit top to check the bust dart placement and the armscye shape. For this first version I did not do the color blocking on the upper bodice or upper arm. I wanted to make sure of the fit before doing the extra work! I did use the fabric from the pants for the collar and the cuff to tie the top and bottom together into a cohesive outfit. The buttons for the sleeve and collar are just decoration, no buttonholes necessary. I just happened to pick these up for free at a sewing meeting and hadn't yet put them away. They match perfectly!

Taking pics of myself is never easy but ALWAYS funny!! I look like I'm trying to channel my inner Wonder Woman!!

This top is View A collar and cuffs without the color block and View B body length. The fabric for the collar and cuffs is a stiffer double knit and it really holds its shape.

The Tobin Sweater line drawing from the Cashemerette website.  from top to bottom- View A-B-C
Other than a very small tweak to the placement of the bust dart and grading between sizes, I made no other changes to the pattern. my hope for this version was that I could wear it out of the house and into the public arena without showing off my butt to the world. I am very happy with the outcome. It is a perfect length to wear with joggers or leggings and be OK to run to the store or out on errands.

I am looking forward to making more versions of this sweater! I want to experiment with different knits, color blocking and different lengths. There are so many different options and opportunities to play with this sweater!


My favorite knit jogger pattern is The Hudson Pants from True bias. I have made this quite a few times and have a TNT pattern that has been optimized for my fit. There are many different jogger pant patterns out there. I really like the fit of the Hudson pants and the pants length and leg width's are just what I like. Not skin tight leggings yet not big, ugly sweatpants. The fabric for the pants is an ponte- double knit. and the cuffs is a black rib knit from my stash. Of course after I completed these I found Navy blue rib knit for cuffs... oh well.

You can see on the back of the legs that I have some extra fabric pooling above the knee.  In an early version I did a test pair to remove this from the pattern. However this then makes the pants less useful for what I want for a pair of knit joggers. Like bending, crouching, kneeling and all types of moving around. When my leg is bent as in this kneeling photo the length of fabric being taken up is more than when just standing. Hopefully that makes sense.
 

However, IF I was to make a fancy pair of these that would be worn for going out and NOT for moving around then I would remove this fullness. In my head I think of a fancy pair of knit gold lame or some other super fancy fabric! Now that could be a very fun idea!


Happy Sewing!!
For my birthday we went to the Botanic Garden for the light show. It was so much fun to share this special event with the Princess! The lights were beautiful and we were very happy!!!
Add caption