I decided to make 3 additional Tobins.
1. A cowl neck high low hem in a light weight scuba knit in a yellow leaf print from Haberman fabrics.
2. A long midi-length dress, color blocked split funnel neck with added color blocking at hem, in seam pockets and hand applique's. This done in a combination of floral printed ponte knit and a plaid double knit. The print is from an Amsterdam market (Blogged about here) and the plaid is from somewhere... where that is, I cant remember.
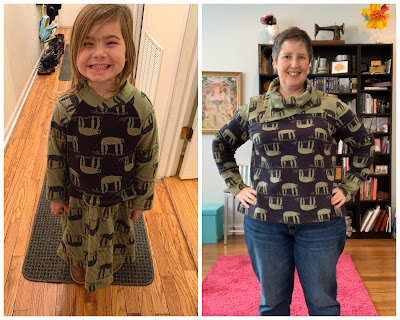
3. A shorter color blocked split funnel neck version using a double sided Japanese cotton ‘Sloth’ knit from Miss Matatabi’s fabrics.
The cowl neck top is done with a lovely light weight crepe texture scuba knit that I purchased at Haberman fabrics in Michigan. It was so lovely to work with! Cut, sewed and even pressed well for a scuba. I have worn this for travel on my work trip this week and the top is very comfortable and not hot or sweaty at all. Plus it has the added benefit of not wrinkling. The cowl on this top has a very nice shape and is a double piece cut and sewed and turned, which I feel gives it a nice weight and drape. The cut of the cowl with an added slightly U shape gives a little more drape to the front without extra bulk. Nicely designed. Also no wardrobe malfunctions when you bend over or reach up with your arms! Yay for good coverage!
The dress version was fun to pattern hack! I placed see through pattern paper on my large gridded cutting surface and placed the main back body piece under. I traced this and then extended the center back to the length I wanted. I got this measurement by measuring my CB from nap of neck to floor. Placing the tap measure under my heal and when I got to the nap of my neck I stepped down and fixed the tap measure. I then carefully picked it up at that point and subtracted about 4 inches. This measurement I then transferred from the neck at CB on the pattern paper to the hem. Because I had made this top already I knew that I had plenty of hip room. So to draft the side seam, I used a yard stick to draw a line from the widest portion of the hip to the same length of the CB wile angling out by 1 inch to have a slight a-line. I then decided that I wanted the back hem to match the curve of the high low top and matched that curve using my fashion ruler. Then I did the same procedure on the front. After I had the length and shape correct I then decided where I wanted the color blocking at the hem to be and cut the pattern and added seam allowance on both pieces. I also drafted in seam pockets. Somehow, I royally screwed up the placement of these!! Oops! I had drafted them too low by several inches. I would have needed monkey arms to use this. This was a little bit of a pain having to unpick the serging and moving them up 2 inches. They are still slightly low but I didn’t have enough to re-cut them and this was as far up as I could move them while still feeling the shape of the side seam matched closed enough.
I really like the color blocking on the dress. However when I had it hanging waiting to be hemmed I kept thinking that it needed something.... SO I kept it hanging while I worked on construction a dress for the Princess and my last Tobin sweater. At some point it dawned on me that it needed something to break up the stark color blocking lines. Both the plaid and the print are softer looking to my eye and the hard line of the color blocking seemed a little jarring to the soft feel of the fabrics. So I payed around with cutting out several of the flower motifs front the small leftover pieces that I had and I placed and pinned them in a couple places. Carefully putting the dress back on I used my mirror to refine the placement of the motifs. I then sewed them on by hand. There are 3 appliqués - one on left front shoulder, one on right upper back and the last on the lower right side near the hem. I think these add just the right touch to soften the lines and add some lovely interest and fun.
The last top was the ‘Sloth’ top. Oh my this fabric is so soft and comfy and when I wear it I don’t want to take it off! This top is done specifically according to the pattern with just a change in the length. I shortened it 2 inches. To figure out the correct length to shorten, I put it on and lifted my arms and marked the spot where it touched the waist of my jeans. From this point I added a hem allowance and cut off the rest.
I had enough fabric left over to make something else. Since I really don’t need 2 sloth garments I decided to try out a new dress pattern for the Princess. Again, it was quite fun to play with the double sided fabric! She clearly likes her new dress as evidenced by the big smiles!!
Happy Sewing!!


No comments:
Post a Comment
comments, thoughts, idea? Please share!