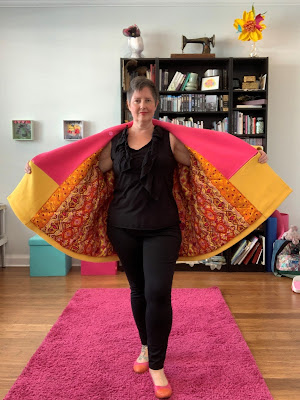
Coat project for 2020 is in the books and done before summer is even over! I finished my Issey Miyake Coat!!! Let me tell you that I am in LOVE and ready to take on another cold Chicago winter! Please see this blog post for construction details.
Pattern: Vintage Issey Miyake Vogue 1227 from 1993
Fit Changes: Due to the extreme oversize nature of the coat I decided to make a full muslin, including collar and pocket flaps to see what would work. I ended up making a size Small. Just for reference I normally make a large or extra-large depending on the pattern company. Other than using a different size I did not change anything else in regards to fitting.
Design Changes: I think you can see from the photos that I made one big change and that was to make the coat color blocked. To do this I used my muslin, a mirror, a black sharpie and a measuring stick. In order to get the line to look straight while the coat is on the actual design line or seam is not straight. You can really see the difference when the coat is on versus when it is flat or when I have my arms up. To me, this is one of the coolest parts about sewing and manipulating fabric and patterns in 3-dimensions! Figuring out how to make something translate from flat paper pattern into a gorgeous 3- dimensional garment and having it work out perfectly.
The color in this photo is a little off. Photo below is more accurate!
I also decided to add top stitching. I played around with this on a sample first to get the exact look I wanted. On all Horizontal seams there a 3 rows of top stitching of the appropriate matching color. All Vertical seams are top stitched with a single line in the matching color. The hems, collar and pocket flaps were also top stitched with 3 rows of top stitching.
Pockets: In addition to the 2 front welt pockets with flaps, I also added a large internal pocket on the under lap front facing. The seam line for the color blocking seemed like the perfect place to add a zipper pocket. I intentionally added it to the underside, knowing that it would be a little harder to access which means 2 things. 1 items are safer and more secure and 2 by it being on the under lap side nothing that I put in it will show through to the front. With this volume I just want the outside as sleek as possible.
Other Design Features: This coat has underarm gussets which in my opinion are CRUCIAL to the design being functional. With the oversized drop shoulders the only way you can move and function to say calla Taxi or wave to a friend on the street is to have these underarm gussets.
Fabric: The outer fabric is a double faced cashmere or cashmere blend. It is a true double cloth meaning that it can be gently pulled apart and you can see the tiny threads holding the 2 sides together. This was purchased online at Gorgeous fabrics at least 3 years ago… maybe more. The lining fabric is a Nanatte Lapore silk that I quilted onto a thinsulate interlining. I purchased the silk from Fabrications while at the ASG National Conference in Indianapolis.
The color in this photo is a little off. Photo below is more accurate!
I also used heavy duty rib knit to make internal cuffs on the sleeves. I purchased several different pink and yellow rib knits for cuffs from an Etsy site that shipped from China. I got quite lucky in that one of them matched my pink quite nicely!!
Interfacing: After doing several tests of interfacing types I settled on a fusible weft that I fused the entire fronts, front facings, collar and collar stands (both sides) and I used 5-inch-wide bias cut strips of the weft to fuse to the hemline and sleeve cuff area.
Notions/Buttons/Zippers: The pattern called for the use of only 2 buttons on the collar stand and after some design consideration I decided that I wanted more than just those 2. I would want several more for Chicago winter. I decided to go with large flat snaps that I purchased in Hong Kong. Of course, I needed to make them match!! I used Sharpie Oil Paint pens to make them the color that I wanted. The original color of the snaps was a light yellow. Using flat snaps keeps from having an imprint though to the front side.
Seam construction and seam finishes: All seams were done on the regular sewing machine using my Digital Dual feed foot for most of it. For the external seams they were all top stitched. I did not finish any seams internally since this is a fully lined garment. I used one of my Siouxzeegirl Designs labels on this coat along with a ribbon hanging loop.
Hem Finishes: Hems were catch stitched in place by hand then top stitched for decorative effect. The lining was then hand stitched in place over the raw hem edge.
I am SUPER HAPPY with this coat!!!! Issey Miyake is a designer that I really admire and I had so much fun recreating one of his patterns. Giving it an updated touch with the colors and the color blocking made it feel like me while keeping with is design. This coat just makes me smile and warms my heart… just tickles me pink!
What is your favorite Coat pattern?
Happy Sewing!!
I had the Princess for over for a 'sleepover' this past weekend! We had so much fun together. Eating sushi, making faces at each other and picnicking in the Grant Park Gardens. It was just a lovely weekend!


