 |
| Obviously I'm not 6 feet tall, nor do I have 'sky high' legs, but I really like the look of these pants! |
The concept of these pants were born out of the need for having and sharing border print garments and fabric at our upcoming June Sew Chicago ASG neighborhood group meeting. Of course, I didn't update my calendar and ended up with a conflict for book club on the same date. Book club won out since it is my turn to host.
 |
| My fabric with 2 selections of reds from my stash. I was thinking of making a red tank top to pair with these pants for a second look. But which red??? They both go well! |
Back to my border print. I had several yards of this border print and just wasn't sure exactly what to do with it. I had several ideas including a shirt dress or a kimono type garment with the border as the banded edge. I pinned the fabric on my dress form in several different directions and left it for a couple days each time. I really like how it looked when the border was all the way to the floor! I didn't want to make a full skirt, those can sometimes make me feel dowdy and I currently have a couple summer maxi skirts in my wardrobe. So the light bulb went off and I saw a pair of wide legged soft, flowy, long pants in my mind that made my legs look 6 feet long! Like a supermodel!LOL!!
Once I determined that I could logistically do what I wanted I laid out my master Eureka Pants that Fit pattern on the fabric and carefully marked where the border print started and transferred this to both the fronts and backs so they would line up perfectly. I also wanted these to be wide legged pants so I changed the leg shape by widening to the hemline. To do this I pinned the front and back pattern pieces to the fabric, determined where the widest point was on the side seam, at my lower hip and drew with a chakoner chalk wheel straight down to the hemline. On the inseam I chose a point several inches below the crotch point and did the same thing. This worked great!! Only bad thing about doing it this way is that I do not have a hard copy of the pattern to duplicate if I want the exact same pants. I may have made a paper pattern and muslin If i had a limited amount of fabric to work with. I had 4 or five yards of this fabric so I figured if it did not work out I still had plenty of additional fabric to play with!
I really love having a master pants pattern that I can change up and make many designs off of! No having to re-fit pants every time I want a new design :)
 |
| back, front, side views |
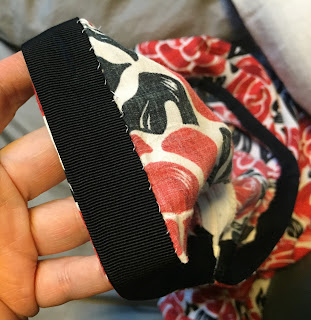
I have also been wanting to try out using a petersham waist finish instead of a waistband or facing. A techniques that has been on my mind to try for a while. I even had enough 1.5 inch wide petersham ribbon that I purchased from Soutache sitting in my arsenal and ready to be used. To use the petersham I sewed it right sides together using a 3/8 " SA to the fashion fabric, turned it to the inside, steamed it into shape over a pressing ham and slip stitched it into place. Worked like a charm and is very comfortable. Certainly would not do this for a garment that needed more support. However, the Petersham waist finish paired quite well with the lightweight drapey rayon fabric and I was happy that I got to try it out.
 |
| 1 1/2" wide petersham |
 |
| Petersham waist facing |
 |
| Invisible zipper at center back |
I hemmed these pants long to specifically be worn with a higher pair of black platform wedge sandals that I have in my shoe closet. I normally hem things to be worn with flats but having these hemmed long for a higher pair of shoes makes them feel special and adds to the length illusion of my legs!
I have several black tops in my wardrobe that these pair well with for a fun summer ensemble. My favorite is this black sleeveless knit top with ruffles that my daughter gave to me a couple years ago as a gift. I have already worn these several times! Out to dinner with friends, at design class in Baltimore and for a day of airline travel for work and they have been fantastic. A winner of a garment!
 |
| Hopefully the neighbors weren't watching me bust out a move while taking selfies! |
Happy Sewing!
Happiness is playing ball on the lawn with Princess Victoria :)
.


These pants look fabulous on you, Steph. They do make your legs look super-long! Thanks for the insights on working with the border print in time for Sew Chicago this week.
ReplyDeleteWish I could have been there!
DeleteReally nice pants, they suit you. I think the fabric on the right looks the best match
ReplyDeleteThanks!
Delete