Friday, October 23, 2020

Notes on Mentorship- Developing an idea into a garment- Asymmetric Gathered Tunic

After looking at all the sketches that I did I decided that I wanted to first work on what I am calling the Asymmetric Gathered tunic. 

1.   Just a quick recap of how I got here.

2.   Started with a well fitting master pattern of my tunic.

3.   Used a sketch done in Procreate on my iPad to create design I really liked.

4.   Used an approx. ¼ scale pattern to practice the flat pattern work to be done to original pattern to get to new design.


For the Asymmetric Gathered Tunic, I started by taking my base muslin and with it on my dressform I used red narrow tape to plot I my approximate design lines using my sketch as a basis to work off of.


With my design taped off I moved into flat pattern work. I started by tracing off my master pattern onto clean pattern paper. My master pattern is on cardstock with no seam allowances making it very easy for me to trace and make changes to.
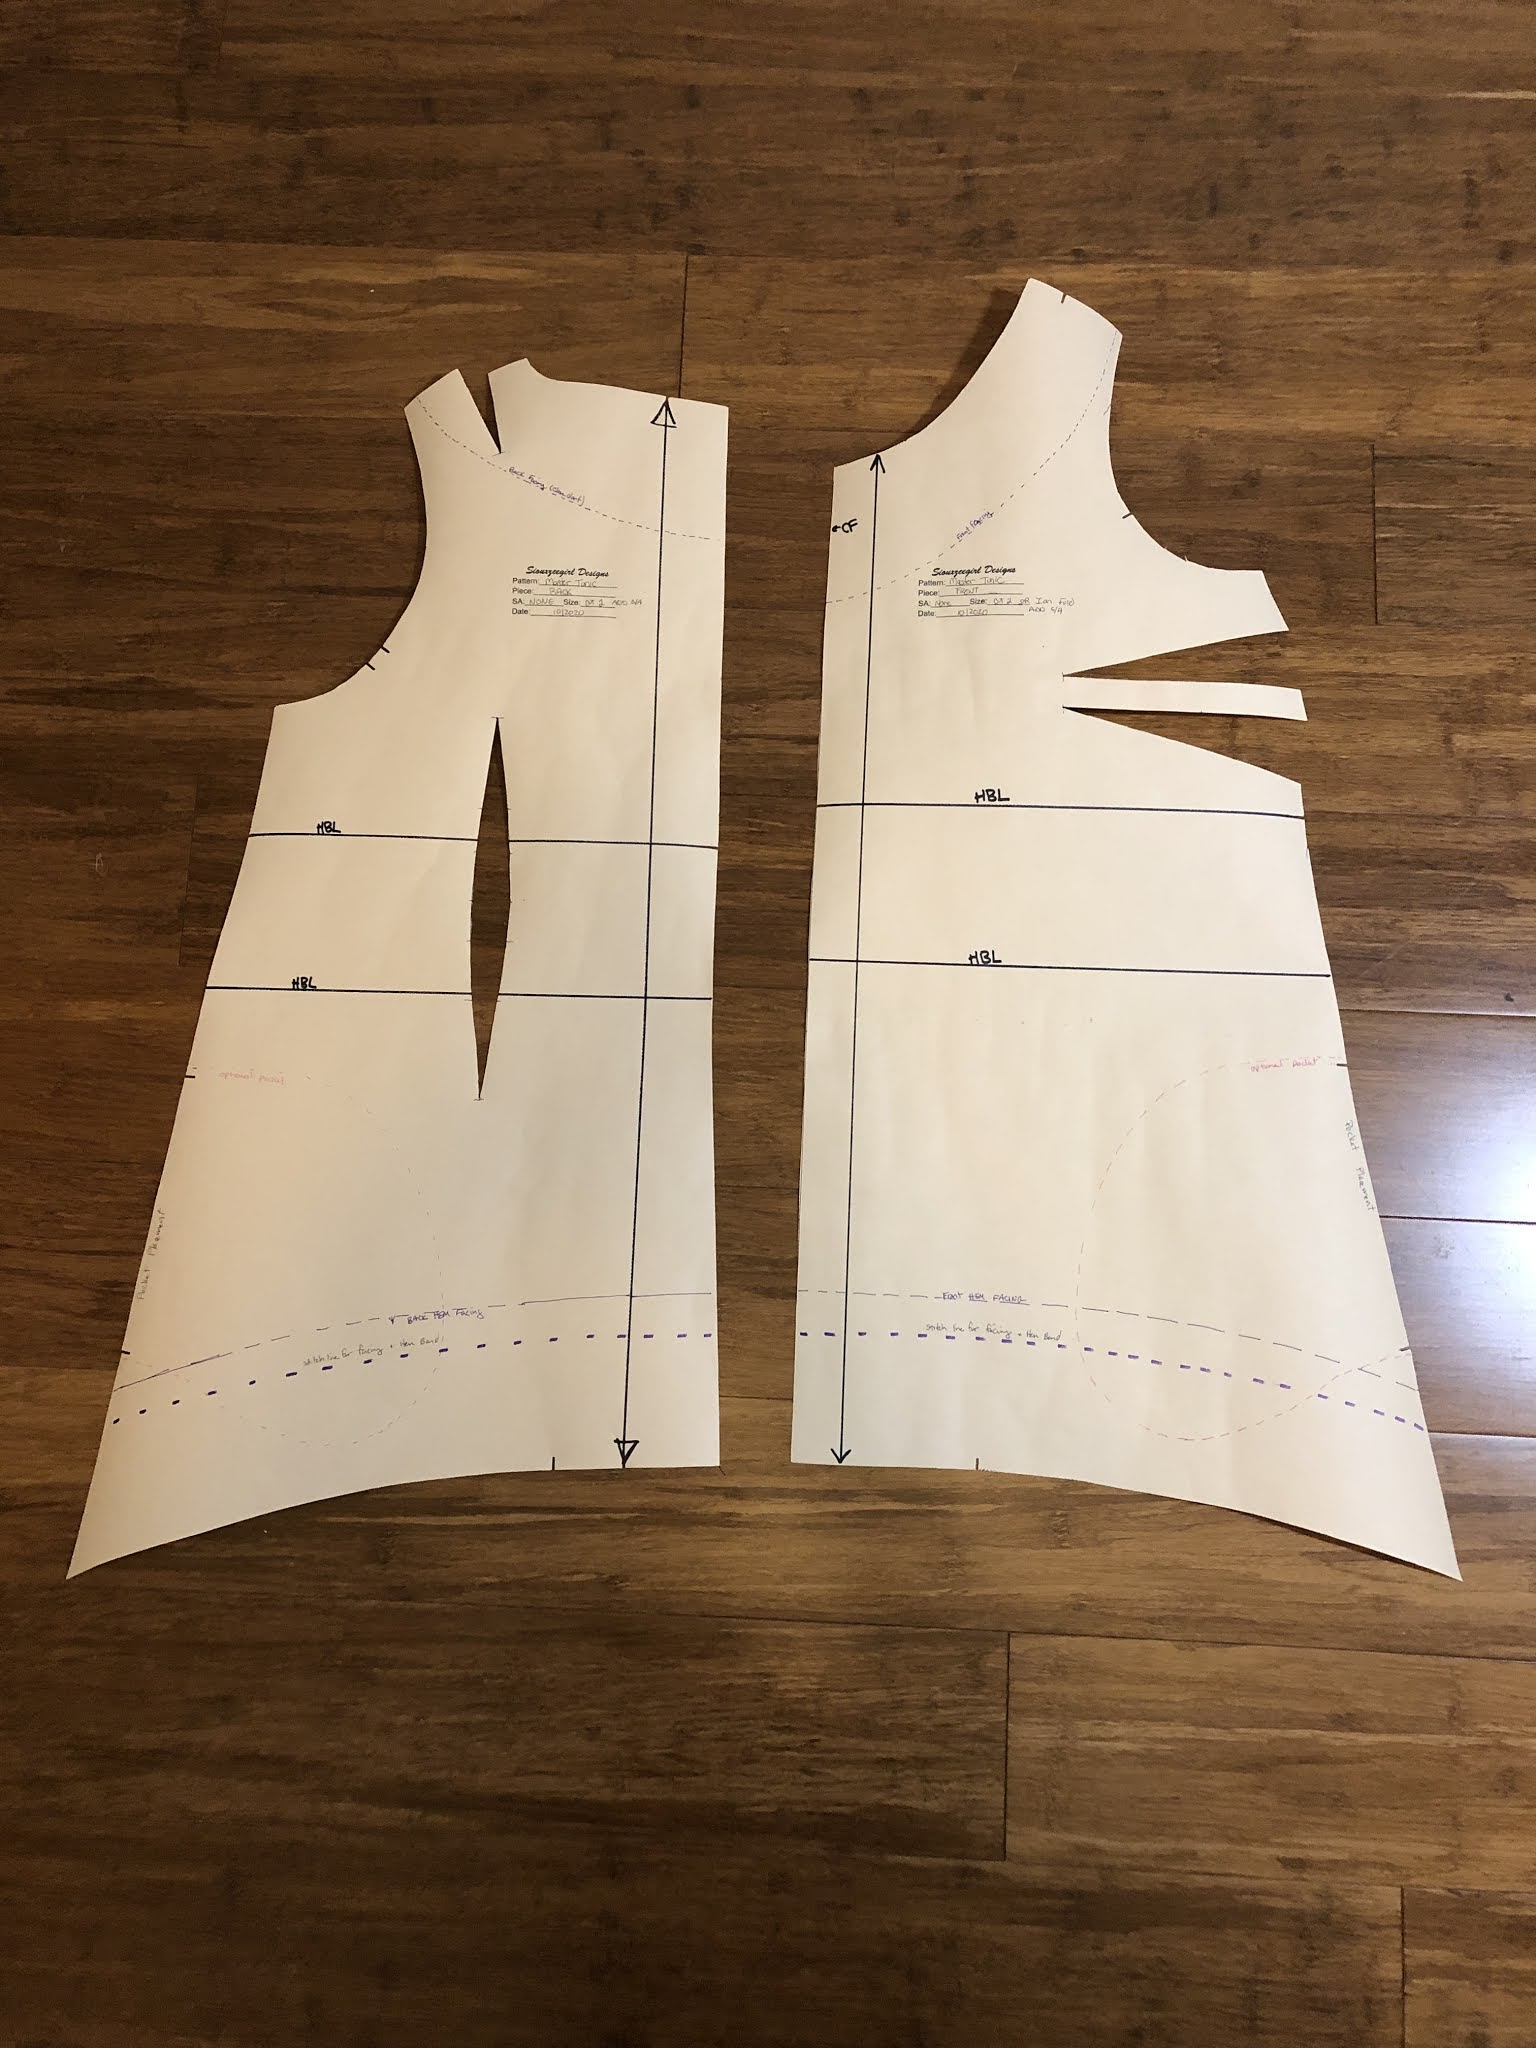

With the clean pattern and the front cut as a full pattern, I started with my flat pattern changes to get to my new design.

This is what I did:

Front Pattern (most changes)

  • 1.   Moved the neck line in at the shoulders by a ½ inch
  • 2.   Changed neckline to a soft V
  • 3.   Cut pattern in half along the diagonal line
  • 4.   Closed the bust darts on the left side and transferred them into the diagonal seam line.
  • 5.   Closed the bust darts on the right and transferred them into the gathers going into the seam line that runs under the right breast. This is a starting point and is then fine-tuned through muslins.

Steps 1,2 and 3
Step 4

Step 5

Back Pattern (minimal to accommodate front neckline changes)

    6.   Move neckline in by ½ inch

Sleeve pattern (changed hem shape- different from sketch)

    7.   Added a shaped hem

The shaped sleeve hem

Once I had these changes made on the pattern paper. I once again pulled out the tracing paper and traced these onto a clean pattern paper and added seam allowances.

Final pattern with seam allowances and the change indicated below to gathered area.

Then I moved into making a muslin. For my muslin I knew I needed to use a test fabric that would mimic the type of fabric that I wanted to use in the final garment. Luckily I had some poly silky from a fabric swap that I took to use for making test garments. The biggest unknown here was the gathered area along the diagonal seam line. I had several decisions to be made. The amount of gathers and if I needed/wanted to add additional gathers, the size of the area to gather into, the placement along the seam line to put these gathers. I did my best guesstimate by playing with the fabric in my hands and seeing how much gathers looked good. I started with a 4:1 ratio. SO I knew I wanted my gathered area to be across 4 inches so I slashed and spread to get to a total of 12 inches of fabric to be gathered.

The important part to remember here is that I knew this was just going to be a starting point and that I would end up making several versions and several muslins to come up with the final design. I also knew that there was a possibility that it would never go to garment stage and I was OK with that!

Version one was so bad and looked so frumpy that I just laughed!!! Basically the gathered area was in the wrong place and too poufy! It was in-between my breasts, not a good luck! The muslin/test fabric I used was not conducive to pics, it was all I had so I used it.

I unpicked the seam and redistributed the gathers to a better placement. This helped a lot and I felt like I was on the right track. In the photo below you can see the progression of the placement and amount of gathers. Red was first try, green second and blue final success!


I still had to move the gathered area further down the seam line as well as removing some of the fullness and reduced the size of the gathered area down to about 3 inches. To reduce the amount of the gathers I did a closed wedge so reversed my slash and spread to a slash and close to the amount of fabric that I had pinched out.


I made another muslin and realized that I still had too much poufiness in the area. I was starting to think that maybe this was not going to work for me. Then I decided to unpick the seam line and see where the fabric in the upper area relaxed too. Basically I let it fall under the seam and pinned it. This worked!! I realized that when I first converted the darts to the gathers that I had too much length. Not so easy to true up this area.

The fabric underneath was what I originally had and was causing poufiness. You can see how much "length" I removed to clean up the fit!

With that change to the flat pattern made I then made 2 more muslins in 2 different fabrics to check the fit. SO MUCH BETTER!!!


One of things that I really like about this design is how the drape of the fabric is also affected asymmetrically. It has a super pretty drape coming off of the left breast and down the side front of the garment. SO soft and lovely.

With the final muslins looking good I decided to make it up in real fabric.

I am trying to NOT buy any fabric, I have so much already. I used a rayon challis William Morris print. It makes the detail of the gathers and seam line a little hard to see but I was okay with that. The fabric is so soft and lovely. Feels so great to wear!

In using the patterned rayon challis, I had some considerations I had to make when cutting it out. I wanted the right and left backs to mirror each other so I carefully cut them on single layer. Very happy with how this worked out! I also wanted the outer sleeve seam to mirror each other. I was less successful in this. However, I am okay with how they turned out.

Center back seam lines up so nicely!! Made me very happy!


On the front I wanted to make sure that Center front remained along the same line in the print down both upper and lower pieces to maintain continuity where it could be maintained. On the side seams I just made sure that the horizontal lines or bands of print were maintained.


I am very happy with the outcome of the print placement on this design! The neckline is also perfectly placed on me, no wardrobe malfunctions. This is definitely a benefit to designing your own clothes!


Now to find a solid-ish fabric in the collection to make this in to really show off those design details!

The pics of me in this tunic are not the best. We have been having lots of rain and grey cloudy skies- not the best for taking pictures but these will have to do! Does anyone else take all sort of strange pictures of themselves in garments?


Happy Sewing!!

I caught this smirk of a smile on the princess the other day :) She is getting do big!


Friday, October 16, 2020

Notes on Mentorship- sketching and playing with small scale patterns

The first portion of my mentorship is concentrating on Tunics. I did a bunch of sketches on my iPad using Procreate app using my Body model Croquis.


I initially imported the sketch of my base pattern and used the warp function to get it to fit on my croquis. This gives me the closest representation of how the garment sketch will look on my body.

Using inspirations photos that I have collected I took some time to do a bunch of sketches. When I sketch I use layers, this allows me to play with different ideas and turn things on and off. You can take each of these and save them as images which you can see here.


When I do the sketches I make sure to keep the ones that I don’t like since these give me almost as much information as the ones that I like. I personally feel that when doing your own design process, it is just as important to identify things that you don’t like and why as well as the things that you do like. Sometimes you come up with an idea that you want to like and it is fun to take that and figure it out, break it down into its basic pieces and identify how to make it work for you.


Much of this process is all about playing and taking the time to evaluate your ideas.

Once I identified the sketches that I really liked I took the time to work in small scale patterns and do practice pattern work.

It was important to me to work in small scale on my pattern. To do this I put my pattern pieces on the floor and photographed them straight down. I printed these out on regular printer paper. Then put them on my light box and traced the seam lines so that I would have a small scale line drawing of my pattern. I then just photocopied a bunch of these!

Full size pattern piece on the floor 


Traced seam lines and any other info you want onto plain paper


Make as many copies of this line drawing as needed!

Playing in paper this way makes it so much fun and easy to practice pattern work! It really allowed me to figure out how to go from my base master pattern to all sorts of variations and let me work these out in paper doll fashion. Which is so much easier and less wasteful than doing it in large scale! Once you get started playing it is a bit addictive and I spent an entire afternoon just practicing taking my designs from sketch to small scale pattern through flat pattern work.

The process is quite easy. When doing an asymmetric design I just tape 2 halves together to make a full front.

1) start with your sketch and blank copy of small scale pattern

2) Draw the style lines and neckline onto the small scale pattern. I make sure to mark grainline and number my pattern pieces.


3) Close up and transfer the darts to the new seam/design lines and cut apart the pieces.


4) easy to practice in this small scale and something to refer to when you go into full size pattern adjustments.


As usual, the more I did the more ideas that kept popping into my head! There really is an infinite number of variables that can be played with.

Asymmetric gathered tunic

Curvy neckline princess with a neck band

Asymmetric swooping tunic

Swooping crossing lines? Stained glass tunic? Not exactly sure what to call this!!

DO you like designing your own patterns? 

Happy Sewing!!

Missing my daily lunchtime zooms with my goofball Princess! I am glad that she is able to go back to school safely- hoping things stay that way...


Friday, October 9, 2020

The Active wear project is completed!! McCall's 7261 is the last piece! or is it????

 This is the last blog post for now on Exercise clothes! This one is for cooler weather on its own or in cold weather layered under outerwear. McCall’s 7261 is a raglan sleeve and princess seam top and leggings active wear pattern. With this top made, and one last one in the que, I have completed my active wear project!! YAY! I love when I can successfully see a big project through to the finish!


Pattern: McCall’s 7261 – Out of Print but It is available on eBay and Etsy. I purchased specifically for the top. The bottoms have some fun possibilities but I am good with leggings for now. Description form pattern: Pullover tops have princess seams. A: Neck band and contrast panels. B: Lapped cowl collar. C: Single-layer, seamed hood, front band and kangaroo pocket. B, C: Cuffs with thumb opening. Wrong side shows on shaped hemline A, B and hood C

I made view B (the one the model is wearing on the pattern envelope). I like a higher neck and the shaped hemline, along with the cuffs and thumb holes. Keep my hands nice and toasty on chilly Chicago days.

Fit Changes: SO many changes! I knew from looking at the pattern photos and drawings that this was going to be the case. The general shape is that of what I call ‘Swimmers’ shoulders and a very athletic type and I am not quite of that build.

I really love having my custom dress form to use for a lot of fitting and for pictures. I did do most of the below fitting process while on me. Nothing like trying to undo your own princess seams with out stabbing yourself in the armpit! After making all the changes I put the mock-up back together so you could see how bad it really was! The mock up is in green and hot pink- nice and easy to see where changes needed to be made!


I Selected my size based specifically off of the size chart and sewed it up as is on my regular sewing machine. Right off the bat on the first try on it was way too big in circumference in the body and the arm. I am not sure if the drafting is off or if whomever made this didn’t realize that it is supposed to be close fitting (even though the description says close fitting…)

I started right off with reducing the side seams and underarm seams by an additional 5/8 inch.

With circumference under control I moved to the myriad of length issues. On the back this included removing a wedge on the back piece and a closed wedge on the side back. This removed the extra fabric pooling in the low back.


The front also had some length issues in the upper chest. I removed a wedge on the upper front (above the side front panels) as well as doing a closed wedge across the raglan sleeve. There was way too much fabric there! I also released the upper princess seams and let them overlap to where they wanted to go. I ended up taking out a pretty good sized wedge in that area.


Overall sleeve length was reduced by 1.25 inches and there is still plenty of length!

I also had to change up the cuffs. They were way too wide even with the reduction in the circumference that I made. On this top I just cheated and took it in on the opposite side of the cuff so that it would work for me. Because of this the thumbhole is slightly out of place on this top. I will have to make sure to correct this on future versions.

Design Changes: No design changes in this version. I will change the collar to a 2-piece collar next time so that I can make it fall in closer to my neckline for warmth.


Fabric: The fabrics for the mockup were midweight nylon/spandex things that I purchased specifically for making test garments. The fabric for the final garment is from Fashion Fabrics club and is 90% Supplex Nylon and 10% Lycra It is a slightly brushed and very soft midweight fabric. This fabric is very easy to sew and wear! Quite happy with it.

Interfacing: none

Notions/Buttons/Zippers: none

Seam construction and seam finishes: For the mock-up I used a narrow zig zag with 0.5 mm wide and 3.5 mm long. To make it easy to unpick seams as needed. For the final top I constructed on the machine using Eloflex thread and narrow zig zag and then serge finished using a 4 thread overlock with wooly nylon in the loopers.  (I did it this way so that I could try on as I went before serge finishing in case I needed to make any additional adjustments) Next time I will just fully construct on the serger.

Hem Finishes: A simple narrow zig zag on the hem using matching Eloflex thread by Coats and Clark. I usually would do a cover stitch but I wanted to try out the Eloflex thread. SO far no popped stitches.


Once I made all of the fitting changes I really like this workout top. It now fits better than any other long sleeve close fitting exercise top that I own. Plus, there are so many fun possibilities with color and print blocking. I have another version of this top all planned out in my head. Out of the floral discovery fabrics Solar weave fabric to match the leggings already made. It has just been a busy week so not done yet and it is on the short list!


Happy Sewing!!

Update coming soon on my Mentorship project!